This bubble letter banner has a sew AND no-sew option.
There’s something undeniably charming about a handmade banner, whether it’s paper pennants strung up in a row, or hand-stamped letters that give a vintage feel. If you really want your message to pop, spell it out with puffy fabric letters! This simple sewing project takes any flat font and gives it dimension and personality.
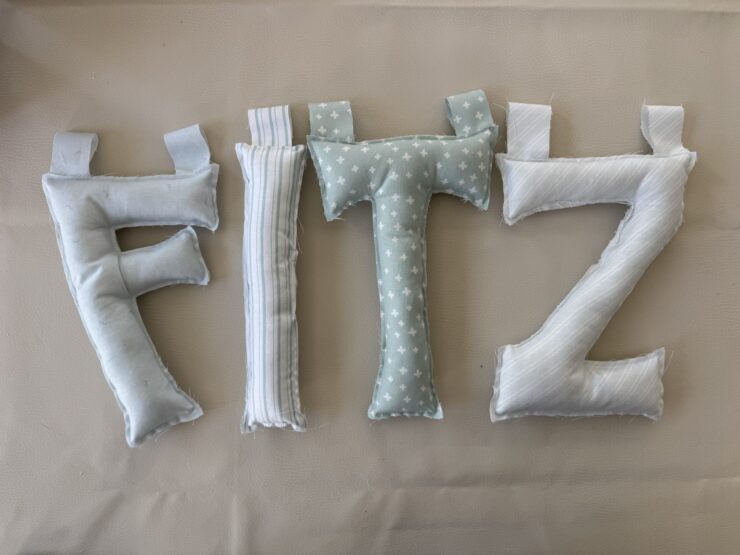
Emily Price shared how to make this soft, stitched, statement piece.
Bubble Letter Banner Instructions
- Find Cute Fabric: Start by selecting some cute fabric for your project. You can choose solid colors or patterned designs, and feel free to mix and match different fabrics for a fun and unique look. Quilting cotton is a great choice because it’s easy to work with and comes in a wide variety of prints. Alternatively, you can use a light lawn fabric for a softer feel.
- Create Your Letters: Decide on the letters you want to make. You can either freehand draw them or print out a font from your computer. The printed font will serve as a guideline. Remember, you need the letters to be larger and puffier than you might initially think because you’ll need at least 1/8 inch for seam allowance. Trace around your letters to create the shapes on your fabric.
- Cut Out the Letters: Carefully cut around the traced letters on your fabric. Make sure to cut two pieces for each letter, one for the front and one for the back.
- Sew the Letters: Using a sewing machine, hand stitching, or fabric glue, sew or glue the two pieces of each letter together. Leave a 2 to 3 inch opening on one side of each letter for stuffing. If you plan to hang the banner, cut small loops from spare fabric or use ribbon to create loops at the top of each letter. Sew or glue these loops in place before closing the letters.
- Stuff the Letters: Fill each letter with stuffing. You can use polyester fiberfill, cotton batting, or any other stuffing material you prefer. Add enough stuffing to make the letters thick and able to hold their shape well.
- Close the Opening: Once the letters are stuffed to your liking, sew up the opening you left for stuffing. Make sure the stitches are secure so the stuffing doesn’t come out.
- Finish and Display: Your letters are now complete! String them up on a piece of ribbon or twine to create a banner, or use them as individual decorations for play or display.
Find more ideas from Emily on Instagram, @embprice.


Add comment