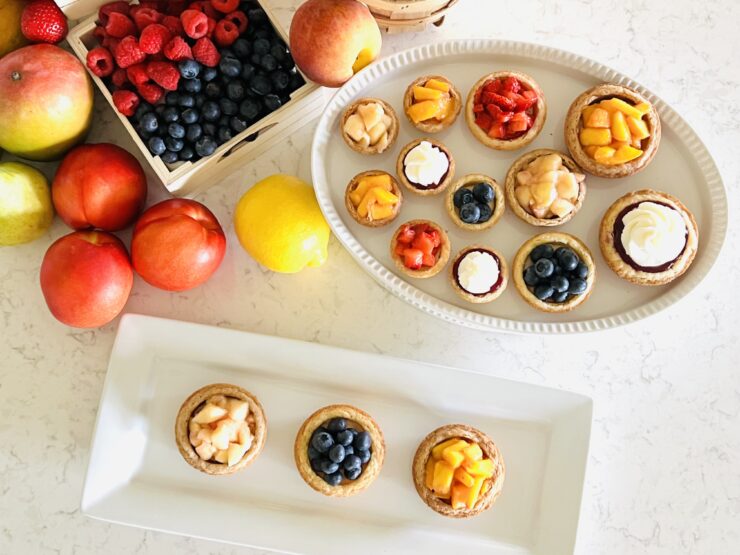
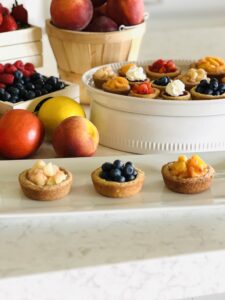
Sugar cookie cups are a mix between a tart and a cookie!
Bake your sugar cookie into a cup!
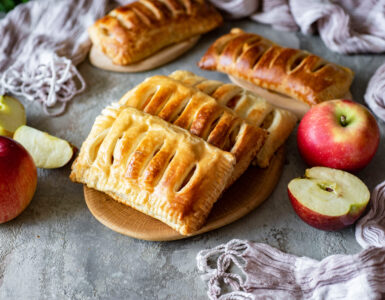
Khara Westergard is reimagining classic sugar cookie dough into crisp-edged cookie cups—perfect for holding spoonfuls of fresh, peak-season fruit. They’re easy to make, endlessly customizable, and look like they came straight out of a boutique bakery display.
Whether you’re craving a summery bite or dreaming of fall desserts, these cookie cups will carry you through every season. Here’s how to make them, plus some tips to make them your own!
Start with the Cookie Cup Base
Khara uses a homemade sugar cookie dough—think something close to a Pillsbury-style dough, but without the preservatives. This isn’t soft and fluffy dough, this one is a bit sturdier. It’s capable of crisping around the edges if baked a little longer, or staying chewy and soft with a slightly shorter bake.
Yes, you can cheat and use a store-bought sugar cookie dough, but making it from scratch means you know exactly what’s in it (and it tastes even better)!
Press the dough into mini muffin tins and smash it all the way in. Don’t worry about forming a cup shape yet, you’ll do that when they’re hot out of the oven.
Fresh Fruit Fillings
This dessert is all about the fruit. You can go with any seasonal fruit you love—berries, stone fruits, or even poached pears. If you’re using fruits like peaches or nectarines, Khara recommended blanching them first to make peeling easier.
To blanch fruit:
- Make a small ‘X’ cut with a knife on the fruit.
- Drop into boiling water for 30–60 seconds.
- Transfer to an ice bath.
- Peel the skin right off!
After peeling, chop the fruit and mix with a little sugar and lemon juice. This simple combo enhances flavor while letting the fruit shine.
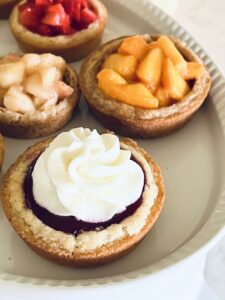
Buttercream vs. Whipped Cream
Once the cookie cups are cooled and the fruit is prepped, it’s time to fill! You’ve got options here:
- Vanilla Buttercream Layered on the Bottom: This works beautifully with tart fruits like berries or cherries. It adds richness and a little contrast.
- Vanilla Whipped Cream on Top: Perfect for lighter fruits or if you’re looking for an airier finish.
Fall & Winter Twist: Use Cooked Pie Fillings
These cookie cups aren’t just for summer! When the weather turns cooler, swap the fresh fruit for cooked pie fillings—like apple, cherry, or even pumpkin. You’ll instantly turn this into a cozy, warm dessert that’s still easy to serve and pretty on a plate.
Sugar Cookie Cups
INGREDIENTS
- 13.5 oz./383 g. All-purpose or “00” Flour
- 2 oz./57 g. (6 Tbsp.) Cornstarch (helps the flour act like cake flour)
- 1 1/2 tsp. Baking Powder
- 1 tsp. Salt (minus 1/4 tsp. if using salted butter below)
- *5-6 tsp. Cinnamon – OPTIONAL (consider filling flavor you will use)
- 8 oz./227 g. (1 C.) Unsalted Butter – cool but softened
- 16 oz./454 g. (2 C.) White Sugar
- 2 XL Eggs
- 2 1/2 tsp. Molina Mexican Vanilla Extract (or other quality vanilla)
METHOD
- Combine Flour, Cornstarch, Baking Powder, Salt, and cinnamon if using together well in a bowl and set aside.
- In a separate bowl, with a hand mixer or stand mixer, start the wet batter by creaming together the Butter and Sugar until light and fluffy. Next beat in the eggs and vanilla.
- Fold wet & dry ingredients together until combined well, but do not overwork the dough. Scoop cookie dough into well-greased muffins tins. See size help at top of recipe. Flatten dough evenly into muffin tins to encourage nice edges on cookie cups. Bake at 350° – 375° F. Play with these options as you get to know your specific oven. Try approx. 10 min. for mini cups, 12-14 min. for regular/standard size, & 15-16 min. for Jumbo size. Look for a browned edge that gives a sturdy result for holding filling with some chew still present. Then straight out of the oven while hot press cup shape into centers with a tart tamper (press) or a spoon or a round clean spice jar etc. If uncooked dough oozes out when pressed, return to oven for about 2 minutes. Allow to cool completely in pan before twisting cookies to release from pan. Use a thumb on each side of the cookie to gently but firmly twist to release.
Gluten-Free Adjustments
- Replace flour with Bob’s Red Mill Gluten-free 1to1 flour.**
- Increase Baking Powder to 2 teaspoons.
- Minus 1/4 tsp. Salt.
- Use top Cinnamon amount, if using.
- When combining wet & dry ingredients together, combine fully but minimally. Rice flour builds starch with movement. Less agitation when wet is best for texture.
- Chill 24-48 hours in refrigerator for best texture on cookies. GF cookies will seem grainy if baked the same day (but still good enough to eat if low on time). The grains need time to soften.
- Increase bake time 3-5 minutes.
**Every gluten-free flour turns out different (even cup4cup brand), because they are all essentially different recipes. This recipe is specifically made to work well with this flour. I am not sponsored or paid to pick this flour, it just works best. But you may find another rice-based Gluten-free even exchange flour works well too.
For fruit fillings, get creative with your fruits, you have three options for preparation.
You can use fresh fruit as is on top of layer of vanilla buttercream frosting (recipe below).
Or macerate your fruit. Just combine chopped fruit with a touch of sugar and lemon juice. For every 8 oz. chopped fruit add 1-2 tsp. Fresh Lemon Juice and 1-2 Tbsp. Sugar (Can double this for strawberries to taste). Each fruit will be to taste on how much you add keeping in mind the cookie and buttercream will add sweetness too. Macerating, or marinating in sugar and lemon juice will soften and draw juices from the fruit in addition to sweetening that will create a syrup by about 30 minutes. Drain syrup before adding to cups on top of a layer of the buttercream frosting which helps to protect the cookie from the moisture. Wait to fill cups until just before serving or just before event they are served at.
Or for berries or very juicy fruits, you can cook fruits over stove top with added cornstarch to thicken into a sauce. My raspberry sauce recipe is included below. You can duplicate with blackberries or blueberries etc. with additional lemon juice to taste. Let it inspire you for other options too. Add cooled berry sauce into cookie cups without a layer of frosting, but overtop more whole uncooked fruit. Top with Vanilla Whipped Cream (recipe below).
My favorite combos: Macerated peaches on vanilla buttercream. Raspberries and raspberry sauce with vanilla whipped cream. Fresh whole blue berries on vanilla buttercream. Strawberry sauce with vanilla whipped cream (macerated works too, but be sure to drain juices well. As a sauce is my fave.)
Vanilla Buttercream
INGREDIENTS
- 16 oz./454 g. (2 C.) Unsalted Sweet Cream Butter – Room temperature
- 1/2 t. + 1/8 t. Salt – Ground extra fine with mortar & pestle*
- 1 lb. 12 oz. (7C. Fluffed) Powdered Sugar (C&H brand is best)
- 1 Tbsp. Quality Vanilla Extract of choice
- 2 oz./57 g. (4 Tbsp.) Heavy Whipping Cream
METHOD
- Beat butter & salt until light & fluffy (best done with stand mixer or electric hand mixer).
- Add powdered sugar about 1/3 of total at a time & beat until light & fluffy after each addition (Beat until the color has lightened visibly & texture is fluffy).
- When buttercream starts to get too thick, add vanilla & a bit of the heavy cream to loosen it up.
- Add the rest of the heavy cream & beat well.
- Scrape bowl & beat again. Stir by hand to remove big air bubbles.
Can be stored covered in the fridge or freezer and brought back to room temperature on the counter. Beat with a mixer to even out temperature throughout and soften all parts.
*If no mortar/pestle available, you’ll have to wait a while until the salt has dissolved before tasting (or it WILL taste salty). CLEAN your mortar/pestle before use to avoid undesirable spices in buttercream
Vanilla Whipped Cream
INGREDIENTS
- 4 oz./113 g. (1/2 C.) Heavy Whipping Cream (measure before whipping)
- 1/2 tsp. McCormick’s Clear Vanilla
- 1-2 oz./28-57 g. (2-4 Tbsp.) Powdered Sugar to taste
METHOD
- Whip with electric whisk until medium to stiff peaks form. I like stiff because it holds its shape & volume best.
Raspberry Sauce/Filling
INGREDIENTS
- 12 oz./340 g. Frozen Raspberries – thawed, or use fresh
- 7 oz./198 g. (3/4 C. + 2 Tbsp.) White Granulated Sugar
- 1 1/2 tsp. Corn Starch
- 2 tsp. Fresh Lemon Juice
- 1/16 tsp. Salt (2 pinches, or eyeball about half of your 1/8 tsp. measuring spoon)
- 9-12 oz. Fresh Raspberries *Optional, set aside to fold in later.
METHOD
- Process the thawed raspberries in a blender just enough to break them down, but not enough to break up seeds. OR, wait to process them & use a handheld immersion blender in the pot after the mixture is warmed a bit, but before boiling.
- Mix sugar & cornstarch together in a cold medium pot until cornstarch is broken up & mixed in well. Add the lemon juice, salt, & thawed raspberries. Mix all ingredients together well.
- Stirring constantly, bring to a boil over medium heat. Boil 5 minutes (start time when boil is visible while stirring- then reduce the boil if it is splashing at you).
- Pour raspberry sauce through a fine mesh sieve into a glass 9×13 dish for cooling. Push as much sauce through as possible with a rubber spatula. Cover & cool completely in refrigerator.
- Sample sauce. If too thick, add a tiny bit of water at a time until a refreshing consistency is reached (careful, not too runny). If thicker is really what you want, boil a bit longer or add more cornstarch, up to 2 tsp. You can thin back out with water if necessary.
- Cut fresh raspberries in half (or leave whole) & mix them into the cooled raspberry sauce. Raspberry sauce will store longer if not mixed with the fresh raspberries. I like to store it refrigerated or frozen in an airtight container. Then mix it with raspberries as needed, or spoon this sauce over top raspberries.
Strawberry Filling/Topping
INGREDIENTS
- 16 oz./454 g. Strawberries (tops off) (can use frozen berries thawed)
- .5 oz./14 g. (1 1/2 Tbsp.) Cornstarch
- 7 oz./198 g. (3/4 C. + 2 Tbsp.) White Sugar
- 1 oz./28 g. (2 Tbsp.) Fresh Lemon Juice
METHOD
- Process strawberries very lightly in a blender so they are still chunky, but broken down. Or, slice them up. Processed will have a slightly thicker end result. Sliced will be a bit more saucy. (Texture optional)
- Combine sugar & cornstarch until cornstarch is well incorporated. Add to a sauce pan with the lemon juice & berries. Mix well before cooking. Cook over medium heat stirring constantly until mixture comes to a boil for 2 minutes. Remove from heat & cool completely. Pour into a glass 9×13 pan, cover with plastic food wrap, & put it in the freezer for quick cooling.
- All batches of strawberries are different. Sugar balances & natural pectin vary. If too tart, add sugar (try 2 more Tbsp to start). If too sweet, add more FRESH lemon juice (not bottled). Once balances are pleasing, check consistency. If it’s too thick, add a tiny bit of water at a time. If too runny, reduce by warming again on stove top.
Find more from Khara on Instagram, @balsamicbaker.


Add comment