You don’t even have to turn on the oven to make this Charlotte Cake.
If you’re searching for a dessert that’s as elegant as it is effortless, look no further than the mini Charlotte Cake. This European-inspired treat, introduced to us by Betheny Tomseth, transforms store-bought staples into a pastry-shop-worthy dessert. Lined with delicate ladyfingers and filled with a creamy cheesecake center, it’s the ultimate no-bake treat for spring gatherings.
The Charlotte Cake is named after Queen Charlotte, known for her love of luxurious confections. Traditionally, this dessert is made by layering sponge cake or biscuits with a rich filling, but Betheny’s take simplifies the process—no baking required! Whether you’re hosting a garden party, baby shower, or afternoon tea, this dainty dessert is sure to impress.
Mini Charlotte Cheesecakes
GROCERY LIST
- 1 store-bought cheesecake (any flavor)
- 1 package of ladyfingers (about 11 per cake)
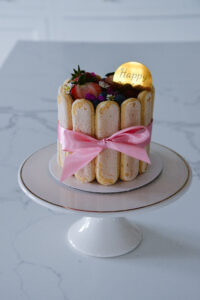
- 1 jar berry filling (for berry version)
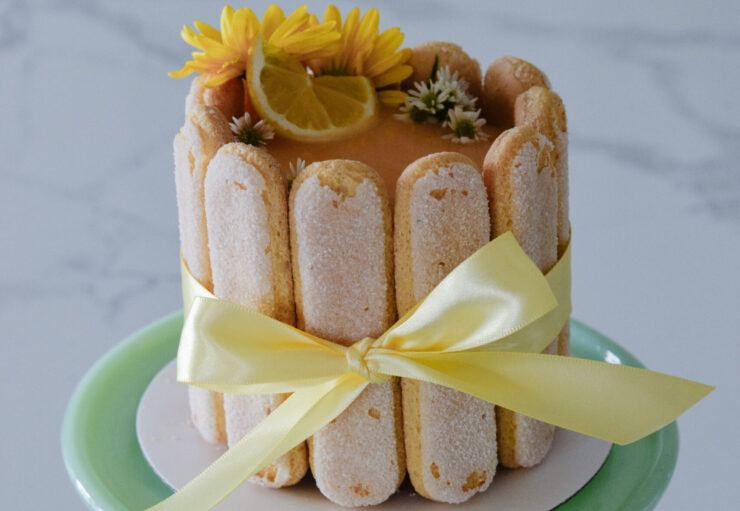
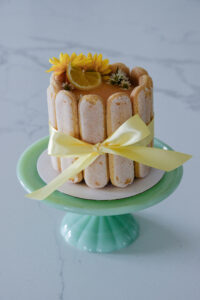
- 1 jar lemon curd (for lemon version)
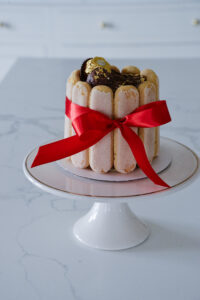
- 1 jar Nutella (for hazelnut version)
- Fresh berries (blueberries, raspberries, strawberries) (for berry version)
- Fresh lemon slices (for lemon version)
- Ferrero Rocher chocolates (for hazelnut version)
- Edible flowers (optional, for garnish)
- Edible gold leaf (optional, for elegance)
- “Happy Birthday” medallions (optional, from Amazon)
METHOD
1. Cut the Cheesecake Layers
- Use a 4-inch biscuit cutter (or your preferred size) to cut circles out of the cheesecake (This can be messy so wear gloves if you can. It also helps to prep the cheesecake and it’s very cold, almost frozen.)
- Stack two cheesecake circles on top of each other to create the cake base.
2. Add the Ladyfingers
- Stand 11 ladyfingers (depending on the size of your cheesecake circles) vertically around the cheesecake stack, gently pressing them in place to create a classic Charlotte Russe shape.
3. Spread the Flavor Topping
- Spoon your chosen flavor onto the top of the cheesecake with the back of a small spoon
- Berry: Spread berry filling.
- Lemon: Spread lemon curd.
- Hazelnut: Spread Nutella.
4. Add the Garnishes
- Berry version: Top with fresh blueberries, raspberries, and strawberries.
- Lemon version: Decorate with thin lemon slices.
- Hazelnut version: Place a Ferrero Rocher chocolate on top and sprinkle with crushed Ferrero Rocher pieces or crushed hazelnuts.
- Optional: Sprinkle edible gold leaf for an elegant touch.
5. Final Touches
- Wrap in a satin ribbon in the color of your choice
- Add edible flowers for a sophisticated look.
- Place a small ‘Happy Birthday’ medallion on top for a festive finish.
Serving Tip
- Serve chilled for the best texture and flavor.
- These mini cakes can be prepped ahead and stored in the fridge until ready to enjoy!
Betheny offers cake classes from her very own cake barn! Find more cakes from Betheny and her class schedule on Instagram, @bethenycakes.


Add comment