
Studio 5 Contributor Kiersten Blanchard discusses some unique ways to dress up the turkey table.
 Turkey Place Cards
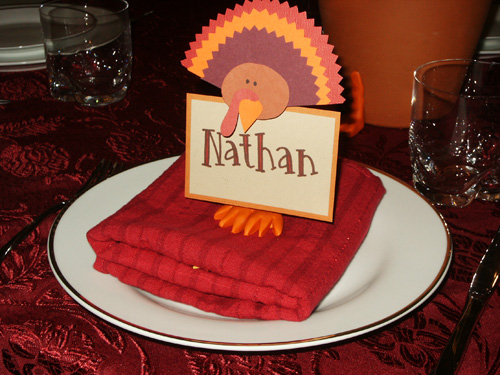
What better way to welcome your young guests to the table than with a flock of these big-footed fowls! They are easy to put together and make great holiday favors, perfect for holding notes, recipe cards, or a favorite photo.
You Will Need:
Orange polymer clay, approximately 1 ounce per foot base (I used Premo by Sculpey)
Butter knife
Cloth-covered floral wire, 20-gauge
Wire cutters
Mini clothespins
Decorative scissors or pinking shears
Card stock in 5 colors (I used light brown, orange, tan, purple, and red)
Double-sided adhesive
Glue gun
Black marker
Colored markers for writing name cards
Directions:
1. For each turkey, mold about 1 ounce of polymer clay into a 1/2-inch-thick fan shape, then use a butter knife to cut V shapes for toes. Make a small hole in the middle of the foot base by pushing floral wire halfway through. Be sure not to press the wire all the way through. Remove the wire and bake the base according to the package directions.
2. While the clay is cooking, push one end of a 6-inch piece of floral wire through the metal spring of a mini clothespin (the beak), bend it around the pin, and twist it back around the wire.
3. Next, use scissors or pinking shears to cut out 3 semicircles in graduated sizes from different colors of card stock. Cut a small light-brown oval for the head, a tan beak, and a red wattle. You can download template here
4. Stick together all the pieces with double-sided adhesive to make a turkey and glue it to the clothespin.
5. When the foot base is cool, insert the wire into the hole. If it fits loosely, add a dab of glue to the end of the wire, push it into the hole, and allow it to dry.
6. Finally, make a name card for each guest and clip it in the turkey’s beak.
 Potted Turkey
This lively flowerpot doubles as a handsome Thanksgiving centerpiece.
You will need:
Self-drying modeling clay (brown and orange)
Butter knife
6-7 inch-tall terra-cotta
2 wiggle eyes
1 walnut in the shell
1 red chenille stem (8 inches long)
Hot glue
Potted mums (in a pot at least 1 inch smaller than the terra-cotta pot)
Directions:
1. THE HEAD: From some of the modeling clay, shape two balls, each about 3 inches in diameter, and a third ball that is half the size of the other two. Sandwich the balls so that the smallest ball is in the middle, and press together. Smooth the balls together to form a head, neck, and chest. Tip: To smooth cracks or rough edges, wet your finger and smooth the clay.
2. With a butter knife, cut a vertical slit halfway up the center of the bottom ball. Slide it over the rim of the terra-cotta pot. Press the two sides of the clay ball together to secure the turkey’s head to the pot. Lightly flatten the clay on the inside of the pot.
3. THE FACE: To make the turkey’s face, firmly press the wiggle eyes and walnut (for a beak) into the clay head. You may need to cut out a place for the walnut. For the wattle, fold the pipe cleaner in half and twist the ends together. Press 1 inch of the pipe cleaner into the clay just above the beak, and bend down the protruding end.
4. THE FEET: From the orange clay, make two 3-toed turkey feet. Next, press the feet onto the front of the pot.
5. Once the clay is dry, secure any loose pieces with hot glue. Once everything has dried, insert the potted mums into the turkey planter.
 Finger Puppet Favors
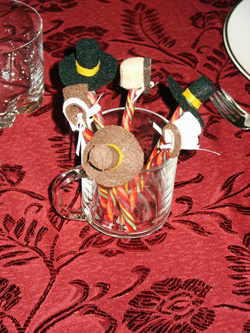
Felt finger puppets placed on top of candy sticks and arranged in containers make a sweet and simple Thanksgiving centerpiece that will keep kids entertained long after the turkey is gone.
You Will Need:
Pilgrim Hat and Bonnet templates
Several Contrasting colors of felt (I used light brown, dark brown, black, tan, beige)
Glue gun
Scissors
1/8″ ribbon in brown or beige
Tiny round punch
Candy stick (If you can’t find a candy stick, break the top off of a candy cane)
Directions:
1. Print out the templates and cut them out. You can download the templates here Then, trace them onto felt, and cut out. Use contrasting colors for pilgrim hats and bonnets and their decorative bands.
2. Pilgrim Hat: Glue a thin band to the longest edge of a trapezoid; roll the trapezoid into a cylinder shape, and glue the seam. Place glue along the bottom edge of the cylinder’s wider, banded opening, and affix it to the inner edge of the doughnut-shaped brim; to create the top of the hat, glue the small circle to the other end of the cylinder.
3. Bonnet: Glue contrasting trim to the long edge of a T-shaped felt piece. Using your punch, make tiny holes in the T-shaped piece as indicated on the template. Fold the T-flap down, and pull the side flaps in. Glue the edges together to form a bonnet. Use a needle to thread 1/8-inch-wide ribbon through the holes, and tie them in a bow at the center.
4. Place the hats on candy stick and display for your guests.
 Marshmallow Pilgrim Hats
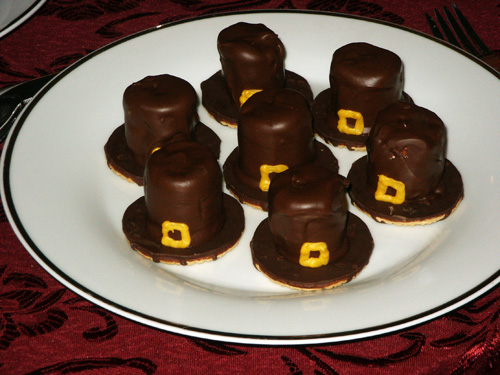
Here’s a treat that looks old-fashioned but is made with two of kids’ favorite sweets: marshmallows and chocolate.
You Will Need:
24 chocolate-striped shortbread cookies
12-oz. package of chocolate chips
24 large marshmallows
Tube of yellow decorators’ frosting
Toothpicks
Wax paper
Microwave-safe bowl or double boiler
Directions:
1. Set the chocolate-striped cookies stripes down on a wax-paper-covered tray, making sure they are not touching
2. Melt the chocolate chips in a microwave or double boiler.
3. One at a time, stick a wooden toothpick into a marshmallow, dip the marshmallow into the melted chocolate, shake off excess chocolate, and quickly center it on top of a cookie.
4. Using a second toothpick to lightly hold down the marshmallow, carefully pull out the first toothpick. Smooth chocolate over top.
5. Chill the hats until the chocolate sets, then pipe a yellow decorators’ frosting buckle on the front of each hat.
 Tom Turkey Cupcakes
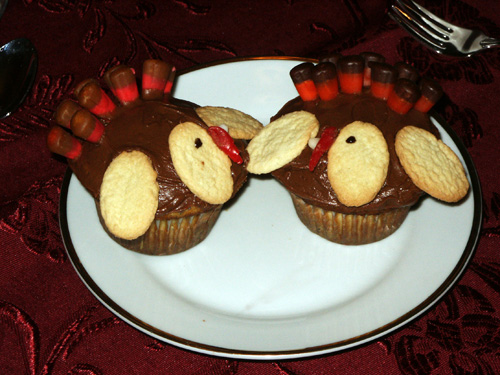
Their candy corn plumage and shortbread wings guarantee that these irresistible turkeys will be gobbled up as soon as they land on the dessert table.
You Will Need: (for each cupcake)
Cupcake
Chocolate frosting
3 oval shortbread cookies (I used Keeble Sandies Right Bites)
9 candy corn pieces
Black decorators’ gel
Red fruit leather
Directions:
1. Frost the cupcake, then press in a cookie head and 2 cookie wings.
2. Press in a row or two of candy corn tail feathers.
3. To make an eye, add a small dot of black decorators’ gel to the head.
4. For a beak, cut the white tip from a piece of candy corn and press it in place.
5. To make the wattle, cut a 1-inch square of fruit leather. Roll it into a tube and stick it in place over the beak.


Add comment