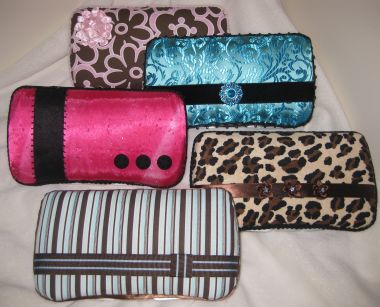
You may have seen them in the baby boutiques…now Studio 5 contributor, Kiersten Blanchard, shares the secret to making your own wipe container fit for a night out on the town…with the baby in tow, of course.
Needed:
Small wipe container (I used Huggies brand that I purchased at the grocery store.)
7″ of material
1½ yard decorative trim (that corresponds with your material) cut into two equal pieces
Batting (I suggest 6- or 4-oz.)
Other ribbon or embellishments (optional)
Glue gun and glue sticks
Scissors
Pen & permanent marker
Directions:
1. Using a pen, trace the wipe container onto the wrong side of the fabric. Cut outside the line (1/4″ to 3/8″) so that you have enough material to wrap up the side. This will be your bottom piece. Turn the container over and trace it again onto the wrong side of the fabric. This time, cut further outside the line (about ½”). The top piece needs to be a bit larger because it will be wrapping over batting on top of the container. IMPORTANT: Err on the side of making your piece to large. You can always trim the material if needed. Simply hold it up to the container and trim it if it is too large.
2. Using a permanent marker, trace the wipe container onto the batting. Cut just inside the line. The batting should be just smaller than the top of the container. Use a little hot glue to secure the batting in place on top of the container.
3. Glue the material to the container as follows:
Glue both the sides first, stopping before you get to the corners.
Next, glue each of the corners, distributing the material carefully so that it doesn’t pucker.
Finish by gluing along the length of the container.
Do this on the top and bottom. Don’t worry if the edge isn’t exactly aligned with the edge of the container. You will be covering it with trim.
IMPORTANT: Be careful not to glue the top and bottom of the wipe container together.
4. Glue on any ribbon and other embellishments.
5. Finish by gluing the decorative trim along the edges of the container (over the edge of the material). The top and the bottom trim should be right next to each other except by the container clasp.
Hints:
Use as little glue as possible while you stick the material to the container. You don’t want hardened lumps of excess glue.
Straight ribbon is difficult to use as trim.
If you have excess glue, wait a few seconds for it to begin cooling and wipe it off with your fingers…Don’t burn yourself.
Open the container periodically as you are gluing the material on to make sure that you aren’t gluing it shut.
Different fabrics have different “give.” Satin-type fabrics are more difficult to work with, but look great when you take the time and work carefully. Striped fabric is a little tricky as well. Just experiment and have fun.
Other decorating ideas and resources:
You can use fabric paint to write your child’s name and draw pictures on a container.
You can put vinyl lettering and shapes on a wipe container.
You can also buy containers in colors other than white. (http://www.littlegorilladesign.com/baby-wipe-holder.html)
If you’d rather not make your own, you can buy them for $30…or just check these out for ideas. (http://www.thepolkadotplatypus.com/item/Baby-Wipe-Containers-by-Made-by-Angie/634))
Here’s a link for a cute “clutch” that can hold the wipes and diapers:
thediaperclutch.com/products.html


Add comment