Don’t wait for all of the snow to melt to begin your spring nesting. Start
decorating today and make the season last a little bit longer!
Michelle Virtue with Campus Floral shares some ideas and inspiration.
Don’t wait for all of the snow to melt to begin your spring nesting. Start
decorating today and make the season last a little bit longer!
The key to seasonal decorating with fluidity and style is to choose a specific
spring theme from ANY single element of the season. We love the idea of
selecting a particular color scheme and centering it around nests, grass,
budding branches, a particular flower, birds, eggs, branches, bulbs, etc. The
possibilities are endless.
These three simple tips will help you get started:
1. Raid your sewing basket and crafting surplus for spring surprises!
-Braid together branches or angel hair vine (available at your local
craft store) to make nests. TIP: Bind branches or vines as you go to
create a consistent and stable form.
-Use jars of feathers for a dramatic and unexpected bit of texture.
TIP: buy an inexpensive down feather pillow and let the feathers fly.
-Buttons and beads make fun eggs in smaller spring projects.
TIP: Do not be afraid to paint or dye beads and buttons to suit your project.
-String, fabric scraps and ribbon can be an inexpensive way to add color to
nature’s neutrals.
TIP: Coil thick jute to make a nest and use robin’s egg blue beads as eggs.
These make really cute magnets, party favors or they can be displayed in an
open frame. This is one of the best tutorials
http://www.beneathmyheart.net/2011/06/beautiful-mod-podge-
candle-
holder-with-twine-birds-nests-by-lindsay-from-living-with-lindsay/!
-Yarn—oh, you sweet crafting bit of goodness!
TIP: Wrap yarn around an inexpensive bowl to create a spring nest. Fill it full
of sweet treats—it won’t go unnoticed. A similar tutorial from Martha.
http://www.marthastewart.com/272442/candy-nests?
backto=true&backtourl=/photogallery/easter-crafts-and-
treats#slide_14
2. Cleverly combine fresh and permanent botanicals. This can
be a tacky disaster if done thoughtlessly OR an art form if done correctly.
Remember these simple guidelines and you can’t go wrong—
-Buy realistic looking permanents. The silk flowers on your grandmother’s
outdoor patio (you know, the one’s that bloom year round?) have no business
in your home. If they don’t look like you could pick them from the garden,
DON’T buy them.
TIP: Watch for colors, sizes and textures you would actually find in nature!
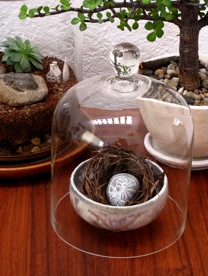
-Use glass cloches to “frame” your vignette.
TIP: Vary sizes, heights, and even styles to create an interesting centerpiece
or something stunning for your entry way.
I love this example from Geninne’s Art Blog–
http://
blogdelanine.blogspot.com/2009_12_01_archive.html
3. Select Spring decorations that compliment your current décor.
-Don’t be afraid to combine natural elements in a contemporary setting.
TIP: Play with your designs and be open to the unexpected. You might start
with one project or style in mind and end up with something completely
different and altogether wonderful. These nesting peonies for a formal
outdoor dinner party (via www.marthstewart.com ) fit the
bill.
Bonus project we LOVE:
http://www.countryliving.com/crafts/projects/easter-crafts#slide-1
For more great design inspiration, visit Campus Floral in Provo, or online at
http://www.campuscraftfloral.co
m/.


Add comment