You’re next fall décor statement piece is a dollar store pumpkin, with some upgrades!
As a fall décor piece, they’re not only the right size, they’re the right price. Grab a handful of foam pumpkins from the dollar store and with a little bit of dressing up, they will be that coordinated touch for your fall décor.
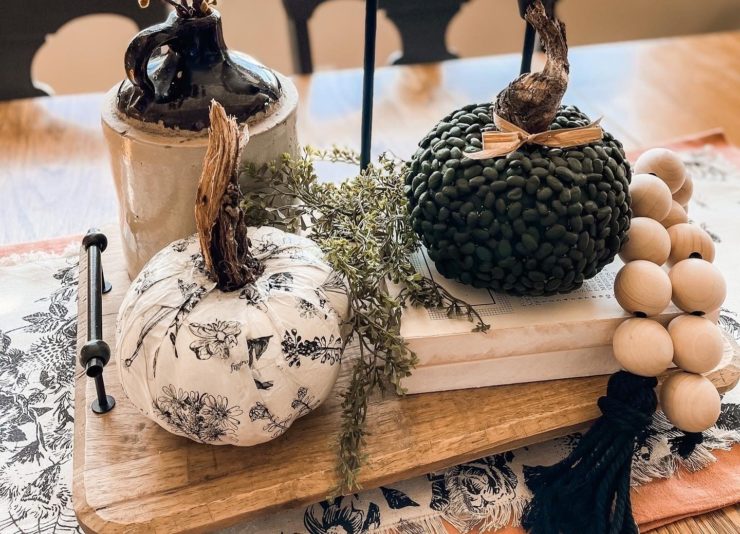
Michelle Bauer shares three ways to makeover the dollar store pumpkin with an up-to-date look.
Michelle is a DIYer and home décor enthusiast. Find her on Instagram at @_thepinklemon, and on Etsy.
STEPPED OUT INSTRUCTIONS TO MAKE PUMPKINS
SUPPLIES
- Unfinished pumpkins
- Serrated knife
- Stems
- Wax paper
- Ribbon
- Gift wrap tissue
- Paintbrush
- Scissors
- Mod podge
- Paint
- Dry pinto beans
PAINTED PUMPKINS
- Choose your color of craft paint, spray paint or latex house paint
- Place wet, painted pumpkin on wax paper to dry. This will prevent sticking.
- Swap out the stem for a foraged twig for a rustic look.
COVER A PUMPKIN WITH GIFT WRAP TISSUE
- Paint your pumpkin a color similar to the tissue paper you will use.
- Apply mod podge with a paintbrush to a dry, painted pumpkin.
- Gently press the gift wrap tissue around and onto the pumpkin. Let dry.
- Cut off excess tissue
- Apply final coat of Mod Podge to tissue covered pumpkin. This step will help eliminate the excess tissue from sticking out & give it a hard finish.
- Add a stem & ribbon if desired.
PINTO BEAN COVERED PUMPKIN FOR A GOURD/WARTY LOOK
- Apply the dry pinto beans by using Mod Podge and a paintbrush. Let dry.
- Add a final coat of paint, with good coverage.
- Add a stem & ribbon.


Add comment