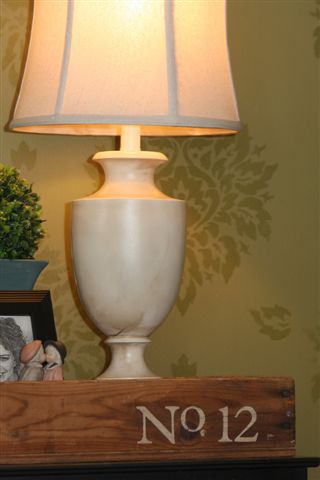
Give your walls a burst of personality with stencils! It’s a trend made popular decades ago, but making a big comeback in the design world now!
Designer Tausha Hoyt, with Sassy Style shares tips to help you stencil like a pro!
I know what you are thinking, but I promise you that these are not your peach ducks and sea foam green heart stencils. You know that you were thinking that. It’s ok, I used to think that as well. Until I found the new and improved un-90’s stencils.
I am all about simple decorating and stencils more than fit the bill. Enough chatting and on to the possibilities and the how to, of course.
Are your walls feeling a little flat? Stencils are the quickest, easiest and non-permanent solution to remedy this problem. I am not kidding when I tell you that using these stencils are beyond simple and quick. Plus, you can use them over and over again. If you have a wall, a table, or even a book that needs a little something, something…stencils are your answer!
If you are looking for a decorating solution for a forgotten corner or a high impact wall-you will want “decorating” stencils. These stencils are quite large and give you big impact!
Head over to the website- cutting edge stencils.com and pick which stencil makes your heart go pitter patter. I am warning you now; you will have a bit of hard time once you get there. The possibilities are endless!
http://www.cuttingedgestencils.com
While you are there, make sure that you pick up a stencil level. Also, if you don’t want to make a separate trip to the Home Depot, you can get all the tools that you need on the cutting edge site. They will ship it out to you with detailed instructions.
Don’t be intimidated, it’s simpler than it seems.
Supplies needed for a beyond Awesome stenciling experience:
Stencil or stencils-
Clip on stencil level (very helpful if one of your legs is longer than the other)
Dense Foam roller and handle
Spray Adhesive-Elmer’s works the best. It doesn’t leave a residue and it’s not too sticky to handle.
Paint color of your choice-Depending on your walls size, you can more than likely get away with a quart or less.
Ready for the instructions?
1-attach the level to the stencil.
2- Spray the back of the stencil with the spray adhesive. Make sure that you get the little pieces. This is important for the crisp edges. (spray adhesive can make a mess-use a towel or something to cover the carpet)
3- Put the stencil on the wall-make sure it’s straight-Level, level, level!!
4- Roll on the paint.
Start at the bottom of the wall, or practice before you stencil the “real” wall. This will just help you be able to know how much paint you need on the roller to get the look that you want.
5-Take your stencil off the wall
6-repeat as needed-the paint dries to the touch quite quickly, so overlap as needed. Don’t be afraid!
7-Step back and look how amazing your wall (s) look and reward yourself with chocolate or cheesecake, or both!
I promise you, it really is that simple!
The stencils were the perfect solution to give my hallway some depth, without extra furniture for my family to bump into.
They were also spot on for my master bedroom issues. I wanted something that felt classy, sophisticated and not too girly. The results were spectacular!
I know what you’re thinking now. I’m set on my walls, but some of my furniture is looking a little um…pathetic. Also, you may want a stencil on a smaller scale?
Fabulous news, you can make your own!! Remember the queen of cheap has got your back! I used my Cricut, but you could use your computer, a steady hand and an exacta knife.
To make your own-You need some quilter’s plastic. You can buy this by the single sheet or in a package. I used a few different kinds and I do have a favorite. I picked up this pack of 5 sheets from My Heritage Fabric in Ogden. It was about $7.50. This kind was by far my favorite. Not quite as thick as some of the other brands, so it is a little bit easier to use.
http://myheritagefabrics.wordpress.com
When you make your own stencils, you need to remember to do a few things.
1: if you have a Cricut, make sure that you double cut. It’s much easier that way.
2-Make sure that you flip the image. As in, cut it out backwards. Maybe all of you already knew that, but I didn’t and I learned the hard way. DO this!
3- Even if your image is small-you want to make sure that you plenty of space around the image that is not cut. The reason for this is just so you don’t get paint where you don’t want paint.
So, if you want to number your bar stools, or your jars or your children even. Stencils! Add some fun to your furniture, or even some detail to an old book.
The options are only limited by your imagination.
Pull out your paint and get to work. I guarantee that you will be happy that you did!
Happy Creating!
Check out http://sassystyleredesign.blogspot.com/ for all kinds of before and after pictures with stencils. You can also win some free stencils!
If your home is in need of little TLC and you’re not quite sure what to do? Give the sassy stylists a call! They specialize in using your stuff and your treasures. They Decorate your room and display your treasures in such a way that your house, becomes the home you always wanted. Call for a free consultation. Check out for more info.


Add comment