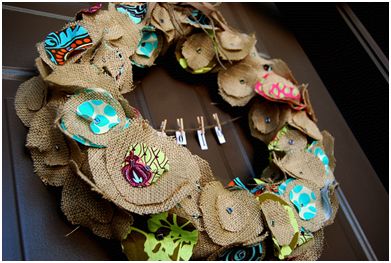
Jennifer Hadfield of the blog “Tatertots and Jello” shares the how-to for this burlap wreath.
Materials:
• Wreath form
• Burlap — approximately a 3 foot section. (it is usually $2.99/yd. at most fabric stores)
• Assorted fabric. I had some “Amy Butler” fat quarter squares
tulle (optional).
• Scrapbooking brads — but buttons would work too
• Hot glue and gun
• Twine
• Tiny clothespins
• Paper
• Stamp pad (brown or black)
Instructions:
1. Cut a 4 inch section down the length of your burlap.
2. Secure the end of the burlap strip to your wreath form using your glue gun. Then wrap the fabric tightly around your wreath form until the entire form is covered. Overlap the edges slightly as you wrap/ Secure the other end to your wreath form.
3. Cut out two different sizes of burlap circles. I used a 14 inch wreath form and I cut out 50 3-inch circles and 50 2-inch circles. The circles do not need to be perfectly round. You can use a glass or cup that is about that size and trace around it if you would like. Also, you can double up the fabric by folding it up — I folded it twice to cut out 4 circles at a time. This is will save you a lot of time!
4. Cut out two different sizes of fabric circles using different fabrics. I cut out 25 3-inch circles and 25 2-inch circles total of assorted fabrics. I also cut out about 20 tulle circles to put under some of the flowers – this is optional.
5. You need about 50 jeweled brads or buttons to put in the center of your flowers. (remember you combine 2-3 circles together to make each flower so you need about between 120-150 total circles).
6. Attach the flowers together with a brad in the center. If you are using buttons, hot glue the flowers together.
7. Lay all of the flowers out on your work surface.
8. Hot glue your flowers on to the burlap wreath form. Start with the fabric flowers. Attach each of the designs at one time. So you are spacing out the different fabrics evenly on the form. For example, if you have three pink and green fabric flowers, attach one at the top, another at the bottom right and another opposite on the left. Then do the same thing with each of the other fabric prints.
9. Once you have your fabric flowers glued on, fill in the rest of the form with your plain burlap flowers. You may have to make a few more burlap flowers to fill in any bald spots.
10. After all of your form is filled and the glue is cooled, turn the wreath over and attach the twine across the center of the back. I attached the twine with hot glue.
11. Then tie the ribbon to the center of the top of the wreath to hang the wreath.
12. You can attach any message that you want to the center of your wreath. A couple of ideas: 2010, Happy, Joy, Love, the name of your family, etc. I printed off letters on my computer using different fonts and various size letters. Then I cut out the letters/numbers. I used a brown ink pad to rub the sides of the letters to make them look old. Then I attached the letters to the twine using very small clothespins.
13. Then you can fray up the edges of the burlap and fabric as much as you want. Enjoy your wreath!
Jennifer Hadfield loves all things creative and new. She loves making something beautiful out of nothing – remake is her style! She is a family gal who loves meeting new friends.
She started her blog as a place to store creative ideas and projects. She believes anyone can be creative and loves encouraging other people to develop their creative side.
To visit Jennifer, and view all of her fun projects, go to: www.tatertotsandjello.blogspot.com.


Add comment