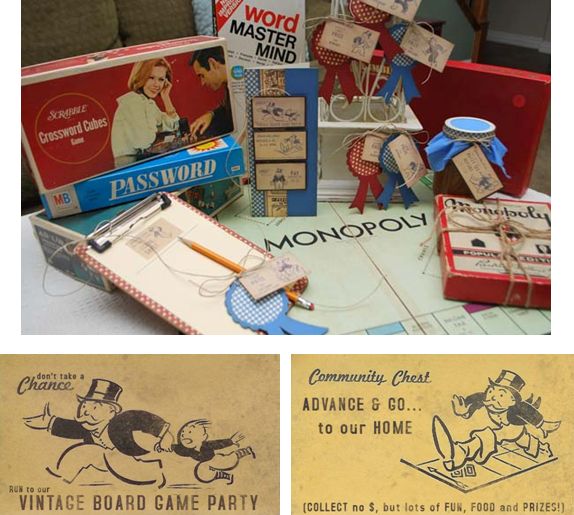
Studio 5 Contributor Sue Neal has some unique ideas to host your own Vintage Board Game Party.
March is one of those transition months. Winter lingers and spring teases us with occasional warm days and little bright spots of color in our garden.
We want to emerge from our hibernation, but it’s still chilly and likely wet and muddy. Not exactly picnic weather. What we need is to get out, talk to people, have some fun, socialize…what we need is a party!
Not just any party. Remember, we’re sluggish from the winter. Sitting around chatting might end up in some snoozing.
A Vintage Game Board Party hits all the right notes. It’s nostalgic, interactive and competitive. The idea, at its simplest, is inviting friends over with their oldest, most vintage games they own (or ones they can get their hands on), playing them and of course, eating.
Just a few steps more than ‘simple’ however, it this complete party ensemble. Depending on your time, just pick which steps you want to do.

You can download all the vintage cards HERE for free! (Either in PDF or JPEG.)
Step 1: Make an invitation.
Download vintage cards. I kept these generic enough and left space to add your own details; place, time etc…
Print them on ivory colored cardstock and trim. They should measure approx. 3″ x 1 ¾”. Trim closely. Mat on brown cardstock.
Cut a 8 ½” x 7″ piece of ivory cardstock. Fold in half to create card. Card will measure 8 ½” x 3 ½”, so be sure to fold it correctly.
Cover front of card with strips of patterned paper. I used Graphic 45’s beautiful vintage paper.
Adhere printed cards to front of card with foam squares. Tie some twine around the spine of the card.
This card looks complex, but is very easy to complete and duplicate.
Step 2: Clipboard & Score sheet
Create a coordinating clipboard and score sheets for each game table.
Purchase a 6″ x 9″ clipboard (I got mine at Walmart). Cover with paper. Use a sanding block to smooth off the edges. Ink up the edges with Distress ink if you wish (I used Ranger Distress Ink, Frayed Burlap)
Attach a pencil with some twine.
Download Score sheets. Trim and put on clipboard.
Step 3: Prizes!
Prizes can tie a whole party together. It’s something to anticipate at the end of the party and a whole lot of fun!
Download and print off Vintage Prize Cards on Ivory cardstock. Trim closely.
Attach to any kind of award or tag. I used a Cricut die-cut from the Paper Pups Cartridge. Tie with Twine.
Step 4: Party Favor!
Download Party Favor card. Print on Ivory cardstock and trim closely. Mat on Brown cardstock and punch a small hole in top LH corner. Tie with jute to your favor.
I tied it to a jar of homemade Butterscotch syrup, to coordinate with the Aebleskivers we had for a treat. You could also include the recipe on the back.
To decorate the jar, simply lay a coordinating piece of fabric over the jar before you screw on the lid. Cut a ½” strip of patterned paper and adhere around the lid.
Easy and instant transformation!
Additional ideas:
• Don’t forget music. Keep it low, but pick something vintage, Big Band Music would be fun, but pick anything from the 40’s to the 70’s.
• Have a white board to keep track of who is winning.
• Have consolation tables, so people who don’t win can continue to play.
• Have a Vintage Game trivia sheet to complete in between games.
• Have everyone wear the best vintage clothes. Have a prize for best costume.
• Don’t have any vintage games? Try your parents, grandparents or Deseret Industries. Or, like me, eBay! I found amazing deals on old, old games. I just might start to collect them!
You can download templates to make all of these items at www.sueneal.blogspot.com and it’s free!


Add comment