Craft a new Christmas tradition. Celebrate the season with do-it-yourself
Christmas crafts from around the world.
Christmas Clogs and Slippers with Ribbon Rosettes
This is a great way to start off the Holliday season
Designed by: Sharon Butterfield
Time: ½ hour
Skill level: Easy
Materials:
Ribbon: 13″ of 1 ½”
Decorative flowers
Red Glitter Button
Needle
Thread
Scissors
Slippers
1. To make the ribbon rosettes, use 13″ of 1 ½” ribbon. Sew a running
stitch about ¼” up from bottom of ribbon. Gather ribbon together and sew
shut. Glue flower to the center of the rosette then attach red glitter button.
This is a tradition from both Germany and Holland.
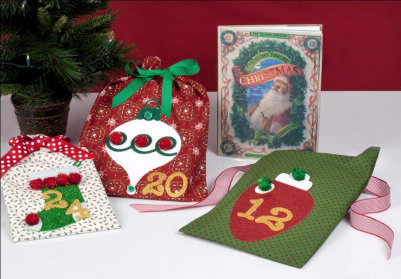
Christmas Story Book Bags
What a perfect Christmas tradition
Time: 1 hour
Skill level: Beginner
Materials:
Cricut Expression® 2 Personal Electronic Cutter
Cricut® Joys of the Season cartridge
Cricut® Christmas Cheer cartridge
Cricut® Alphabet cartridge
Christmas fabric
Ribbon
Sewing machine
Thread
Glittery pompoms
Storybooks
Glittery fun foam – red, green, yellow
Felt, glittery & stiff – white,
Felt, stiff – green
Tacky glue
Scissors
Cartridge Cuts:
Christmas Cheer
· Stocking – 10.88″
· Bulb – 10″
Joys of the Season
· Ornament – 11.44″
Cricut Alphabet
· 1,2 – 3.09″ Font 1
· 2,0 – 2.6″ Font 1
· 2,4 – 2.7″ Font 1
Designer Hints:
1. Cut material to fit each book, allowing room for seams on the sides and
a hem at the top.
I cut 6″ above the book. This gave enough room for the hem and the ribbon
to tie. The fold of the material will be the bottom of the bag. You will only
sew the sides and hem at the top. Fold material in half, with right sides
together. Seam the sides and hem the top. Turn right sides out. Place book
in bag to see where to sew ribbon. Using a straight stitch, sew ribbon to the
back of the bag.
2. When cutting foam and felt, always use a sticky mat. The felt, it must
be the stiff felt. If you don’t want it to stay stiff, you can put the felt under
water to rinse out the sizing. Let it dry, adhere to bag. Using a tacky glue,
layer shapes. Adhere to bag. I placed a piece of cardstock inside of bag so I
didn’t glue the bag together. Embellish with glittery pom poms.
This is an American tradition.
Place the bags under your tree. Each night open a bag and read the story.
This becomes a great tradition.
Mini Christmas Pinatas
This is a tradition in Mexico. Wouldn’t it make a great tradition for your
family?
Time: 1 hour
Skill level: Beginner
Materials:
Cricut Expression® 2 Personal Electronic Cutter
Cricut® Christmas Cheer cartridge
Cricut® Joys of the Season cartridge
Disposable cups – 2 (Can be decorative)
Fun foam – green glitter, red glitter
Curly bows – for gifts
Ribbon – 1 ½” wide 13″long
Ribbon – red ¼”
Decorative trim
Rhinestones – 3 red
Glitter button – 2 red
Needle
Thread
Scissors
Glue gun
Glue sticks
Candy
Shredded filler
Cartridge cuts:
Christmas Cheer
· Wreath 3″
Joys of the Season
· Snowflake 3″
Designer Hints:
1. Fill one of the cups with candy. Using glue gun, glue the two cups
together.
2. Adhere the curly bows to bottoms of cups.
3. Using the decorative trim, glue where two cups join, to cover up the
glue.
4. To make the ribbon rosettes, use 13″ of 1 ½” ribbon. Sew a running
stitch about ¼” up from bottom of ribbon. Gather ribbon together and sew
shut. Glue the red glitter button to the center of the wreath and the
snowflake. Add the three rhinestones to wreath. Tie a bow out of the ¼”
ribbon and adhere to wreath. Adhere ribbon rosettes to piñata, where the
two cups join.
This is a tradition from Mexico.
Christmas Paper Lanterns
What a cute and inexpensive way to decorate a Christmas tree
Time: 45 minutes
Skill level: Easy
Materials:
Cricut Expression® 2 Personal Electronic Cutter
Cricut® Tis the Season cartridge (Creative Memories)
Holographic glitter paper – silver & gold
Metallic paper – red & green
Fun foam – red & green
Rhinestones
Tea lights – battery operated
Glue dots
Trimmer w/score blade
Cartridge Cuts:
Tis the Season
· Snowflake 2.70″
· Holly 2.70″
Designer Hints:
1. Sizes for the lanterns:
a. Small * 4 1/2″ x 8″ Score at 2 ¼”
b. Medium * 6″ x 8″ Score at 3″
c. Large * 12″ x 12″ Score at 6″
2. Leaving paper folded, cut every ½”, from the fold line down, stopping ½”
before bottom. Be sure Adhere the two ends together with glue dots.
3. Cut two strips of contrasting paper ¾”. Adhere these around the top
and bottom of lantern. Trim excess.
4. Cut a strip of paper 1/2 ” x 7 ½” for the handle. Adhere to the inside of
the lantern.
5. When cutting the fun foam, use a sticky or new mat. Cut the holly
leaves, berries and blackout of the snowflake out of fun foam. The other
parts are cut out of the holographic paper. The back of the snowflake is the
layer/shift. Embellish with a rhinestone.
This is a tradition from Asia. It is called the “Tree of Light”.


suíomh íoslódáil pictiúr próifíl ig
mac instagram profil şəklini pulsuz yükləyin
Спампаваць ролікі instagram для iphone
instagram ios story download online
instagram bedava reels indirme
descarga destacada en línea de ios de instagram
sommer ray