
Blogger Mandy Douglass shares some tips.
If you’re human, I am sure at one time or another you have had a stack of recipes to go through.
I started with a spiral index card book in High school, then went onto a small ring binder for index cards, next was a small album with sheet protectors, and now I have FINALLY found a great strategy that works for me. Let’s go about this in 5 steps!
1. Sort & Stack
2. Re-Format, Re-Write
3. Take Pictures
4. Goodbye, Magazines
5. The Color Coded Cookbook
Sort & Stack:
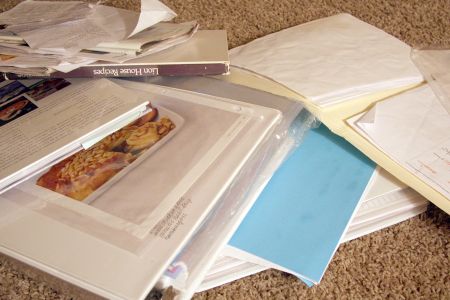
Go through your recipes and decide which ones you actually want to keep. These are loose recipes that are stacked, not magazines just yet! Stick the recipes in two piles – Tried and True & Yum & New.
Tried and True = recipes you have made more than 2x and will continue to make.
Yum & New = recipes you have never made, or only made once.
Re-Format & Re-Write
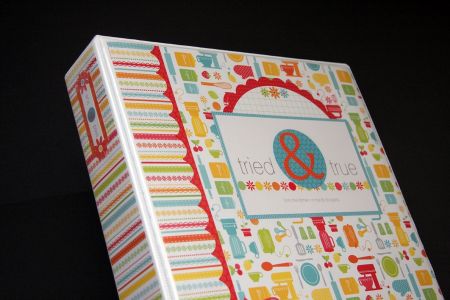
Get two binders. DON’T buy the $.99 cheapo’s … be sure to find a good quality binder. I really like the ones that have the “Gap Free” rings … the ones without the teeth.

A 2″ sized Binder is the size I like best. It isn’t too big and heavy. Last, go to Costco and get a big stack of photo sheet protectors.
Making your binders. Get 12 x 12 paper and cut your own tabs. I used a new paper line from Doodle bug Design that is bright and colorful.

“Surrounding yourself with playful colors promotes creativity and will brighten your day!”
Customize the tabs to your recipes. The ones that you buy in the office section won’t stick out over your sheet protectors. Laminate your tabs.
Here are the tabs I created:
Drinks (Blue)
Appetizers (red)
Breakfast (Turquoise)
Breads / Muffin’s (Yellow)
Salads (Green)
`Entrees (Purple)
Side dishes (Black)
Cookies (Brown)
Deserts (Pink)
Slip all of your recipes in sheet protectors in their category. These are your old recipes. Don’t even think about typing them yet! Once they are in the book then you can take your time typing the recipes!
For your TRIED AND TRUE Binder only
Create this album for your posterity! This is an album with your recipe notes, and the way that YOU cook things. Be sure to include those recipes that are just “in your head”. You know you have some of them! Also, decide which ones you actually want to keep. You don’t need four different recipes for cranberry muffins!
Type your recipes as you can. Make a template and use the same one for all of your recipes.
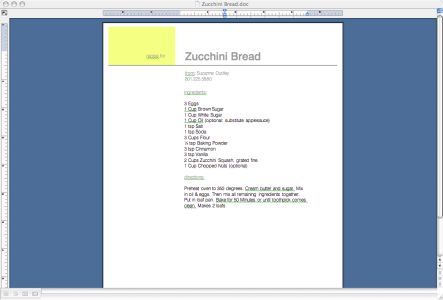
Same font, same colors etc. Use a very simple font, don’t use decorative fonts or trendy fonts. You’ll get sick of looking at them!
Don’t be overwhelmed with typing them all in one sitting. You will give up … trust me, I have multiple times. Print them as you type them, and when you send someone an email with a recipe. Place it in your pre-made template and print it! Don’t let it sit in your computer, it will get lost! It takes just a few minutes! Typing also, allows easy sharing with others.
Slip in a sheet protector in front of the original recipe until you have made it. This will help you make sure there aren’t any typos. There is nothing worse than putting in 1 TBSP of salt, rather than 1 tsp of salt. YUCK. When you have made the recipe then you can either do what Brooke did by displaying old recipes in your kitchen (Brooke’s Happy Home:
www.studio5.ksl.com, or just toss them!
Another idea would be from a great website I found!
www.tastebook.com The website allows you to upload all of your favorite recipes, including ones your found online from the recipe area of studio5.ksl.com and create your own recipe album. What could be better than creating your own studio 5 cookbook! This would be a great alternative to Holiday Recipes. It could be a great gift idea for next year as well!.
For your YUM & NEW Binder:
Make another set of tabs, the same as your Tried & True binder. Slip the recipes into sheet protectors, tape them to paper, or better yet, get one of those photo albums that you can stick them to the pre adhesive pages. (I found a darling one on sale at Target!)

I wouldn’t recommend them for photos, but I would for recipes. I would recommend however having something that will make it splash proof and wipe able.
Take Pictures
Take pictures of your food.
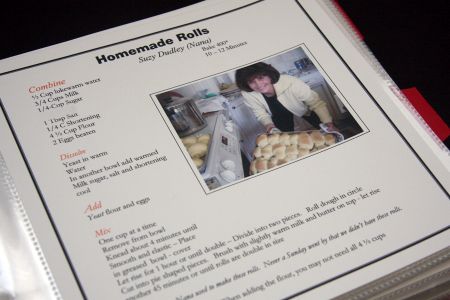
The mind is very tricky and can be stimulated by site of food. Take pictures with people. If it is grandma’s roll recipe, take a picture of grandma with the rolls! Include a history on the recipe, who gave it to you and their phone number in case you have questions while you’re cooking the recipe!)
Goodbye, Magazines!
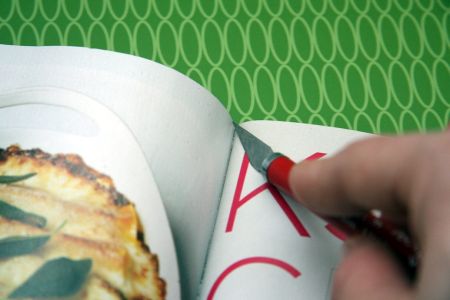
GET RID OF THE MAGAZINES! You don’t need to keep them. They are a bunch of advertisements with a few recipes you might want to try. Tear out the ones you would like to try. *TIP* Use a craft knife to get a clean edge.
DON’T stick the torn out recipes in your “hoping to try” pile just yet. Stick them in a file folder, and put them away. The next time you have a stack of recipes, go through your magazine pile and see if you still want to make the recipes. At this point that is when you would stick them in your “hoping to try” binder.
The Color Coded Cookbook
Go through your cookbooks and with color coded tabs.
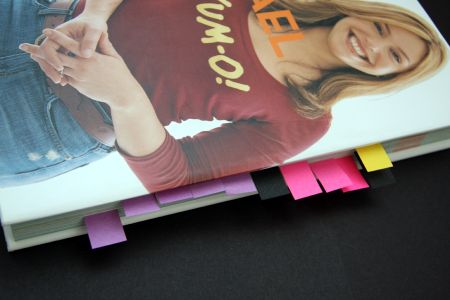
These would be the same colors as your tabs in your other binders. Then create a list, can be handwritten, in each category. This way when you are looking for a recipe, you can find it quickly. Be sure to include the page number from the cookbook so that each recipe is easy to find! If some of these recipes are ones you refer to often, be sure to type them up and put them in your Tried and True album.
For more amazing ideas, and even an awesome offer for meal planning and even a giveaway of scrapbook paper that will get you started on your recipe organization, visit my blog: mandydouglass.blogspot.com


Add comment