
Blogger Jennifer Hadfield of “Tatertots and Jello” shows us how.
Do you have any of those doilies that your grandma or great-aunt made by hand? Instead of putting them on the back of a chair or a side table to gather dust, turn them into pieces of art that can be displayed forever.
Here are a few ideas:
1. Embellish a bag with doilies and ribbon (Bag: Wal-Mart, $10). I used scrap pieces of fabric, two doilies and a button cover to create a custom look.
2. Create a paper doily banner. An easy and inexpensive craft to add festivity to a birthday party. All you need is Bias Tape (from the fabric store), fabric scraps and 9 large or 15 small doilies.
3. Makeover your lampshade using doilies. A $7 Target lamp gets a nautical makeover with fabric from an old skirt and 2 doilies from the Dollar Store.
4. Embellish a basic picture frame with doilies. Decoupage paper doilies to a plain frame for something vintage-inspired.
5. Create a pillow cover with a large doily and vintage button. Stitch on a Dollar Store doily to a pillow cover for a fresh Spring look. Add a vintage button for a punch of color.
6. Use doilies to make a fabric pennant. This project is perfect for any celebration. No sewing required. All you need is bias tape, some fabric and a few Dollar Store doilies.
7. Mount doilies in embroidery hoops. This is a great way to display treasured doilies with a modern twist. You can paint the embroidery hoops to match your decor.
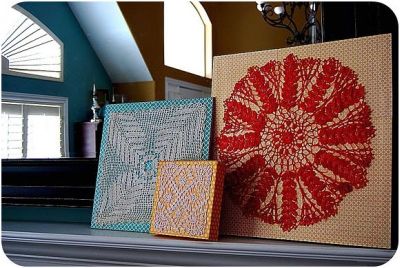
8. Decoupaged three vintage doilies on canvases. This is a great way to turn your grandmother’s doilies into modern art and preserve them for all time.
Here are step-by-step instructions for this project:
Materials Needed:
• Doily (If you don’t have any you can get them on Etsy, garage sales, e-bay or even the Dollar Store sells doilies).
• a canvas or MDF board (I found mine at Robert’s Crafts for $5)
• Scrapbook paper
• Decoupage Medium like Mod Podge
• Foam brush
Instructions:
1. Measure your canvas or board, then cut your scrapbook paper so it fits. Depending on the size of your board, you will probably have to use a few sheets of paper.
2. Put a layer of mod podge on the back of your scrapbook paper. Then put a layer directly on the canvas or board. Place the paper on the board and smooth it until all of the air bubbles are out. I use the lid from the mod podge to smooth the paper, but you can also use an old credit card or a spatula.
3. Apply the rest of the paper, doing the same thing. Once the paper is on, put a layer of mod podge over the entire board/canvas and let dry. I put a layer of paper over the edges of the canvas too.
4. Once the mod podge is dry, lay the doily on top and center it. Then I drizzled the mod podge over the doily. It takes quite a bit of mod podge. Once I had a good amount on the doily, I smoothed it gently over the doily with my foam brush, until the entire doily was wet.
5. If you are using a colored doily, your doily will change color when it gets saturated with the mod podge. So you want to make sure it is all wet so it is all the same color. Let dry.
And now you have those precious doilies preserved forever!
Jennifer Hadfield loves all things creative and new. She loves making something beautiful out of nothing – remake is her style! She is a family gal who loves meeting new friends.
She started her blog as a place to store creative ideas and projects. She believes anyone can be creative and loves encouraging other people to develop their creative side.
To visit Jennifer, and view all of her fun projects, go to: www.tatertotsandjello.blogspot.com.


Add comment