
Susan Neal shows us how soot to create this hard-to-replicate look.
What could be scarier that putting a flame to an expensive, pretty paper we collect? But that is exactly what we’re going to do with this exciting and creative stamping technique called Soot Stamping.
Every candle will leave soot if applied properly, but tapered, stick-like candles seem to work best with this technique. They are a little easier to handle as well.
The first step is to use glossy paper. It has a film over it that works very well with the soot.
I like to work over my kitchen sink, lined with paper towel, to catch all the waxy drips and have quick access to water if necessary (it’s never been necessary!).
Light the candle and start moving it back and forth under the surface of the glossy side of the paper. You will be holding the paper over the candle on a bit of an angle so you can see where the flame is.
Keep passing the flame along the surface of the paper until you have a good layer of soot. The size depends on the size of stamp you are using. Remember, the flame will actually be touching the paper. It will not catch on fire, as long as you keep moving the flame. Try to avoid touching the paper with the wick, as it will leave a small mark on the surface.
Already, you’ll start to see a beautiful pattern of ghostly soot on the paper. Once you’re down, blow out the candle and transfer the paper to a flat surface (I use my counter). Be careful handling it as at this point the soot is delicate and can be rubbed off easily.
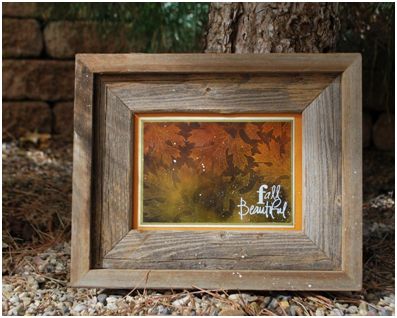
Simply stamp your image on the soot. Lay it down parallel to the paper and I press down firmly. The rubber image will remove the soot. Remove stamp and behold! An amazing, hard to replicate look that is perfect for this time of the year, Autumn, Halloween, Thanksgiving etc…
Spray lightly with Matte finishing spray to set the soot. I give is a couple of quick, light coats. Once dry (takes only a minute) you can now handle the image without any smearing.
Try another version by adding color to the glossy paper first. You can directly rub an inkpad to the paper or use a brayer. In this example I’ve brayered a variegated inkpad (several colors in a row, Big & Juicy by Ranger). Repeat the Soot application and stamp.
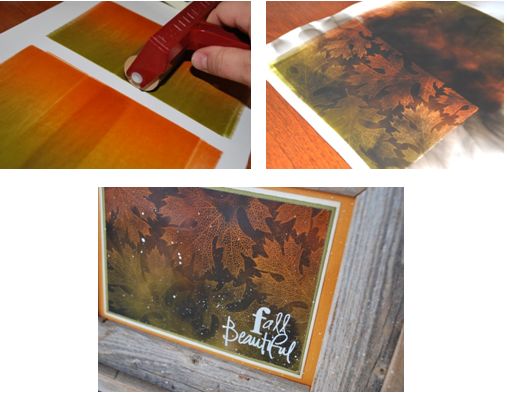
Here’s an example of a card I made with just orange ink applied to the glossy paper so it would show up under my pumpkin stamp. Have fun!
Susan Neal has a passion for paper and food. Both present an opportunity to be creative and make other people happy. She has spent the last 20 years sharing that passion with students and customers alike.
Susan was born and raised in Montreal, Quebec. She has lived in Utah for 13 years and is now a U.S. citizen. She has been married to Steve for the last 27 years and is the mother of 5 children and one daughter-in-law.
She has authored 4 decorative painting books and designed hundreds of projects for several scrapbooking and paper crafting magazines and publications. She has also started several successful retail businesses.
Besides her free-lance design work, Susan is currently a PC Pro for PaperCrafts Magazine, serves on their editorial board and teaches throughout the country at Creative Keepsakes conventions. After years of creating jobs for herself in the craft industry, she has found her niche in paper; “the perfect, inexpensive, creative medium.”
After two years on Studio 5 representing PaperCrafts magazine, Susan is joining us as a regular paper crafting and cooking contributor.
Susan is also teaching her own series of card-making classes at eight of the local Roberts Arts & Crafts stores. To learn more about Susan please visit her blog, www.sueneal.blogspot.com.


Add comment