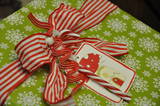
It’s a way to make any holiday gift an instant winner – much like the frosting
is the best part of a cake, present toppers are what will send your gift over
the top!
Blogger Kelly Brown with Simply Kelly B shares ideas and inspiration for gift
toppers, trimming and embellishments.
The month of December is filled with trimming our trees and decking our
halls. Here are a few ideas for “trimming” a holiday gift. I love embellishing
my presents to make them extra exciting for the recipient. These quick and
easy little trimmings will take your present wrapping to the next level and
delight your friends and family.
A Gift Can Never Have Enough Accessories!
I love an accessory! Purses, scarves, jewelry, hats….I just love them. And, it
turns out, accessories make great little gift trimmings. Adding an accessory
to your packaging is a great way to wet the palette of your gift’s recipient. It
gives them just a little taste of the wonderful gift inside. Try using
headbands, flowers, necklaces, scarves, broaches or belts to spice up your
wrapping.
A hand crocheted headband ties easily around a package to create a band. I
topped this package off with a simple round gift tag hanging from the
headband.
These clip or pin on accessory flowers make great wrapping decor! Simply
clip your flower onto a ribbon that had been secured around the package.
The recipient can use the flower, ribbon and whatever waits inside the box!
This cute little resin necklace is clasped onto the ribbon that is tied around a
simple cardboard box. I love the simplicity of this package that really makes
a statement.
Handmade Paper Bows
Putting a handmade touch on a gift says “You are Special to ME!” These fun
handmade bows can be created from any double sided patterned paper and
are a great way to trim a gift.
To create a handmade paper bow of your own, you will need:
Eight 6X1″ strips, Four 5×1″ strips, One 4×1″ strip cut from double sided
patterned paper, one long brad *Hint-bows are much easier to manipulate
with lighter weight paper
1. Hole punch each strip at the top and bottom as shown above.
2. Start threading strips onto the brad, beginning with the 4X1 strip. Make
this strip a loop (overlapping holes) and place through brad.
2. Start threading the 5″ strips. Place one hole through the brad and then
twist the other side around and place the hole through the brad as shown.
Continue with all four 5″ strips.
3. Begin threading with the 6″ strips and continue until all eight strips are on
the brad.
4. Open up brad clasps to secure strips in place.
5. Add a pop dot or strong glue dot to adhere the completed bow to your
package.
Vintage Postcards
I love the idea of using an adorable vintage image to dress up a package.
There are so many sweet little Christmas vignettes available online for free!
All you have to do is type “Vintage Christmas” into your search engine and
you will have an abundant supply of fabulous images to choose from. Here is
one of the vintage images that I used on my packages today:
If search engines aren’t your cup of tea, try The Graphics Fairy, one of my
favorite places to pick up vintage prints.
Once you find a print you love, save it to your computer, print it out on
cardstock, punch a hole and attach it to your gift.
Vintage images are perfect for creating a themed tag as well. You can modify
your search to include a theme such as “Vintage Christmas Cookies” or
“Vintage Hawaiian Christmas.” This is a simple solution for “trimming” your
neighbor gifts.
FREE Christmas Tag Downloads
How about trimming with a simple tag? Did you know there are hundreds of
FREE printable Christmas tag patterns available online. Just type “FREE
PRINTABLE CHRISTMAS TAGS” into your search engine and you will have your
pick of darling tags, waiting to be printed.
Once you download the tag patterns, print them onto heavy cardstock and
cut them out. Punch a hole and tie them into your packages as desired.
Just incase you don’t find a tag you love, here are some of favorite free tag
finds:
A Fanciful Twist (pink and red mushroom and tree tags), Living
Locurto(bright owl pictured above)
I hope you enjoy trimming your gifts with creativity! Have fun and let your
imagination go to work and you will create a wrapping masterpiece!


Add comment