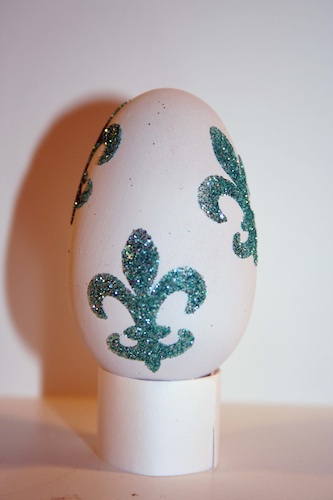
Creating beautifully decorated Easter Eggs doesn’t have to be time consuming. With a few quick tips and tricks you can make masterpieces out of plain eggs for your Easter table.
Brett Lund from Robert’s Craft shows us an easy technique for decorating Easter Eggs.
Supplies:
* Wooden Eggs in 2 ½”
* ¼” Terrifically Tacky Tape
* Terrifically Tacky Tape in Sheets
* Assorted punches
* Martha Stewart glitter multi pack
* Martha Stewart glitter glue
* Martha Stewart glitter tray
* White spray paint
Instructions:
Shaped images
1. Spray the eggs white.
2. Punch out of the Tacky Tape in the sheet assorted shapes with the punches or you can even cut out the shapes with the Cricut.
3. Peel off one side of the paper.
4. Stick the image onto the egg.
5. Repeat until all images are on the egg.
6. Peel off the top layer on the images.
7. Sprinkle the glitter over the images.
8. Burnish the glitter with your finger to make sure the glitter is completely covering the image.
9. Brush away any excess glitter from the egg.
Polka Dot
1. Spray the eggs white
2. Take the glitter glue and with the eraser part of your pencil or something round, dip it into the glue then stamp onto the egg.
3. When the entire egg has dots, sprinkle glitter onto the dots.
4. Set the egg off to dry.
Something that I thought of while I was doing the instructions, for the polka dot egg, you could easily use glue dots in assorted sizes. That way it would me much quicker if you needed the eggs sooner and wouldn’t have to wait for drying time.
Stripes
1. Spray the eggs white
2. Take the ¼” tape and apply it to the egg in any pattern you would like.
3. When all the tape is on your egg, peel off some strips, leaving others still covered, and sprinkle glitter on the exposed strips.
4. Burnish the glitter with your finger to make sure the glitter is completely covering the image.
5. Brush away any excess glitter from the egg.
6. Repeat with the other strips.
Glitter covered egg
1. Take an egg that has not been painted, and cover it completely with the glitter glue.
2. Sprinkle the glitter completely over the glue.
3. Brush off any excess glitter.
4. Set the egg off to dry before handling.
With this technique, I found it the easiest to do only half of the egg first. Cover it with glitter, let it dry. Repeat with the other half of the egg. If you need to, perform touch ups with the exposed spots.
To access the Robert’s Crafts blog go to: blog.robertscrafts.com
To find a store located near you go to: www.robertscrafts.com


Add comment