
Designer Tausha Hoyt has crafted up a centerpiece for every style, from the ghostly elegant to the creepy crawly and she says you can too!
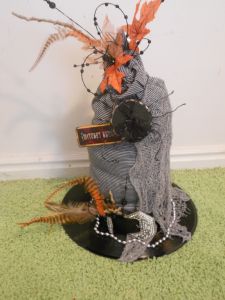
Witch Way…
Some days I’m not sure which way is up, but this simple hat is sure to point you in the right direction. This hat is made using a record as the brim. Some old fabric that I glued together, a fabulous belt found from the DI and of course feathers! To find out all the details on how to make one of these for your house-check out my blog. How perfect this hat would be as a centerpiece for a school or church function. It would also be “wicked” awesome perched on your kitchen table.
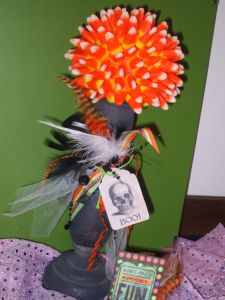
I know this might be kind of CORNY but…
When you are thinking about centerpieces, head down the candy aisle at the grocery store and let your imagination take over. After all, isn’t this time of year all about the candy?
I made these candy topiaries using candy corn. I painted some Styrofoam balls with craft paint and then glued the candy corns to the ball. I then attached the candy ball to a fun container and accessorized! That’s what I do best, so why not when I craft as well?
These would be darling in all shapes, sizes and containers. How very cute would they be down the center of your table? You can make these for both Halloween and Thanksgiving. They have candy corn in all kinds of colors! There are more details on how to make these on my blog as well. This is a great craft for bigger kids to help with.
A sure thing for a TREE-mendous party.
Got sticks? Well, if you have access to sticks, you can make this. I just went outside and gathered some sticks from my trees. I sprayed them Apple Green and then glittered them with purple sugar glitter. OOOHH!! Spay paint and glitter; really, can you go wrong?
I just cut out some bats using 2 sided scrap book that I picked up. Punched a whole in the top of the head and hung the bats on the branches with ribbon. If you don’t want to make your bats out of paper, you could use felt or even fabric and some batting.
I also have a Thanksgiving version.
I gathered more sticks. Only this time I didn’t spray them. I left them as nature made them. I put the sticks in a fun container and then added some leaves. I also just cut some leaves out of 2 sided scrap book paper and hung them with ribbon from the branches. This is a fun thing to do as a family the first of November. Then for each day of the month, have your kids write something that they are thankful for on a leaf and add it to the tree. By Thanksgiving, your tree will be full and you can all sit down and read what everyone is thankful for. Really easy, cheap and you can make some memories!
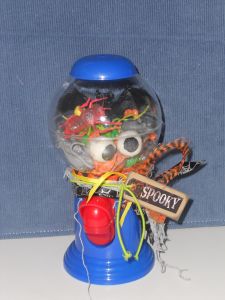
Creepy, Crawly, Creature Confectionary…
This one is perfect for the kids table at the Halloween Party. Or, you could use them as a favors. Head to the Dollar Store and pick up one of these plastic, bubble gum machines.
While you are cruising the aisles’s at the Dollar Store-look around and get some creepy, crawly, gross looking bugs. Add the bugs to the machine and now you have your own Creature Confectionary! I added some accessories and a spooky tag and I was done. If you need more details on this little Bug Haven-head over to the blog.
“Leaf” it to me…
To bring your plants, grasses and tree clipping in the house and turn them into a centerpiece. Really though, think outside on this one. Use funky grasses and cat tails. These are great because they have some texture. Cut a small branch off your tree (or your neighbors) and bring it inside. Find a fun container, and go to town.
This will bring some drama to your space for little to no money.
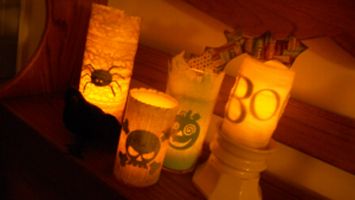
Ghostly Elegant…
You can use these luminaries for a fall themed table or spook it up a bit. I picked up some glass vases at the Dollar store. I also got some Flicker Candles from Costco. I made 4 different styles of the spooky silhouettes. For the first one, I used some old lace that I had lying around. I just inked it with some black and silver ink to give it a more spooky effect. I also used some tulle on one. I love it because it gives it a mummified look. I made one using book pages that I inked with brown to make it appear aged. If you are going to use book paper, make sure that the book has thin enough paper that you can see the image. Last but not least, I used some tissue paper that I cut points in to give it a fun border. These would be fabulous on your kitchen table for your Halloween dinner. You could also use them to make an extra spooky, haunted mantel. Any way you use them, you are sure to be the most haunted house on the block.
If you are looking for fun ways to give your home an updated fresh look, contact Tausha at Sassystyleredesign.blogspot.com


Add comment