
Marla Dee helps us sort it out and shape it up. She shares three container solutions to organize the small stuff.
Let’s talk about the toys. They are everywhere (kind of like the paper for adults). They keep coming in at every holiday, birthday, trip to eat out, or even going to the zoo. How can we possibly stay on top of it? And, then there is all the small stuff that goes with them – HELP! The tiny Lego pieces, the doll accessories, or arts and crafts supplies to name a few. Today we are going to offer three simple container solutions along with three tips for maintaining the stuff once it gets organized. Are you interested – let’s dive in!
CONTAINER SOLUTION 1:
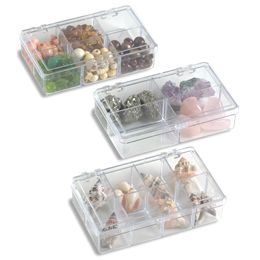
Use small containers within the large tub, drawer or other container to hold the small stuff. For example, a clear shoe box inside the large tub can hold the small Thomas Trains that go with the Lego set.
Another favorite is to use small baskets or drawer inserts within a drawer to hold the small stuff.
Or you can use small contained cubes that can go inside any large container.
CONTAINER SOLUTION 2:
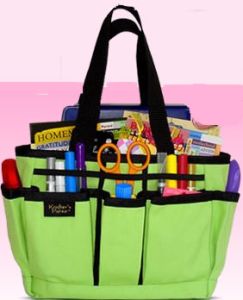
By keeping the container/organizer open you allow for ease of access and returning the item to its proper home. A favorite example is this arts & crafts tote with a variety of pockets and everything visual and easy to grab.
CONTAINER SOLUTION 3:
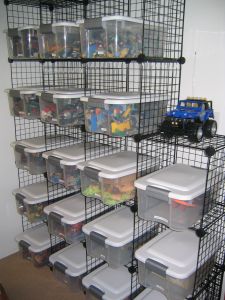
Put the small stuff inside consistent containers so that the whole area looks and acts organized. This allows your child to only pull out the one Lego project or one puzzle at a time. The best size is 12-16 quart with easy latch handles and lids that will allow you to stack them if necessary.
Remember to label (see TIP 3 below)
TOY TIP 1:
Before rushing out to buy the containers use the C&S System of S.T.A.C.K.S. – SORT, TOSS, ASSIGN, CONTAIN, KEEP IT UP, and SIMPLIFY. Take the time first to Sort the Legos, Toss the ones you don’t need or want, Assign where they are going to go in the room, write down the dimensions or size/amount needed to contain, and then go shop! This will save you money and stress!
TOY TIP 2:
Have boundaries with the toys both with your children people who give them things. My grandson just turned 5 years old and his mother spoke up about NOT wanting plastic and junk toys in their home. I was thrilled with her decision and for setting an example on discriminating what comes in.
TOY TIP 3:
Label Everything. There is so much research that shows the less we have to think about putting something where it belongs the greater the odds doing so. We have to make it as easy to put the toy back in its container as to plop it down.
Here is a brief description of simple labeling methods:
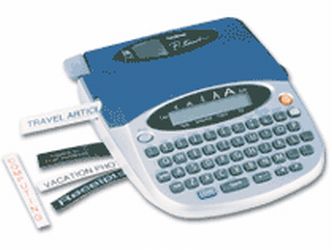
• Go get a labeler and use it. Every home needs one! I recommend the Brother PTouch 1800 or 1900 Series. This is the larger labeler that sits on a surface (not in the palm of your hand). The keyboard is set up like the computer keyboard so it is easier to learn. Use this to label the containers, dividers inside the containers and the shelves. By taking mere minutes to do this you save yourself so much time. Also, children love to do this. I taught my daughter how to use the labeler at 3 years old and she has been doing it ever since. She is now 15 and still labels everything.
www.officemax.com
• Have fun by creating labels on the computer. This way you can include a picture with the word which is a fantastic teaching tool. This even works with adult toys. You can then laminate them if you want. Lastly, the easy way to attach them is use Velcro adhesive patches or strips. This also allows you to change out the labels at any time. Works great for baskets.
• You can also make hand written labels on a variety of adhesive/removable labels now available at your office supply store. I prefer Office Max for a great variety. Here is a link with examples:
www.officemax.com
© SEE IT. MAP IT. DO IT. and S.T.A.C.K.S. Copyright of Clear & SIMPLE, Inc. All Rights Reserved


Add comment