
Studio 5 Contributor Susan Neal shares fun paper pocket projects.
We all love pockets.
They’re handy for hiding and holding all sorts of things, but even better, they’re a clever and attractive design element on paper crafted projects, so follow along for some creative pocket ideas.
The secret to creating easy pockets in paper crafting is envelopes. Envelopes are a ready-made space that does double duty by creating the base of your project and providing instant pocket possibilities.
Cut it up, unglue, glue together or fold. Use new envelopes or recycle ones you get in the mail. Every size, shape and color of envelope lends itself to creativity.
Birthday Calendar Album
(Uses 6″ x 9″ catalog envelopes)
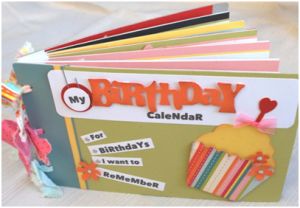
Envelopes are perfect for easy albums. Choose the size of envelope you want and create a cover (the same size or a little bit larger) with chipboard (recycle with food packaging like cereal boxes). Punch holes through one end of the covers and envelopes and bind with ribbon, fabric or metal rings.
Tuck and adhere flap to inside of envelopes. You can either use one envelope per page or adhere two envelopes together for added strength and double the pockets. Cover each page with paper and embellishments.
Punch half circles at the end of each page or add a tab for easy access and organization of your pages.
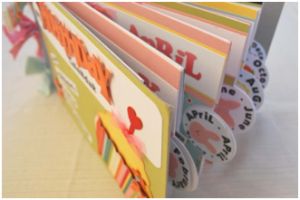
Here is an example of a Birthday Calendar Album. Each page features a month and photos of the people/birthdays I want to remember. Each page is made of two envelopes adhered together creating two pockets. The pockets have monthly inserts for more notes and space for birthday cards.
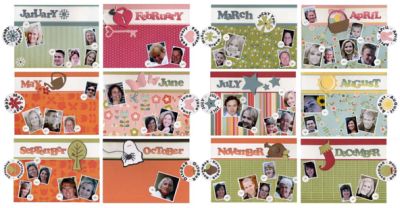
Use a software program to print out thumbnail photos of your friends and family. Mat on white cardstock and adhere to each page.

Print out ‘birthdates’ on white cardstock and punch out with small circle punch. Adhere next to photos for a quick and easy way to remember birthdays.
“Friends Understand” Gatefold Card
Fold a Legal size envelope gate-fold style (both ends meet in center). Open and cut flap along fold lines. Adhere both end sections down. Lift up middle flap and fold end sections in . Flap will lay over the entire card. Adhere some kind of embellishment (it will lend some weight) at center of flap to keep it down.
“My Girlfriends” Mini Album
Cut legal sized envelopes down to 3″ (or whichever size you wish). Fold at least 3 of them in half and adhere them back to back to create the pages. Cut a piece of cardstock a little longer to create the cover. Adhere the pages to inside of the cover. Cover pages with paper and embellish for a sweet little album to keep or give away.
“So Sweet” Pocket card
Fold a 6″ x 9″ catalog envelope (with flap along the length) in half. Cut flap at fold line. Adhere the left-hand side flap down and cover that side of the inside of card. Cover the front of card as well.
Create a closure to right-hand side flap. This is a nice, roomy pocket to fill.
Some things to tuck into a card pocket:
• Gift card
• Real, hard, cash
• Individual Gourmet tea bags and/or hot chocolate
• Seed packets
• Candy, gum or chocolate
• Hand-written note or poem
• Small set of note cards
• Coupons (homemade)
• Pot pourri or small perfume packets
• Jewelry
• Bookmarks or fridge magnets
• Photos
Susan Neal has a passion for paper and food. Both present an opportunity to be creative and make other people happy. She has spent the last 20 years sharing that passion with students and customers alike.
She has authored 4 decorative painting books and designed hundreds of projects for several scrapbooking and paper crafting magazines and publications. She has also started several successful retail businesses.
Susan is also teaching her own series of card-making classes at eight of the local Roberts Arts & Crafts stores. To learn more about Susan please visit her blog, www.sueneal.blogspot.com.


Add comment