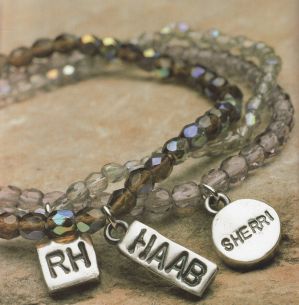
Sherri Haab is a professional jewelry maker and explains how to make your own silver metal charms.
Supplies:
PMC3 silver metal clay (pmcsupply.com)
Work surface-Teflon sheet
Roller (pmctoolandsupply.com)
Olive oil
Water
Playing cards or matt board
Small clay cutters or cookie cutters
X-Acto knife
Letter Stamps-metal or rubber
Needle tool, awl or cocktail straw
Mug or candle warmer to aid drying
Small paintbrush
Nail file
Fire brick
Kiln or butane torch
Brass brush (Freshmans.com)
Polishing papers (pmcsupply.com)
Burnisher
Patina Solution
Buffing pad (Rio Grande Jewelry Supplies)
Jump rings and chain for finished piece
Steps:
1. Roll out a sheet of clay about 4-5 cards thick.
2. Stamp letters in the clay to spell a name or word. Always oil rubber stamps to prevent sticking.
3. Cut out shape around letters or use cutter.
4. Add small balls of clay or stamp additional designs as desired, using water to make attachments.
5. Make a hole in the clay for hanging using a needle tool or awl. Use a cocktail straw to make larger holes. Alternatively you may add fine silver hooks.
6. Let the charm dry for a few hours or use mug warmer to speed things up (about 30 min).
7. Refine the edges with a nail file and water to smooth. Clean up any surface mistakes with water or sanding.
8. Fire the piece in a small kiln or other firing device. PMC3 allows you to use a simple butane torch if you don’t have a kiln. Fire the piece on a fire brick for 2 minutes, keeping the piece glowing red-orange the entire time. Be careful not to overheat and melt the silver. (The silver will start to shimmer before melting).
9. After firing, cool the piece and brass brush to burnish. Use sanding papers and burnishing tools for more shine if desired.
10. Patina the piece with Black patina solution or liver of sulphur as directed by manufacture. Both are toxic, use full safety precautions and keep away from children. Buff the black off of raised areas, leaving the recessed letters dark.
11. Use a jump ring and pliers to attach the charms to a charm or necklace chain.
For more information on making charms or to see more of Sherri’s work, you can visit her website:
ww.sherrihaab.com
© Sherri Haab; author of The Art of Metal Clay and Metal Clay and Metal Clay and Mixed Media Jewelry


download de imagem de computador instagram
lejupielādēt instagram ziņu uz tālruni
ios instagram şəklini yükləyin
david laid
download instagram video
download instagram video
download instagram video
download highlights from instagram
fraser wilson
where can i get snake eyes tongue piercing near me