
Shelli Gardner, CEO of Stampin’ Up!, says a big trend is to use stamps in home décor. She shares ideas for a couple of projects she has in her own home.
Technique #1: Add Color and Texture
Inexpensive pieces of furniture are often plain, one-color bargains. They’re easy on the pocketbook but not so pleasing on the eye. However, in only a few minutes, you can add value—and appeal—to almost any piece of furniture simply by stamping.
Stamping on furniture adds both color and texture to pieces that might otherwise look dull and boring. You can stamp a single image, to draw attention to the image you’ve selected, or you can stamp a design or pattern on your piece.
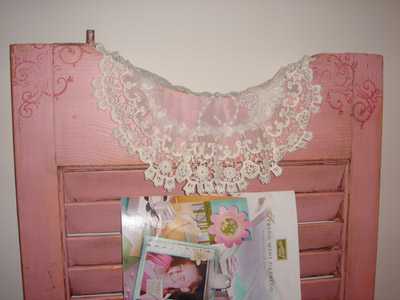
To do this, select a piece of furniture that needs a little livening up. Shelli selected an antique shutter.
She prepped the surface by first applying a layer of pink paint over the orange, sanding, and then setting the paint with a glaze.
Next, she chose a stamp image from Stampin’ Up!’s Baroque Motifs set and a color (a rust/red) that coordinated with the decor in her stamp studio, where she uses this piece of furniture to hold her Stampin’ Up! mini catalogs.
Using a paintbrush (you can also use a foam brush), Shelli brushed the paint on the stamp and randomly stamped a pattern that appealed to her. She applied new paint every time she stamped an image.
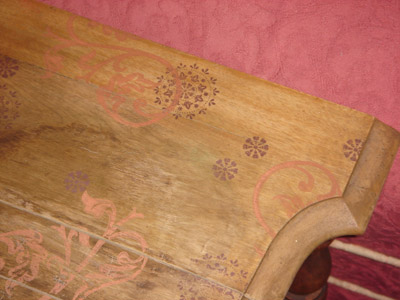
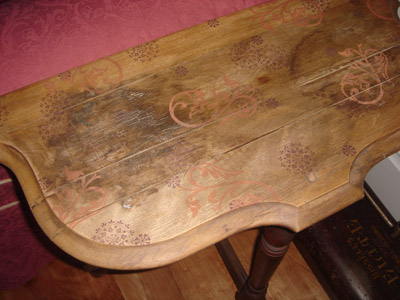
Shelli started her end table project by cleaning the table, especially the top. She loved the rough and weathered look and feel of the table, so she wanted to preserve that. However, she also needed to smooth out the surface so the stamped image would adhere better, so she sanded the table lightly for approximately 30 seconds. Next, she applied a glaze to seal the wood prior to stamping.
For this project, Shelli selected three images—the flower and circle images are from the Wanted set and the swirl image from the Brocade Basics set. She painted the images in dark brown and rust/red, again because the colors coordinated with the décor of her stamp studio.
Technique #2: Two-Step Stampin’
If you’re like most women, updating the design and style of your home is an ongoing process. You finish one room, and there’s always another one that feels outdated. There’s nothing like changing the colors of your walls or laying down new carpet to make a room feel fresh and new. However, that can be both costly and time consuming.
If your budget and calendar can’t handle the strain of a complete design overhaul, consider simply updating a piece of furniture or two. With Stampin’ Up!’s own Two-Step Stampin’© technique, you can create a stunning, professional image easily and quickly.
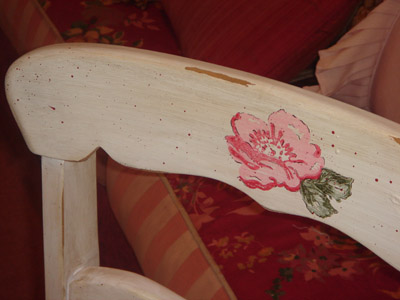
To illustrate this technique, Shelli took a chair that she’s had for years. Previously it had a sunflower stamped on it, but since Shelli is now, in her own words, “past her sunflower stage,” it’s time to update. Prior to stamping it in the first place, the chair was a simple wood chair, and Shelli had applied a coat of white paint and let it dry. Then she sanded it around the edges and corners to create a distressed look. Finally, she carefully applied a glaze.
For this update, Shelli chose rose and leaf images from our Wild Rose set. For this technique, you stamp the lighter image (coral for the flower and moss green for the leaves) first, then stamp the darker, detail image (rust red for the flower and dark green for the leaves) right on top of the first image. You can use a Stamp-a-ma-jig to make sure you’re applying the second image precisely where you want it. To complete the look, Shelli took a paintbrush and splattered colors to add additional texture to the piece.
After stamping images on all of these pieces, Shelli applied a spray sealant, to protect the images and ensure they don’t come off.
![]()
Contact a Stampin’ Up! demonstrator at https://www.stampinup.com/
or call 1-800-STAMP UP!
Join us at the Stampin’ Up! kiosk in Fashion Place Mall through August
to create a FREE handmade card for your next occasion!


Add comment