
Brett Lund from Robert’s Crafts shows us how to make crafts for your home.
Dry Erase Vinyl Board
Created By: Brett Lund
Skill Level: Beginner
Time to Complete: 1 hour

Supplies:
• 12 x 12 frame
• Cricut Cartridge
• Black vinyl
• Transfer tape.
• Piece of patterned paper.
• Gypsy or Design Studio by Provo Craft
Instructions:
Note: the instructions for the following project were done using the Gypsy. The project can be completed without using the Gypsy, it just requires a little bit more “cut and paste.”
1. Using the Gypsy, make the letters 1″ tall.
2. Type the words into the Gypsy, and arrange them together. Using the Gypsy, play around with the letters and words until you find what you want.
3. Spaced them apart and use the 12×12 mat and imagine the mat as your piece of paper. Because the frame that I used was a 12 x 12 frame, the paper fits perfectly.
4. Decide what the vinyl is going to look like and cut it out on your Cricut machine.
5. Once it is cut out, use the pick from your Cricut Tools set to “weed” out the extra vinyl, so all that is remaining is the positive image on the sheet.
6. Next, take the transfer tape and separate the sticky side from the smooth side. Line up the sticky side on top of the vinyl and press down and burnish the vinyl on the transfer tape.
7. Peel off the transfer tape, making sure the letters are stuck on the transfer tape.
8. Place the transfer tape on top of the sheet of 12 x 12 paper.
9. Burnish all of the letters onto the 12 x 12 sheet of paper.
10. Pull off the transfer tape, making sure all the letters remain on the 12 x 12 sheet of paper.
11. Put the piece of paper inside your frame. Secure the back of the frame.
12. Use a dry erase marker to write your menus on the glass. When the week is over, you can erase them with a dry erase marker or a paper towel. If the marker doesn’t easily come off, you can use a baby wipe to clean the glass.
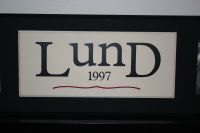
Interchangeable Vinyl Plaque Board
Created By: Brett Lund
Skill Level: Beginning
Time to Complete: 1 hour

Supplies:
• “Everyday Expressions” magnet board with 2 photos
by Boulder Innovations
• Mag Sign Unfinished
• Ivory acrylic paint
• Black vinyl
• Red vinyl
• “Plantin Schoolbook” Cricut® cartridge
• Sandpaper
Instructions:
1. Using the Gypsy, design the family name altering the size of the first letter and the last letter of the name. The first and the last letter is 2.73″ x 2.27″. The middle letters are 2.73″ x 1.82″ The numbers are 1.46″ x .73″. The swirl on the bottom of the name is 5.73″ x 1.01″
2. After you have placed the vinyl on the cutting mat, cut out your vinyl using the appropriate settings.
3. When the cutting is complete, “weed” the extra vinyl off the sheet.
4. Peel off the backing off the transfer tape, and attach the transfer tape to the vinyl.
5. Burnish the letters to make sure they are stuck onto the transfer tape. Set the vinyl to the side.
6. Paint the plaque in ivory or any other color that you would prefer. Let the plaque dry completely before you apply the vinyl.
7. Once the plaque is dry, apply the vinyl to the painted plaque.
8. Sand the edges of the plaque to give it a distressed worn look.

For other craft ideas and to find a Robert’s Craft Store near you go to: www.robertscrafts.com


Add comment