Re-useable shopping bags just to save the planet? Are you kidding, we can
do so much more. A better, cheaper, creative canvas you could NEVER find
at a fabric store. And it costs just $1!
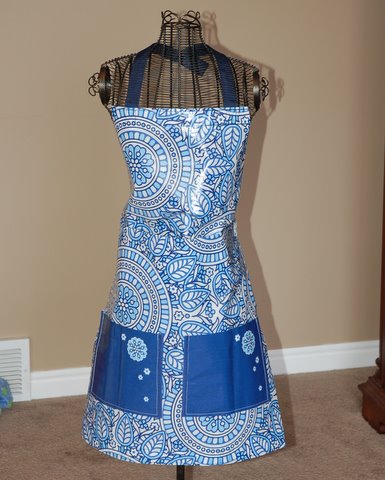
Today’s bright and colorful shopping tote patterns spoke to the creative
soul of one Studio 5 contributor. Risa Baker turns an everyday shopping
bag into funky, tote-ally stylish accessories.
This is easy and inexpensive gift to give a friend or teacher. This apron can
do double duty in the kitchen and the yard. You could even make these
with your daughter and her friends.
All you need is a reusable shopping bag, and about 10 minutes!
Step 1:
Cut the sides out of a reusable shopping bag, leaving the raw edges on the
main body of the bag.
Step 2:
Find a mirror, and hang one side of the shopping bag around your neck.
This will be the top of your apron.
Step 3:
Fold the bag up until you reach the desired length for your apron. Your bag
will naturally fold along the bag’s bottom (the dark blue pictured above.)
I like to leave the folds unfinished, because this will act as extra storage
pockets. If it bugs you, all you need to do is sew it closed, and cut the
excess from the back of the apron.
Step 4:
Cut the strap off the bottom of your apron.
Then, cut the strap in half. This will be your side ties. I know it looks small.
Depending on who you are making this for, you have a couple options:
1) If it is for a child, or smaller woman, you can leave it, to be tied in a
small knot in back.
2) You can add Velcro to each side strap.
3) You can replace the straps with your favorite ribbon.
I just used the small straps.
Step 5:
Pin the strap where you want it on each side.
Step 6:
Fold the apron in half long way, and cut off the sides.
It will look like this when it is open.
Step 7: Pockets!
Take the side pieces you cut off in the beginning, and lay them with the top
up on top of the apron. Decide where you want them, and how long you
want them to be.
Cut off the bottom, and pin to the apron.
Step 8:
Sew each side together. Sew around the sides and bottom of each pocket.
Step 9:
Sew the straps in the same manner they were sewn to the bag originally.
Try on your apron, and decide if you want Velcro on the side straps, or
what you want to do.
Have fun looking sassy in your new apron that you are not afraid to get
dirty!
Was that the easiest 10 minutes you ever spent on a project? When I
showed this to my friend, she said she wanted one for when she makes
dinner, because it would be so nice to be able to just wipe it off when you
are finished! I agree. This apron looks like it was purchased at a boutique!
It can be our little secret.
Enter to win today’s Studio 5 shopping bag apron at Risa Baker’s blog:


Add comment