Studio 5 Contributor Kiersten Blanchard shows five new ideas.
Jack-O-Lantern Whoopie Pies
Needed:
Yellow (or white) cake mix
½ cup vegetable oil
2 eggs
Orange food coloring
Yellow food coloring
White frosting
Round frosting tips, straws, knives (Wilton has Jack-o-lantern face cutter kit)
Orange sugar (available at craft stores)
Green licorice
Directions:
In a small bowl, mix together the oil, eggs, and orange food coloring. Preheat oven to 350°. In a medium bowl, add the oil mixture to the cake mix. Mix together until well blended. Using a small cookie scoop, scoop dough onto a cookie sheet (12 at a time) and bake at 350° for 7-9 minutes. If you don’t have a cookie scoop, roll into small balls. Do not over bake! They should be soft even when cooled. Yields approximately 26 halves.
Allow to cool for a few minutes. If they are still mounded, I use the bottom of a glass measuring cup to flatten them slightly. Cool completely. Using small shapes, cut faces into half of the cookies. I used round frosting tips and straws for the circles. I used a knife to cut triangles and straight edges.
Mix yellow food coloring into the frosting. Generously frost the wrong side of each of the cookies that doesn’t have a face. Place a Jack-o-lantern face on each one and press the two sides together until the frosting starts showing through the openings. Roll the edges of the cookie in orange sugar so that yellow frosting is no longer showing on the sides. Cut a pumpkin stem out of green licorice and carefully insert into the top of the jack-o-lantern.
Nutter Butter Boo Buddies
Needed:
Nutter Butter cookies
White almond bark* (ghost and skull)
Black decorating gel or chocolate frosting (ghost, skull, and bat)
Good & Plenty (skull)
Brown almond bark* (bat)
1 ½” chocolate dipped cookies (I used Keebler Grasshopper cookies)
Candy corn tips (bat)
Yellow M&M minis (bat)
Red frosting (bat)
Wax paper
*In lieu of almond bark you can use white or semi-sweet chocolate chips. Add a small amount of Crisco as you melt to make the consistency smoother. Don’t add too much or your chocolate won’t harden completely.
Directions:
Ghost: Melt white almond bark. Dip cookies in the melted bark, covering completely. Gently shake to remove excess coating. Place on wax paper. Allow bark to harden completely. Using decorating gel or chocolate frosting, create eyes and a mouth on each ghost.
Skull: Melt white almond bark. Dip cookies in the melted bark, covering completely. Gently shake to remove excess coating. Place on wax paper. Place three white Good & Plenty candies to create mouth before bark hardens. Allow bark to harden completely. Using decorating gel or chocolate frosting, create eyes and a nose cavity on each skull.
Bat: Melt brown almond bark. Dip cookies in the melted bark, covering completely. Gently shake to remove excess coating. Place on wax paper to harden. Decorate each bat face. Cut the white tips off of candy corn. Pipe a red frosting mouth onto each bat and attach the fangs. If you are having a hard time getting them to stick, dip the back in the melted almond bark and use as an adhesive. Dip the back of each yellow eye in the bark and attach to the face. Draw black dots on each eye using decorating gel or chocolate frosting. Dip your finger into the bark. (At this point it should be cooling off.) Create the bat ears by touching a bark-coated finger to the top of the bat’s head and drawing away slowly to leave a point. Attach the face to the body using melted bark.
Creepy Brain Cupcakes
Needed:
Cupcakes
Grayish frosting
Medium-sized round decorating tip (I used Wilton #5)
Red decorating gel (optional)
Gummy critters (optional)
Directions:
Frost a mound of frosting on top of the cupcake. Using a round tip, pipe frosting in a brain-like pattern. I started with a line down the center to create the two hemispheres. I continued around the perimeter and then wound back and forth filling it in. The lines should be squiggly, so a steady hand isn’t even a must. Finish off with red decorating gel for blood and gummy critter crawling out.
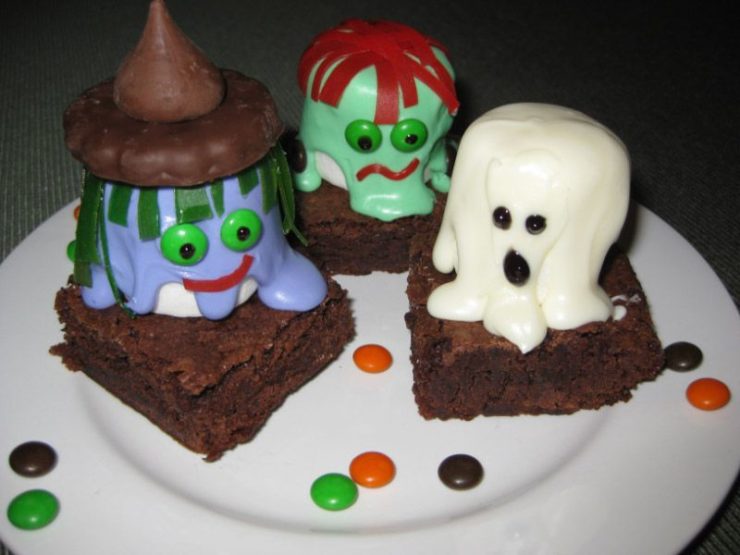
Marshmallow Monster Brownies:
Needed:
Brownies (unfrosted)
Large marshmallows
White frosting
Food coloring (green- Frankenstein, purple-witch)
Black decorating gel
Toothpicks (optional)
Fruit rolls (Red-Frankenstein & witch, green-witch
Green M&M minis (Frankenstein & witch)
Brown M&M minis (Frankenstein’s bolts)
Hershey’s kisses (Witch)
Keebler Grasshopper cookies (witch)
Directions:
Place a marshmallow on each brownie. You may secure with a toothpick if you’d like. Just remember to remove it before eating. Color your frosting green for Frankenstein, purple for the witch, or leave white for the ghost. Warm frosting in the microwave until it is smooth and melted. Do not overheat. Stir frosting. Using a tablespoon, spoon frosting over the marshmallow until it drips down the sides. Let cool. Create the face. For the ghost, use black gel to create eyes and a mouth. For the witch, cut green fruit rolls for the hair. Attach green M&M minis for the eyes and put a gel dot on each. Use red fruit roll for her mouth. Using frosting, attach an unwrapped Hershey’s kiss to the Keebler cookie for the witch’s hat. Use frosting to attach it to her hair. For Frankenstein, cut red fruit rolls for the hair. Attach green M&M minis for the eyes and put a gel dot on each. Attach brown M&M minis on either side of his neck for bolts. Use red fruit roll for his mouth.
Silly Skeleton Cupcakes
Needed:
Cupcakes
Thick white frosting
Sprinkles or orange sugar (optional)
Lollipop sticks
Large marshmallows
White yogurt dipped pretzel twists (Flipz pretzels don’t work well)
Serrated knife
Black food safe writer (or decorating gel)
Directions:
Frost each cupcake but reserve some frosting for assembling the skeleton. Trim about 2 inches off of the lollipop stick so it’s not too long. Press the flat side of each large marshmallow to flatten a bit. Insert a stick into the round part of the marshmallow. Draw a skeleton face on the flat side of the marshmallow. Begin placing the smallest hole of the pretzels through the sucker stick, using dabs of frosting to hold each in place. If using store-bought frosting, you may need to add some powdered sugar. You want it to be very thick! Repeat with 3 pretzels. Place one final dab of frosting under the third pretzel. Stick the skeleton in the cupcake. Create 2 arms by carefully cutting the top humps off of 2 pretzels. (Using a serrated knife will help avoid broken pretzels. Even then you may have a few casualties, so be prepared to munch while you create.) The result will be flattened double arches. Dab a bit of frosting on the end of each and place them in the ribs of your skeleton for arms.


Add comment