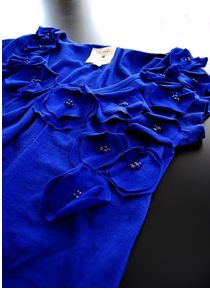
Jen Hadfield, Tatertots and Jello blogger, explains how to refashion a t-shirt for this spring.
Directions:
1. I scouted around for some cheap t-shirts in spring colors. I found these at Forever 21 for $4.50 each. I bought two — one for the t-shirt and one to cut up.
2. To attach flowers to the shirt first sketch out what you want the shirt to look like. This will help you decide how many flowers you want to make. If you do not want the shirt too symmetrical have the design be a little bigger on one side and go down the shirt at an angle; but you can do anything you want – that’s the fun in shirt refashions!!
3. You will want to cut out some circles to use as templates for the flowers. I have a plastic template that I bought a few years ago to use with scrapbooking. I traced the circles onto thick paper. I cut out four circles — 1 inch, 2 inch, 3 inch and 4 inch.
4. Next, cut your extra shirt into sections of material. I started with the largest circle. I put the circle on the material and cut a square around the circle. Then I placed that square on top of the material and cut out a second the same size, I did this until I had as many squares as circles that I needed for the shirt. I stacked the material one on top of the other. Then I pinned the circle on top of all of the layers. I found that it was easier to cut out many layers than just one since the single layer was so thin. Then I cut out the circle with all of the layers. Do this with each circle size.

5. Once the circles were cut out, lay them out on the shirt. You will want to put two circles together on each flower. Then I got my beads out. I chose beads that matched the shirt for a subtle look – but you can put contrasting beads on for a little more bling. It’s one way to really add your personality to your shirt!
6. I took each flower and folded it in half with both layers inside. Then I took my needle and thread and made 4 stitches in the center of the back of each flower. Then I folded it the other way and made four more stitches. This makes the flower pucker a little on the shirt so the flower doesn’t just lay flat. Then I took my needle and put it through the center of the flower — up through the front side. I attached a bead and put the needle through the back, then up the front and another bead and then back through the back of the flower. I attached 5 beads through most of the flowers. (Some of the smaller flowers only need 3 beads.)
7. Once I had all the beads strung on the flower, I placed the flower back on the shirt and attached the flower to the shirt with my needle and thread. I also basted the larger flowers to the shirt if they were flopping around. You can put the flowers on and see how it looks. If you need to baste some of the flowers later you can always do that. You can also use liquid stitch to do that later if you want.
Visit Jen’s blog www.tatertotsandjello.blogspot.com for more do it yourself fashion ideas.


Add comment