
Designer Tausha Hoyt with Sassy Style Redesign shares fun ideas to turn your trash into treasure.
It’s just garbage, junk and trash! Maybe not. Some ideas that might just make you look at your junk and go hmmm……
Bi-fold Doors Make Chic Home Accessories
You all have seen these. Whether you have old or new doors, I have a twist on their reason for existence. I have a space above my kitchen counters. You know the space I’m talking about. The one that you want to decorate, but you don’t want it too look like there is too much stuff? I have a friend who was getting rid of 2 new-in plastic bi-fold closet doors. She asked if I wanted them and I practically yelled yes!!
I primed the door, then spray painted it with a golden yellow color. Then I beat the crap out of it with a chain. It was very therapeutic. I highly recommend that all of you try this.
I finished it off with a quick coat of creamy, brown glaze and I was done. A very quick, easy and awesome piece of art!
Total Cost was $5!
Another use for bi-fold doors is to make them into a room screen. I found 2 sets of bi-fold doors at the DI years ago. I took them home and painted them red first then I used a black over the top. I wanted it to look a little old, but not too old.
I then begged my husband to install some piano hinges so the doors would fold both in and out. We ended with a screen that works fantastically to hide my husband’s office, which he wishes wasn’t in the family room! Now, when you walk into the room, you can’t tell there is anything behind it. It looks like a custom, decorative piece of furniture.
Scrap Wood Turned Catalog Worthy Shelf
Now-I love Pottery Barn. Who doesn’t? I love to look through the pages and wish that I had hundreds of dollars to spend on all of their fabulous stuff. Alas-I don’t, so I must make my own. I love these shelves.
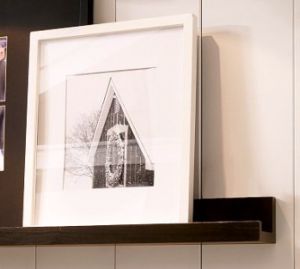
The $55 price tag-not so much.
I commissioned my husband to make me some. With some scrap wood from the Home Depot and the loving directions from me, we ended up with our version of the Pottery Barn ledge shelf.
Total cost for the shelves-$3
I purchased my wood from the scrap pile at Home Depot. But if they don’t have any of the right size wood in the scrap pile, the shelves are still pretty inexpensive to make.
Supplies needed for (2) 4 ft. shelves (of course you could make shorter)
1×3 for the bottom of the shelf-
1×4 for the top
A thin piece of molding- I used the plastic kind. Just something to give it a ledge.
You nail it all together, prime, paint, then screw into the wall.
If you want more detailed instructions and pictures-you can read about here on my blog.
sassystyleredesign.blogspot.com
Price if you can’t find what you need in the scrap bin:
$13.00
This includes quality wood, molding, primer, and spray paint.
Old Wagon Turned into Tray
I love this! I love it because it is such a versatile project. You can use it in your family room or in a kids room or in a game room, really, wherever you want. Find an old wagon. This might be a little trickier that you might think. Don’t give up, keep looking!!
Once you find the wagon-ask your husband nicely to cut off the all of the hardware. The wheels, handles etc. Scrub it out. If your wagon has rust on the inside like mine did-you will want to clean it with baking soda, vinegar and a scrubby sponge. Do this outside, in crappy clothes & with the hose. When you are done cleaning-rinse well and let dry.
Because of the amount of rust damage in my wagon, I chose to prime and spray paint just the inside of the wagon. I did this so the rust wouldn’t transfer to anything that I put in the tray. All of the other rusty, chippy parts that are on the outside of the wagon, I left alone. I liked the character that it added, but it’s totally up to you. I finished it off with a good 3 coats of clear polyureathane, so nothing else would chip off. I added some fun handles to the side of the wagon. Perfect in a little boys room with books or stuffed animals in it. You could also use the wagon’s wheels for book ends. Really, the options are limitless.
Old Books that will Deserve a 2nd Look.
Cover your old books with fabric. You could use paper. I just prefer the fabric so I don’t have to piece them together. I added some “fluff” to make them cute. This is where you could really get creative and customize your books. You could use old hardware, hinges, fabric, lace, zippers. Go crazy!! I used Gorilla glue Epoxy to adhere the metal to the spines of the book. A tip when doing this, you want to make sure that the books that you are using have somewhat of a larger spine. These don’t look as cute, or work as well if you use skinny books. You can also make a set up for Halloween. Really fun to display, plus your kids will love them!
So, next time you look at a bunch of old stuff, think; “what could I turn this into?” You will be surprised what you can come up with!
If you are looking for fun ways to give your home an updated fresh look, contact Tausha at Sassystyleredesign.blogspot.com


Add comment