Don’t break the bank on Christmas decorations when you can make your own!
In a Studio 5 “1 Day 5 Ways Challenge”, five talented bloggers share unique ideas to transform glass ornaments into unique holiday décor.
Kami Watson/Sweet Charli
I love the thought that you can glue anything to the outside of your glass ball ornament and it will transform it completely. I used two different mediums to transform my ornaments.
Twine & Tinsel- This is so cheap and so easy! You need to find some twine-like rope, I used natural jute. Start at the top where the hanger is and put a small dab of hot glue. Then begin winding the jute around the ball and put a dab of hot glue every one or two times you wrap it around to hold it in place. Once you are about 1/3 of the way down your glass ball, cut the jute and glue the end. Next, fill your ball with tinsel!! I just put a bunch in the top and then took a pencil and stuffed it in. This ornament looks so darling on your tree because it is a mixture of a natural element (the jute) and a sparkly element together! There are so many different varieties and colors you can do with this!
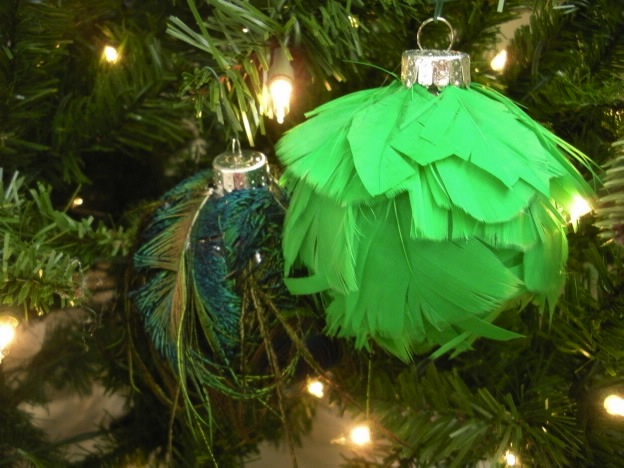
Feathers- These feather ornaments will be a conversation piece on your tree for sure! Use any feather color of your choice, you can even use peacock feathers! The craft stores have bags of all different color-sorted feathers, I picked up mine from JoAnn’s. Start at the bottom of your ball and put hot glue onto the stem of the feather then place on the ball with the feather pointing downwards vertically. Make sure you only place hot glue on the stem, this makes the feathers flare out giving it that soft, textured look. As you move up the ball, overlap your feathers and as you get towards the top of the ball, use smaller feathers. Feather ornaments looks so beautiful on your tree and will stand out because they are soft unlike most of the other ornaments.
I am Kami Watson and I am behind the blog, Sweet Charli. I love being able to take something ordinary and put my own little twist on it to make it extraordinary! On my blog you can find simple projects that are done on a simple budget. When I’m not crafting or sewing, you can find me playing dress-up with my two girls, baking for my sweet husband, exercising, and last but certainly not least, feeding my face with chocolate! Come over and visit my blog at sweetcharli.blogspot.com
Vanessa Barker/Our Thrifty Ideas
Make fun and personalized ornaments for your tree this year. You can customize the snow globe to be whatever you’d like. The best part is that you could possibly have all the items around your house already.
You will want to get a holiday embellishment of some sort. Just make sure that it is skinny enough that it will fit in thru the small hole at the top. I used a Cricut cutter and cut out my Christmas Tree to 2.4 inches wide and about 2 inches tall.
Once you are sure your embellishment will fit into the glass ornament, hold it completely upright and slowly drop hot glue onto the bottom of the bulb. Then quickly put the embellishment into the ornament and using tweezers hold it into the hot glue while it cools and holds the embellishment in place.
Once the glue is completely dry, pour sugar into the bottom of the bulb to create the “snow globe” appearance. Replace the top to the ornament and tie coordinating ribbons or twine onto the top for hanging.
You can use the new snow globe as decor, ornaments for your tree, or as a fun wreath for your front door. Whatever you do with it, make it fun and unique to your personality!
For more projects, check out www.ourthriftyideas.com
Staci Potter/The Potters Place
When I received these ornaments my mind got going with a million different ideas. Then I heard, “Mommy, we want to help!” That was it. Christmas is about making memories and what better way to have my girls help with the challenge and create a memory? My girls love to draw so, we grabbed a few Sharpies (permanent markers) and let them draw whatever they wanted. It was perfect. The permanent marker stayed on the glass bulb. Then being the person that I am (I can’t leave things alone) I added a little accessory to the top of each ornament. On one ornament, I added yarn pom poms. These totally remind me of my childhood. All you have to do is wrap yarn several times around your fingers/or your kids fingers and then tie the bundle in half with a good knot. Then, cut the ends and fluff them to form a pom pom. For the other ornament I added a junk bow. A junk bow is a combination of anything you can find. Just tie it with a ribbon or tulle and you are set. Both accessories are super easy and my girls helped with them. I love that we were able to decorate together and create a new memory.
If you want to find more DIY projects go to www.thepotters-place.com.
Michelle Barneck/A Little Tipsy
Sometimes it is the simple things that can make the biggest impact. This project takes a simple green sprig and transforms it in to something interesting and beautiful. All you need is a clear glass ornament, a sprig of greenery, a chopstick, a red ribbon and about a minute.
Slowly remove the metal ornament top to reveal the opening to the glass bulb. Carefully insert the greenery with the needles pointing in to the bulb. This will seem unnatural, but it is so the bare end of the sprig will be hidden. Use your chopstick to push all the needles through and in to place. Replace the metal ornament top and tie a bow around it with the red ribbon.
These ornaments are not only great for the tree, but are also fun to hang in frames, line up on rolls of washi tape, or use as filler for a lantern or bowl.
For more DIY decorating ideas visit Michelle on her blog alittletipsy.com where she shares creative tips and ideas for moms on a budget and on the go.
Wendy Hyde/The Shabby Nest
Find out more at www.shabbynest.blogspot.com


Add comment