Studio to 5’s Jennifer Heslop has found many ways to re-use, repurpose and recycle old LP’s. Here is her list of ideas and how-to’s:
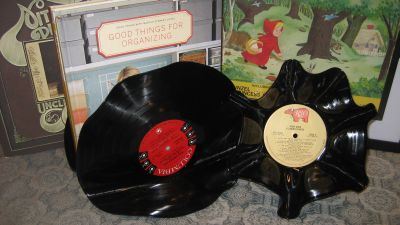
1. Record Bowls: Preheat oven to 225 F. Place a small, oven safe bowl upside down on a cookie sheet. Lay record on top of bowl, making sure the record is centered on the bowl. Place the cookie sheet, bowl and record into the oven. Record will begin to soften and collapse around the bowl. This process only takes a minute or two. Using an oven mitt, or leather gloves, remove record bowl from oven. Use your hands to hold it in shape as it cools. The vinyl cools quickly, so work fast! This same process can be used using clean, empty soup cans- just roll the record around the can. Bowl is not dishwasher safe.
2. Book-end: Preheat oven to 225 F. Lay record flat on cookie sheet. Place in oven, and watch closely. As soon as the record begins to soften- remove from oven. Lay record over the edge of counter or table and bend to a 45 degree angle.
3. Coasters: Using a jigsaw or Dremel, cut out center of record. Follow the edge of record label. Sand edges smooth and cover label with clear adhesive to protect. Cover the back of the coaster with felt or cork. Not dishwasher safe.
4. Headboard: Save the record jackets and frame in record album frames (found at craft stores). Frame several, and hang with frames touching. Hang directly behind bed, creating a large rectangle. Trim out with molding, if desired.
5. Valance or curtain: Drill or punch a hole at top, bottom and sides of record. Spray paint in desired color. Attach records using binder rings. Clip records horizontally together for a valance, or vertically for curtain, drapery effect. Attach to curtain rods using curtain rings.
6. Wall hanging: Using the valance, curtain technique above; attach several painted records in a square pattern to create wall art.
7. Coat rack: Mount record to wall using painters tape. Attach a hook to the wall, inserting the screw through the hole in the center of the record. Remove painter’s tape.
8. Throw pillow: Drill or punch holes around edges of record. Using heavy thread or floss, stitch record onto an existing throw pillow.
9. Gold Record: Spray paint record with metallic gold paint. Create custom label for center of record. Frame in album frame.
10. Message center: Use chalkboard paint to paint record, creating a unique chalkboard, or cover record with cork to create a bulletin board.
11. Earring organizer: Drill or punch holes in desired pattern through record. Attach eyelets through holes. Glue a small round mirror (available at craft stores) over record label. Set on easel and hang hook-type earrings through holes.
12. Picture Frame: Using a jig-saw, cut out center label of record. Cut off approx. three inches from bottom of record, creating a straight edge. Glue an inexpensive plastic frame to back of record. Insert picture into frame. Make sure picture lines up with center cut-out.
Studio 5 Contributor Jennifer Heslop loves turning trash into treasure. She is handy with a hammer, and has a knack for saving a dime by doing it yourself! If you have questions for Jenn, e-mail her at studio5@ksl.com


Add comment