Amy Goffin from Pebbles in My Pocket has the solution with arts and crafts projects
perfect for a variety of occasions.
You can purchase the Kids Craft projects in kits, available at all Pebbles in my Pocket stores and at www.pebblesinmypocket.com while supplies last.
Bug Door Hanger
“March on IN” side:
Using a Black Fine Tipped Marker, draw lines around the edge of the Door Hanger Die Cut, around the hole on the Door Hanger Die Cut, and around the edges of the yellow “March on” paper. Adhere “March on” paper ¼” from left edge of Door Hanger Die Cut and 1¼” from bottom edge of Door Hanger Die Cut. Adhere Red IN Die Cut Letters below “march on”. Adhere Ant Die Cuts onto Door Hanger Die Cut.
“BUG off!” side:
Using a Black Fine Tipped Marker, draw lines around the edge of the Door Hanger Die Cut, around the hole on the Door Hanger Die Cut, and around the edges of the yellow “off!” paper. Adhere “off!” paper ¼” from left edge of Door Hanger Die Cut and 1¼” from bottom edge of Door Hanger Die Cut. Adhere Spring Green BUG Die Cut Letters above “off”. Adhere Red Ladybug Wing Die Cuts to Black Ladybug Body Die Cuts. Wrap front end of Black Strips around Marker for the ladybugs antennas and adhere antenna to the back of the Black Ladybug Body Die Cuts. Adhere Ladybug Die Cuts onto Door Hanger Die Cut.
*Supplies not included in kit:
-Black Fine Tipped Marker
-Adhesive
Bird Paper Plane
Fold White Circle Die Cut in half. Using scissors, cut ¾” slits ¼” apart around White Circle Die Cut and ¼ White Circle Die Cut. After, bend strips up. Adhere pointy side of ¼ White Circle Die Cut to back of round side of White Circle Die Cut. Using the rubberband, band the two spoons together with the back of the spoon facing outwards. Adhere White Circle Die Cut centered onto handle of spoon. Tie ribbon onto spoon, covering rubberband. Using Bright Orange Paint, paint the top and back front of the spoon orange for the beak of the bird. Using a Black Slickwriter, draw two dots onto front of spoon for eyes of the bird.
*Supplies not included in kit:
-Pebbles Inc. Bright Orange Paint
-Foam Brush
-American Crafts Black Slickwriter
-Double Stick Tape
-Scissors
Flower Magnets
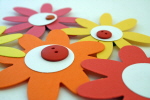
Adhere White Circle Punches onto center of Flower Die Cuts. Place brads or buttons onto center of White Circle Punches. Place magnets to back side of Flower Die Cuts.
*Supplies not included in kit:
-Adhesive
Sports Magnets
Stars:
Place brad through Yellow Star Punch. Place magnets to back side of Yellow Star Punch.
Soccer Ball:
Adhere White Soccer Ball Die Cut to Black Soccer Ball Die Cut. Place magnet to back side of Soccer Ball Die Cut.
Basketball:
Using a Black Marker, trace dotted lines on Basketball Die Cut. Place magnet to back side of Basketball Die Cut.
Football:
Cut on edge of dotted line on darker brown Football Die Cut and adhere onto lighter brown Football Die Cut. Adhere darker brown Football Die Cut behind lighter brown Football Die Cut for stitching. Place magnet to back side of Football Die Cut.
*Supplies not included in kit:
-Adhesive
-Black Marker
Frog Puppet
Fold Meadow Circle Die Cut in half. Using Bright Red Paint, paint large popsicle stick red. Cut a slit the width of the large popsicle stick centered on the crease of the Meadow Circle Die Cut. This will make it so the large popsicle stick can move around. Cut around pieces on Meadow Pattern. Adhere the shorter legs centered on the backside of the rounded edge of the Meadow Die Cut. Adhere the longer legs on either side of the shorter legs. Adhere Small Black Circle Punches to the lower side of the White Circle Punches. Adhere White Circle Punches towards the rounded top of the Meadow Rectangle. Fold the straight side of the Meadow Rectangle at a ¼” and adhere on the top of the Meadow Circle Die Cut, towards the crease. Fold the Meadow Cardstock Strip into a rectangular box and adhere to the backside of the Circle Die Cut to put your finger through to hold the puppet.
*Supplies not included in kit:
-Adhesive
-Scissors
-Pebbles Inc. Bright Red Paint
-Foam Brush
Paper Clip Bracelet
Connect all paper clips together to make the bracelet. If needed add or remove paper clips to make the bracelet fit before you add paper. Use mod podge to adhere patterned paper to paper clips as you wrap patterned paper pieces around paper clips.
*Supplies not included in kit:
-Mod Podge
-Foam Brush
Paper Lei
Using a 1/16″ Circle Punch, punch a hole in the center of Flower Die Cuts. Alternating between straws and flowers, string them onto the twine. Tie twine ends together in a knot.
*Supplies not included in kit:
-1/16″ Circle Punch
Summer Fun Can
Wrap patterned paper around juice can. Adhere Meadow “Summer Fun Can” Word to center of Blue Cardstock Strip. Place Orange Brad to left of “fun”. Adhere Blue Cardstock Strip centered on the front of the can. Using Bright Spring Green Paint, paint all large popsicle sticks green. Adhere Gold Sun Punches to the top of the sticks. Using a black marker, write activity ideas to do in the summer. For example: go up the canyon, sidewalk chalk, fly a kite, go to the park, go hiking, run through the sprinklers, have a picnic, backyard campout, go to the pool, etc.
*Supplies not included in kit:
-Juice Can
-Adhesive
-Black Marker
-Pebbles Inc. Bright Spring Green Paint
-Foam Brush
Flower Bookmark
Using Basic Brown Paint, paint large popsicle stick brown. Adhere Deep Red Circle Die Cut to center of White Flower Die Cut. Place Yellow brad through Deep Red Circle Die Cut. Adhere White Flower Die Cut to top part of large popsicle stick. Tie ribbon around stick.
*Supplies not included in kit:
-Adhesive
-Pebbles Inc. Basic Brown Paint
-Foam Brush
Frog Bookmark
Using Basic Brown Paint, paint large popsicle stick brown. Adhere Spring Green Circle Punches onto Meadow Frog Die Cut. Place mini brads through holes for eyes. Adhere Meadow Frog Die Cut to top part of large popsicle stick.
*Supplies not included in kit:
-Adhesive
-Pebbles Inc. Basic Brown Paint
-Foam Brush
Flower Block
Using Sandpaper, sand block until smooth. Using Bright Spring Green Paint, paint Wood Block Green. Adhere patterned paper to front of Wood Block. Adhere Spring Green Circle Die to center of Blush Flower Die Cut. Place Orange Brad through Spring Green Circle Die Cut. Using foam squares, adhere Blush Flower Die Cut to center of Wood Block.
*Supplies not included in kit:
-Adhesive
-Foam Squares
-Sandpaper
-Pebbles Inc. Bright Spring Green Paint
-Foam Brush
Frog Block
Using Sandpaper, sand block until smooth. Using Bright Orange Paint, paint Wood Block Orange. Adhere patterned paper to front of Wood Block. Adhere Spring Green Circle Punches onto Meadow Frog Die Cut. Place mini brads through holes for eyes. Using foam squares, adhere Meadow Frog Die Cut to center of Wood Block.
*Supplies not included in kit:
-Adhesive
-Foam Squares
-Sandpaper
-Pebbles Inc. Bright Orange Paint
-Foam Brush
Pebbles in My Pocket as three locations for all of your scrapbooking needs and you can visit their website at www.pebblesinmypocket.com
Orem Utah Store
1132 South State
Orem Utah 84097
801-226-2632
10am-9pm
Salt Lake City Utah Store
6185 Highland Drive
SLC Utah 84121
801-272-2280
10am-8pm
St. George Store
779 South Bluff Street
St. George Utah 84770
435-656-5404
10am-7pm


Add comment