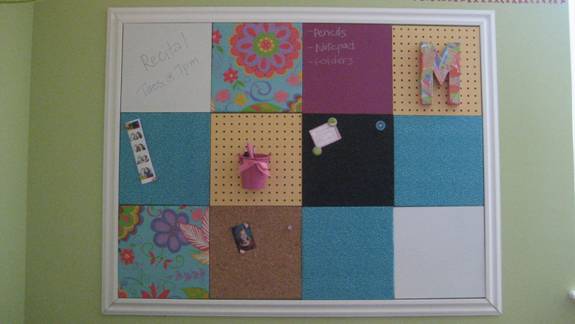
Studio 5 Contributor Jennifer Heslop says making your customized display board requires nothing more than 12×12 squares of backing board, peg board, cork board, paint, and a little fabric. Simply make the individual squares and adhere them to the wall with Velcro!
Tips:
There are endless designs and layouts for your display boards. The above picture includes, dry erase tiles, cork tiles, fabric/cork tiles, magnetic boards, chalk board and peg board.
The backing board and peg board used for this project are sold at home improvement store in large sheets. For minimal cost, you can have the sheet cut into 12×12 squares before you even leave the store.
Rustoleum has an entire line of specialty paints (chalk, dry erase, and magnet), just decide which you’d like to use and follow the manufacturer’s instructions when painting the 12×12 square.
Priming all the squares with a good paint primer will provide you with a smoother finish. I also recommend lightly sanding between all coats of paint.
The cork board squares are made by gluing 12×12 pieces of cork board (sold at Wal-mart or an office supply store) onto backing board.
If you’d like to cover the cork board/backing board tiles with fabric, cut a 14×14 piece of fabric, cover the front of the cork and staple the fabric to the back of the backing board using a heavy duty staple gun.
Once you have completed all the tiles, adhere them to the wall using sticky-backed Velcro. This way you can rearrange the design and easily adjust any tiles that need straightening.
For a more finished look, frame out the entire display board with molding. Door-casing was used in the above picture, but any type of base board or molding will work. Paint the molding, cut to size, and use the Velcro to adhere the molding to the wall.


Add comment