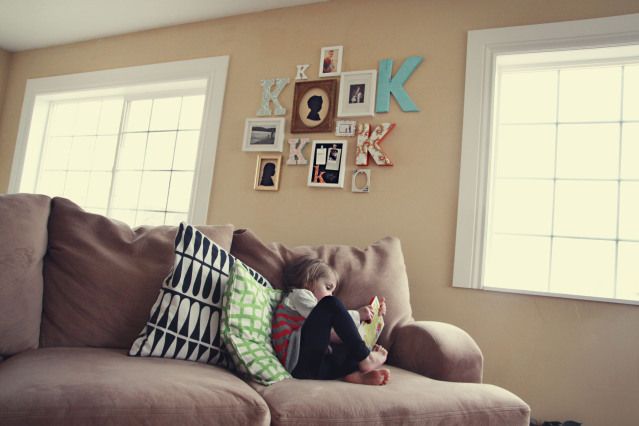
It’s an idea we first spotted on the blog “Just Us” by Elizabeth Kartchner. Using the first letter of her last name, she made quite the statement on a wall in her living room. Perfectly spaced. The right color spread. Fun interest. We loved the look and asked Elizabeth to share a few tips and tricks to achieving the perfect grouping.
1. Start with a focal point
Use a large photo or art piece at the center then build the rest of your letters and elements around it. Lay all your pieces you want to hang on the ground and start moving them around from the inside of the cluster to the outside until you are happy with the result.
2. Design Triangle
When arranging your letters and photos picture an imaginary triangle and those 3 points of the triangle are where you will want to place your letters. This helps the wall stay balanced and also works when you are figuring out where to put your frames and photos.
3. Mix it Up
While Choosing the pattern for your letters and frames mix larger patterns with smaller ones. This helps the decor wall not feel too busy and overwhelming to the eye. Also, I love mixing together all different types of letter fonts. My favorite part of this project is collecting the letters from random places. You can find them at Anthropologie, Urban Outfitters, Craft Stores & even antique stores. Hunting for the perfect letters is the best part!
I also love this tip from Marth Stewart for how to hang up your projects to avoid the unwanted holes, this keeps our husbands happy.
“Here’s a way to plan a display of framed pictures without making a single needless nail hole. First, trace around frames on kraft paper to make a template for each piece of art; cut out. Pull hanging wire on frame taut; measure distance from top of wire’s arc to top of frame. Make a corresponding mark on template. Lay picture hook on template so bottom of hook is on mark; make another mark where nail hole will go. Use drafting tape to hang templates. When you’re satisfied with placement, hammer nails through picture hooks and into wall over the marks on the kraft paper. Rip off the paper, leaving nails and hooks in place, and hang your frames.”
Check out Elizabeth’s blog www.elizabethkartchner.blogspot.com for other cool, creative ideas and everyday moments of being a mom. You can also find her scrapbooking column in Creating Keepsake’s magazine, “Dear Lizzy” each month.


Add comment