Bring a splash of the season into your home, regardless of your time and talent.
Michelle Virtue with Campus Floral presents fall crafts for every level.
I hear clients, friends and family complain ALL the TIME that “they can’t craft” or “they’re not creative.” Often, life situations, financial limitations, time constraints and motivation play important roles in the type of craft project you tackle. Even the most creative of crafters had to start somewhere. Your designing and creating experiences can be more fulfilling and enjoyable if you start at the level you’re most comfortable. Here are three of my favorite fall crafts with something for everyone—regardless of your self-proclaimed crafting status.
EASY: Short on time, need something your children can help with and don’t want to spend the time or money going to the craft store for supplies? This is the project for you.
http://www.sisterssuitcaseblog.com/2012/09/yarn-pumpkin.html
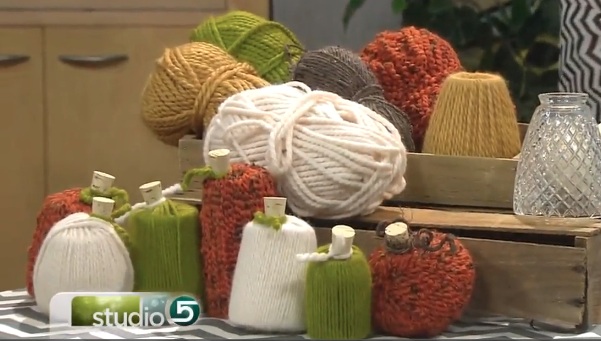
Yarn Pumpkins or Gourds
Supplies: Glass of varied sizes and shapes, yarn, scissors, cork or twigs, hot glue.
1. Wrap yarn around your glass container. You can secure the yarn my tying it in a knot or glue.
2. Add embellishments as desired. I used cork as stems with some felt/fabric for leaves.
3. YOU’RE already done! It wasn’t painful at all, was it?
MODERATE: Your apple cider candle is lit and pumpkin bread is in the oven. If the fall decorating bug has hit and you want to create something quick, affordable, practical and show , you’re going to love this simple fall embellishment.
Fall Mum Finishings
Supplies: Fall mum, plastic pot liner, fabric (burlap works great), stuffing (newspaper, plastic grocery bags, etc.), ribbon, scissors.
1. Place pot liner underneath your potted mum. This keeps your fabric from getting wet and ruined. Burlap is a little more water friendly than some other fabrics.
2. Measure the height of your pot from the base to the rim. Take that number and multiply it by 8. That is the approximate measurement to cut your fabric in a square or circle (depending upon the look you like). Play with this step depending upon how full you want your pot cover to look.
3. Place your potted mum in the center of your fabric. Surround it with stuffing and wrap the fabric around it. You might need a second set of hands for this step (intermediate, right?). Stuff your fabric as you go. When you have it the desired puffiness that you want, secure the fabric with ribbon, jute or fabric strips.
4. Embellish to your heart’s content.
ADVANCED: Feeling ambitious? The kids are at school and for the first time in months your laundry pile is under control? Maybe your husband owes you a little “me time” and you’re looking for a crafting challenge that can be completed in 24 hours or less, but will still impress. This is the craft for you.
Fall Door Décor
Supplies: Cardboard cut in a square or rectangle, quilting batting, fabric cut to fit 1-1.5″ beyond cardboard cut-out, stapler, glue gun, ribbon, embellishments (buttons, felt cut outs, paint, silk flowers, trimmings—the possibilities are endless).
1. Cut cardboard to desired size. I just used portion of a cardboard box. Be sure to check your cut-out against your door to ensure proper proportions. Squares are fun, but rectangles are awesome, too!
2. Cut batting to the size of your cardboard.
3. Cut fabric to hang over the side of your cardboard 1-1.5″ on each side.
4. At this point, you can take the time to embellish your fabric with applique, paint, monogram designs, felting, piecing, etc. Sometimes these techniques are easier to do before the fabric is attached to the cardboard.
5. Layer cardboard, batting and then fabric. Wrap the fabric tightly around your cardboard. Secure each of the sides with hot glue or staples (even a combination of both).
6. If you haven’t already embellished your covered board, now’s the time. Silk flowers, buttons, dimensional design, twigs, etc. Your fabric board can be your canvas! The freedom of being completely creative is sure sign that your crafting project is “advanced”—embrace it!
7. Attach ribbon to the back of your board with staples or hot glue.
8. Hang from your door and feel that crafters HIGH!


Add comment