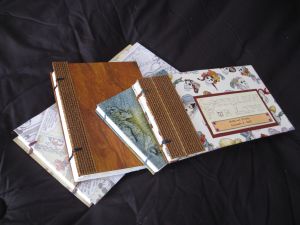
The Coptic binding was developed during the 3rd or 4th century, by the Copts, early Christians living in Egypt. They found that using a technique of interlacing threads in carpet making and weaving, they could bind folded pieces of papyrus to wooden covers. Once parchment became available, it quickly replaced papyrus for the pages.
A Coptic binding is possibly the easiest way to bind a book. It is also the one most people are impressed by, because you can see the binding. It’s nice for journals and sketchbooks, because it lays completely flat when it’s open.
Things You’ll Need:
• paper for textblock
• waxed linen thread
• bookbinder’s board or matt-board
• a good-quality decorative cover paper
• a good-quality decorative paste-down paper
• adhesive (PVA or permanent glue stick)
• two needles
• awl
• bonefolder
Preparing the Text-block
1. Determine the grain of your paper. Do this by gently folding the paper first one way, then the other. Be careful not to crease the paper. There will be more give to the paper when you fold it over parallel to the grain.
2.Cut or tear your paper to the right dimensions. The sheets need to be twice
the width of your finished dimension because you will be folding them in half. Also make sure the grain of the paper runs parallel to the height of your textblock. Depending on the look you’re going for, you can fold the paper and use the bone folder to rip it, giving you a deckled edge.
3. Count out for sheets of paper for each signature (section). You will want at least 7 signatures (no less than three).
4. Fold each signature in half, using a bone folder to sharpen the creases. You may want to put a scrap of paper between the bone folder and signature to prevent the bone folder from burnishing the paper.
5. After you’ve folded all of the signatures, jog them together to line the pages up.
6. Set the signatures aside. If time allows, press under a heavy weight or a stack of books.
Preparing the Covers
1. Find the grain of your bookbinder’s board and draw lines down the board parallel to the grain.
2. Cut two pieces of binder’s board 1/8 inch taller and 1/4 inch wider than the finished dimensions of the text-block. Remember to keep the grain parallel to the length of your book.
3. Cut your cover paper so it’s two inches wider and two inches taller than your cover boards.
Place the cover paper on a sheet of waste paper such as newsprint.
Glue the paper out by brushing glue from the middle out to the edges. Don’t brush parallel to the edge of the paper. This will stretch out of shape.
4. Place your cover board face down on the paper. Use your bone folder to run along the surface of the board to work out any air bubbles. Trim the corner parallel to this 45-degree angle about 1/8 inch from the corner.
5. Glue out the top and bottom turn-ins.
Set the board on the edge of your table and turn over the excess paper with your thumb. Make sure it’s tight. Repeat the last two steps with the spine and fore edge turn-ins.
6.Measure and cut your inside cover linings one inch shorter and one inch smaller than the cover boards. Place the linings on the inside of the covers and use your bone folder to smooth them out.
7.When covers are completed, punch the sewing holes. Transfer the placement of the holes to the edges of a cardstock template.
Sewing the Book
(Much easier to do than to describe)
1.Using the template, punch holes with an awl through each signature.
2. To estimate string length, measure the length or each signature, plus two covers, plus12 inches. (a book with seven 6 inch signatures, plus two covers, plus 12 inches will be approximately 6 feet of thread ) Always give yourself a longer cut rather than come up short.
3. In Double Needle Coptic two needles are threaded each onto one end of a length of thread. The sewing station is a pair of holes because needle #1 exits a hole in the top signature, goes down two or more signatures, loops around the stitch in the lower signature, enters into the signature you are adding above the current signature, continues to the next hole and exits that hole. Needle #2 repeats this sequence and when you’ve finished the needles have crisscrossed each other. Depending on the length of the spine, you can have numerous sewing stations; each will require two needles.
Place a needle at each end of each strand of thread. Begin sewing the Coptic binding by placing the first signature at the edge of a table. Thread the linen through each hole from the inside out.
4. Hold a cover board to the signature and thread you linen through each hole of the cover from the outside face to the inside face. The threads should now be sandwiched between the signature and the cover. Pull tight by pulling the threads directly out toward you. Go back in between the signature and cover board on the other side of the thread, and back through the cover board, this time from the inside to the outside. Don’t pull tight, leave it looped.
Go up through the loop you made. Turn over and pull tight by pulling down.
5. Insert needles back into the center of the signature through the corresponding holes, cross the threads to the opposite hole of each pair, and push through to the outside.
6. Place the second signature on top of the first and align the edges. Thread each needle directly through the corresponding holes of the second signature and cross the threads to the opposite hole of each pair, and push back to the outside.
Tighten the threads and insert your needle between the board and the first signature on the left side of the threads attaching the first signature to the cover. Bring the needle out again on the right side and tighten your threads.
7. Place the third signature on top of the second and align the edges.
Thread each needle directly through the corresponding holes of the third signature.
Cross the threads to the opposite hole of each pair, and push back to the outside.
Tighten the threads and insert your needle between the first signature and the second signature on the left side of the threads attaching the first signature to the cover.
Bring the needle out again on the right side and tighten your threads.
Continue in this manner until the last signature.
8. Lay the other cover board on the textblock. Insert the threads from the outside face of the cover to the inside face of the cover. Bring the needles back out again between the cover and last signature on the left side of the attaching threads, then back in on the right side of the attaching threads. This makes a loop. Don’t pull it tight.
Push the threads through the cover again, from the inside to the outside, then go down through the loop you created in the last step.
Now tighten your threads by pulling down. Insert the needle on the left side of the attaching threads between the last and second-to-last signatures.
Bring the needles out again on the right side.
Push needles into the center of the last signature. Be careful not to split the threads.
Tie a simple overhand knot using the thread that’s already in the spine fold. You’ll have one knot per hole.
More Information:
For those interested in learning more contact Youth City Art Ways www.youthcityartways.org. They often sponsor book classes in the Salt Lake City area. Also check out the Book Arts Program at the Marriott Library, In the Ogden area, classes have also been taught at the Eccles Art Center
Ogden Nature Center
www.ogdennaturecenter.org
Journal Making Class
Thursday, November 6 / 6-8:30 pm
Ages: 12 and up
Cost: $25 members / $30 for non-members / + $5. material fee
Pre-register by Nov. 5.
The Ogden Nature Center is located at 966 W. 12th Street in Ogden, Utah.
To register for classes or for more information, please call 801-621-7595.


Add comment