Elizabeth Kartchner is a member of the Creating Keepsake’s Editorial Board and author of the popular column “Dear Lizzy.” She shares ways to showcase those pictures – without the fuss!
Although I won’t scrapbook every picture from our vacation, I still wanted to showcase
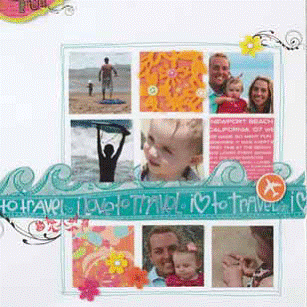
them—and I didn’t want them lost on my hard drive or in shoeboxes. As a solution, behind my scrapbook pages I included six-up photo sleeves to hold the extra pictures. I was thrilled with the result and thought, “Why stop there?” After scrapbooking Avery finger painting, I included her artwork behind my scrapbook page. Along with scrapbook pages about my family reunion, I included some fun memorabilia with the extra photos.
Now I have a scrapbook that includes over 125 photos, and I love how organized I feel!
Plus, if I decide to scrapbook more pages about these events I won’t have to go on a treasure hunt to find my photos—because they’re ready to go.
I want to share with you a couple of solutions and five tips for dressing up the photo page protectors.
Tip #1
I use a square punch tool to crop in on my photos. If you are feeling guilty for cropping out the rest of the image include the photos in you photo page protectors.
Also, add decorative elements to your photo sleeves. I added my “Newport Beach” title, ’07 chipboard oval and some felt flowers and rub-ons on top of the photo sleeves.
Tip #2
Scan or photograph your ultrasound pictures and print them out to ensure they’re on acid-free paper and won’t fade. Include them in your photo pages along with the extra pictures of your growing belly. Create a 4″ x 6″ title or journaling block and include them in your photo sleeves
Tip #3
Since switching to a digital camera, I take so many photos of my daughter Avery and our colorful days together. Usually the photos that don’t end up on a scrapbook page sit in a file on my computer. It felt so great to print those photos out and include them in the album, as well.
Add cute ribbon details to the edge of a photo sleeve. Punch three holes through the photo sleeve and the pictures inside it, then tie short pieces of ribbon through the holes.
You can journal directly on the photos themselves. Be sure to use a pen designed for slick surfaces.
Tip #4
I was excited to display my daughter’s artwork in her scrapbook. It’s so cool that We R Memory Keeper’s 81⁄2″ x 11″ photo sleeves fit right into their 12″ x 12″ albums—they’re the perfect home for Avery’s artwork.
For a pretty touch, add simple embellishments like ribbon and tags to the edges of photo sleeves that house memorabilia.
Tip #5
Photo sleeves are perfect for displaying any memorabilia you didn’t include on your scrapbook pages (or storing it until you’re ready to use it). Here, I included a prize ribbon, Collin’s scorecard from our golf tournament and the schedule of events. I simply tucked them behind a photo slot for an instant pocket. If you include memorabilia tucked behind photos, add tabs to the top so viewers know to pull them out for a peek.
Good page protectors can be a little tricky to find.
Need help? Here are some companies that offer them:
• Bazzill Basics Paper (www.bazzillbasics.com)
• Close To My Heart (www.closetomyheart.com)
• Exposures (www.exposuresonline.com)
• Pebbles Inc. (www.pebblesinc.com)
• We R Memory Keepers (www.weronthenet.com)
Elizabeth Kartchner lives in Pleasant Grove with her husband, Collin, and two daughters. Scrapbooking has been part of her life since grade school when Elizabeth came home from 5th grade camp and started cutting up pictures and adding stickers. It sure has come a long way since then! Elizabeth has worked for numerous scrapbooking companies, including: Close To My Heart, American Crafts, and Rusty Pickle. Last year, she won the “Scrapbooker of the Year” for Creating Keepsakes magazine. Elizabeth now sits on the Creating Keepsake’s Editorial Board, where each month you can read her popular column “Dear Lizzy.”
You can catch Lizzy, her crazy everyday moments of being a mom, and more of her creative ideas on her blog: www.elizabethkartchner.blogspot.com.


Add comment