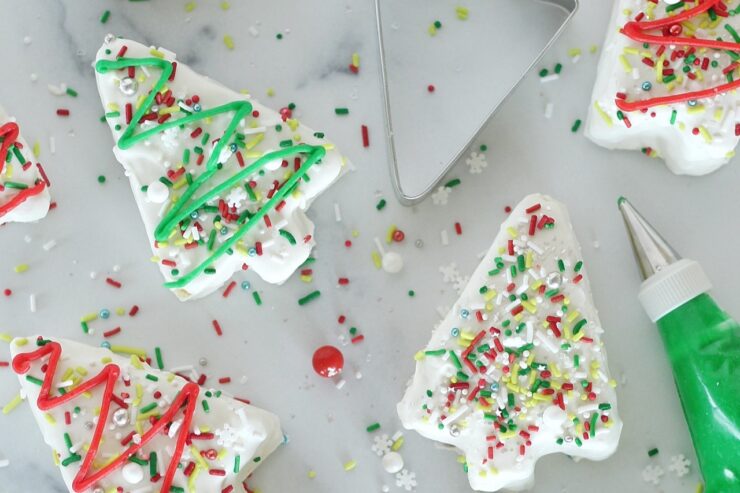
Make Little Debbie Christmas Tree Cakes at home!
Little Debbie Christmas Tree Cakes have been a long time fan-favorite. They’re festive, delicious, and an iconic holiday cake! But we hear the homemade version is even better.
Courtney Rich shares the recipe, and how to achieve the perfect shape. It starts with Courtney’s yellow cake recipe. Bake it up, and then take your cookie cutter to cut out Christmas tree shapes in the pan. Courtney always goes for a metal cookie cutter. Then, sandwich a few trees with some homemade whipped cream (with a secret stabilizing ingredient) and freeze them up so they hold. Once they’re frozen, dip in white chocolate and add a few festive sprinkles!
Find more from Courtney on Instagram, @cakebycourtney or on her website, www.cakebycourtney.com.
Find the full recipe with all of Courtney’s notes here.
Homemade Little Debbie Christmas Tree Cakes
The homemade version of your favorite childhood holiday snack, with tender yellow cake, whipped cream, and white chocolate.
INGREDIENTS
For the Cake
- 3 cups (345 g) cake flour
- 2 tsp (8 g) baking powder
- 1 tsp (6 g) salt
- 1 cup (226 g) unsalted butter at room temperature
- 1 3/4 cups (350 g) granulated sugar
- 1/3 cup (72 g) grapeseed oil can use vegetable or canola
- 5 whole eggs at room temperature
- 2 egg yolks at room temperature
- 2 tsp (8.4 g) clear vanilla extract
- 1 cup (240 g) sour cream at room temperature
For the Whipped Cream
- 3 cups (693 g) heavy whipping cream cold
- 1 cup (125 g) powdered sugar measured then sifted
- 2 tbsp (3 g) E-Z Gel
- 1 tsp (4.2 g) vanilla extract
For the White Chocolate
- 5 lbs good quality white chocolate
METHOD
For the Cake
- Set your oven to 325 degrees F. Spray an 11″ x 15″ rectangular baking sheet with nonstick spray, line the bottom with parchment paper, and spray again. Set aside.
- In a medium bowl, whisk together the flour, baking powder, and salt. Set aside.
- Using a stand mixer fitted with the paddle attachment, beat the butter, oil, and sugar on medium-high for 3 minutes, until light in color and fluffy in texture.
- With the mixer on medium speed, add the eggs, one at a time, scraping down the bowl between additions. Continue to beat on medium-high speed for 2 minutes until smooth. Add extracts and stir to combine.
- With the mixer on low speed, add in internals, blending after each addition: ⅓ dry ingredients, ½ sour cream, ⅓ dry ingredients, ½ sour cream, ⅓ dry ingredients.
- Scrape down the bowl and mix for another 20 to 30 seconds.
- Pour the batter into the prepared pan and bake for 20 to 25 minutes.
- Cool completely before cutting into tree shapes.
For the Whipped Cream
- Using a stand mixer fitted with the whisk attachment, whip cream, E-Z Gel, powdered sugar, and vanilla on high speed until stiff peaks form.
For the White Chocolate
- When ready to dip: using a double boiler or microwave safe bowl, melt the white chocolate.
- If using the microwave, heat in intervals to ensure you don’t burn the chocolate.
For Assembly
- Using a tree-shaped cookie cutter, cut the cake layer into 24 to 26 trees.
- Split each tree in half, using a serrated knife.
- Pipe whipped cream on one tree, making sure to pipe to the edge of the tree. Place a second tree on top of the whipped cream and gently pat into place to secure the trees.
- Once all of the trees have been assembled, cover and freeze the trees overnight.
- When you’re ready to start dipping, gently dip a frozen tree into the melted white chocolate, using a fork to help you lift the tree up and onto parchment paper.
- Cover in sprinkles while the chocolate is still wet.
- Allow the chocolate to harden before serving.


Add comment