
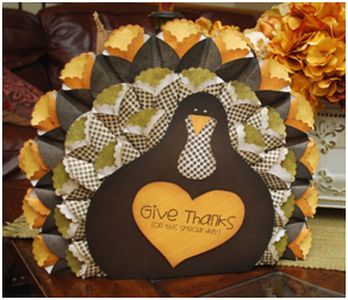
Studio 5 Contributor Sue Neal shows us how to make her original creation turkeys.
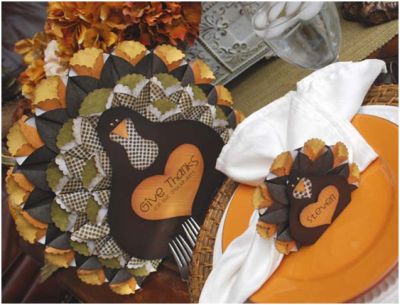
Create this unique paper crafted Thanksgiving table ensemble with simple supplies, step-by-step instructions and in just a few hours.

This “Give Thanks” centerpiece is three dimensional so it can be seen from all sides, yet not so bulky that you can’t fit the gravy on the table!
Adorable mini turkeys pull the look together and do double duty as place cards and/or napkin holders.
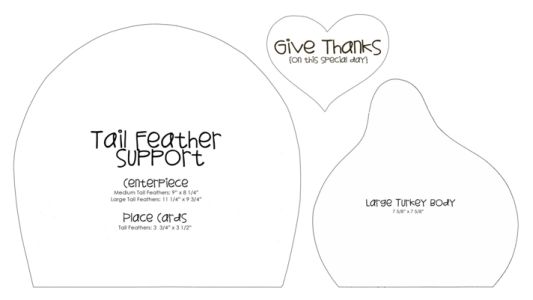
Visit myeyeqdownloads.shutterfly.com for free patterns.
What you’ll need to complete this project:
Scrapbook Paper! I used the beautiful new Moonrise paper from SEI, but find any coordinating paper that you’d like OR go through your scraps and see what you come up with.
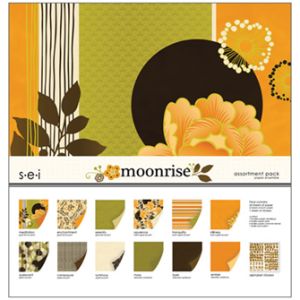
You’ll need 2 sheets of four different colored papers for the centerpiece. Double sided is nice.
Foamcore (or Foam Board), is available at most craft and office supply stores. 1/4″ for the place cards and ½” for the centerpiece, but you can always stack two pieces of ¼” if you can’t find ½”.

Circle Punches (or you can cut them by hand or use your favorite die-cutter).
Ink pads to distress with (I used black for the dark brown paper and Tim Holtz Distress Frayed Burlap ink for the others).
Chipboard, which you can buy at craft stores, or you can sometimes get it for free if you ask. You can also recycle your cereal (and other food packaging) boxes, as this is the same material. Just make sure to cover it all.
Exacto or utility knife to cut foam board and Scissors to cut chipboard and paper.
Adhesive; I used Scotch ATG tape, but anything that is strong will work.
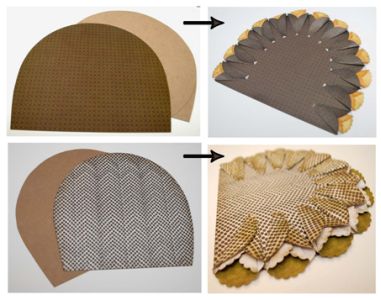
Step 1: Punch out circles for double-sided Centerpiece Turkey. You’ll need
• 26 – 3″dark brown circles
• 26 – 2 ½” orange/yellow scalloped circles
• 30 – 3″ polka dot circles
• 30 – 2 ½” green patterned scalloped circles
Step 2: Distress each side. I used black ink for the Dk brown and Frayed Burlap (Distress) ink for the rest. To speed up this process, lay circle flat on table and rub ink pad directly over edges. This only works with the distress ink, I used a sponge for the black ink on the brown paper.
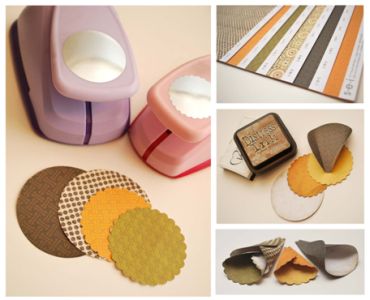
Step 3: Fold circles into cones. I folded them all first and then laid a strip of adhesive along the bottom of the cone and folded them closed. Creating an assembly line will save you quite a bit of time.
Step 4: Create Feathers. Lay a strip of adhesive on the back of the smaller folded circles and tuck them into the larger circle cones.
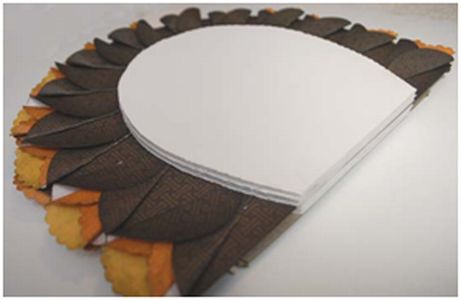
Step 5: Create Tail Feather bases. Print out Tail Feather Templates (large & medium). Assemble and then trace out on chipboard and matching paper. Adhere paper to chipboard. Lay a strip of adhesive on back of double feather cones and adhere all along the circumference of the base. You may want to lay them all out first to make sure your spacing is correct.
For larger Tail Feather base, cover the front and back of chipboard with paper and feathers. Create two separate chipboard pieces for the medium tail feather bases.
Step 6: Create Turkey bodies. Print out Large Turkey body, cut out template and trace on Dark brown cardstock. Cut out (optional: sponge the edges with black ink). Print and cut out Turkey Wattle and beak. Trace on patterned paper and adhere to front of turkey. Attach two brads above the beak for eyes.
Print out “Give Thanks” heart on Orange patterned paper and cut out. Distress edges and adhere to front of turkey with ½” foam squares.
Lay turkey body in center of Medium Tail feather base and adhere the 3 extra polka-dot cone feathers around his head to fill in the spaces. Refer to image.
Step 7: Assemble Turkey:
Print out Foam board divider template and trace onto foam board. Cut out with knife.
Adhere tail feather bases and dividers together. This will stabalize the entire project so it can stand on it’s own. You could use ½” plywood as well.
Finish by adhering turkey bodies to the front and back of project.
For Place Card Turkeys, repeat the process except punch out the following
• 7 – 2″ orange/yellow circles
• 7 – 1 3/8″ dark brown circles
There is only one layer of feathers for the place card.
Use template for Placecard turkey body, Tail Feathers, Wattle and beak.
Use smaller brads for eyes.
Cut a 2″ x 3 ½” piece of chipboard mounted on the back of place card so it will stand on it’s own. Bend strip at 2″ mark.
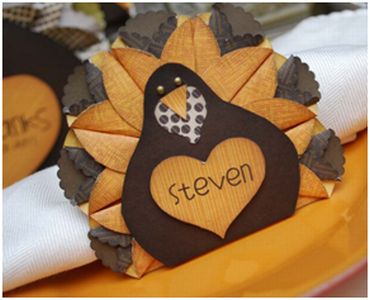
Alternatively you could attach the entire place card to a knapkin holder.
To customize your names for the place cards, purchase the font (SNF GOODY) for $3 at www.scrapnfonts.com
You can see more ideas at Sue’s blog, www.sueneal.blogspot.com


Add comment