
Tammy Morrill from Handmade Simple Magazine, shares three simple projects that will garner you big compliments.
Feather Headband by Kate Anderson
Headband, clips: Goody; Feathers: Michaels; Other: Fabric, hot glue
1. Cut a piece of home décor weight fabric into a teardrop shape, approximately 2 ½” across and 3″ tall.
2. Hot glue a row of feathers along the curved top.
3. Continue to glue rows of feathers, moving down the fabric until you reach the bottom.
4. With the headband on, hold the feather piece up to it while looking in a mirror to determine placement.
5. Hot glue the feather piece to the headband to finish.
You can also purchase these feather accents pre-made at crafts stores, such as Michaels, and simply hot glue them to a headband.
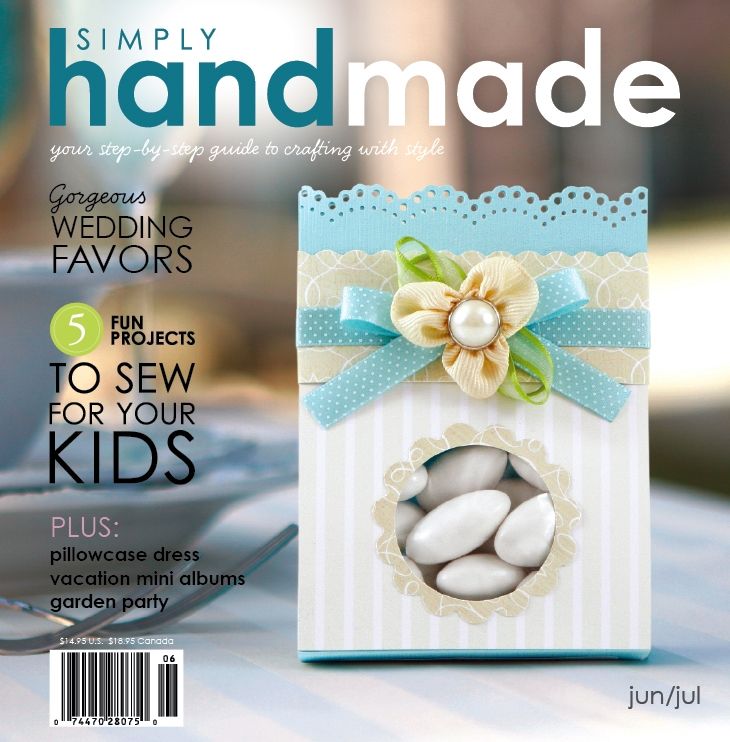
Wedding Favor Bag by Valerie Salmon
Cardstock: Bazzill Basics; Patterned paper: Kimberly Poloson; Vellum: DMD Industries; Pearl brad: K & Company; Self-adhesive pearls: Martha Stewart Crafts; Pearl trim: Craft supply; Ribbon: American Crafts (turquoise), Offray (green, ivory); Decorative border punch: Martha Stewart Crafts; Circle punch: EK Success; Circle cutter: Coluzzle; Scalloped circle punch, flower punch, scalloped scissors: Fiskars; Candy bags: Wilton
1. Trim turquoise cardstock to 3 ¼” x 11″.
2. Score at 4 ¾” and 6 ¼” from one end. Fold up. Your cardstock should now be in three sections, with the middle section (the bottom of the bag) measuring 1 ½”.
3. Use a decorative border punch on the short (top) ends of the holder. Make sure the border design lines up exactly on both sides.
4. Adhere a 3 ¼” x 3 ¼” piece of striped paper to the bottom front of the holder.
5. Fill a 3″ x 4″ clear plastic bag with candy. Sandwich it between the two ends and staple it in place, about 1 ¾” from the top of the bag.
6. Trim dark cream patterned paper to 8″ x 1 ¼”, scalloping the top edge. Wrap it around the holder, scallops facing upward, covering your staples. Glue the ends to the back of the bag, overlapping them.
7. Tie dotted turquoise satin ribbon in a bow, covering the seam of the two patterned papers.
8. Punch two flowers, one from cream paper and one from sparkly vellum. Glue together, staggering the petals, and set a self-adhesive pearl bead in the center. Glue the flower to the center of the bow.
Mr & Mrs by Maile Belles
Cardstock, ribbon, stamps: Papertrey Ink; Pearls: K & Company; Ink: Papertrey Ink, VersaMark; Embossing powder: Ranger; Die cut machine: Cuttlebug by Provo Craft
Make a card using white cardstock. Scallop the bottom edge of a white cardstock block and emboss a medallion background using a die cut machine, then mat it on a green cardstock piece. Knot ribbon around the bottom. Stamp “Mr & Mrs” on the bottom right edge of the embossed cardstock piece and arrange pearls on either side of the sentiment. Adhere the entire embossed cardstock piece to the card base.
Finished size: 4 ¼ x 5 ½”
Simply Handmade magazine is available at most major craft, scrapbook, and book stores.
You can visit their website at www.handmademag.com for subscription information.
They have great ideas available on their blog at northridgemedia.net/blogs/simplyhandmade/


Add comment