
Kelly White from Heartland Paper shows us how to make these fun interchangeable bags.
Supplies you will need:
Zutter Bind-It-All Machine
*Get it for 20% off at
Heartland by mentioning KSL
Clear Vinyl (available at fabric stores on the roll)
You will want a good thick vinyl that
will hold up to weight.
Rotary cutter for cutting vinyl to size.
2 feet of refrigerator tubing for handles
10 yards of clear boondoggle
Patterned Paper and decorations to put in bag
Chipboard to give more support to bag
4 yards coordinating ribbon for handles
Scissors
Cropadile or other strong hole punch.
Instructions:
The great thing about this bag is it is interchangeable! You can swap out your paper and ribbons at any
time to give you an entirely new bag. The bag can also be made in any size and dimension that you desire
(we recommend not going larger than 12X12). To make a bag in different dimensions than the ones
shown, simply adjust the measurements as desired.
Dimensions given are for the large bag shown here. Keep in mind that all vinyl will be doubled so you can
slip paper in between layers.
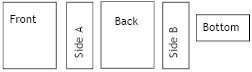
1. Cut vinyl using mat and rotary cutter , cut vinyl in the following pieces:
A. Front and Back- Cut 4 pieces to 8X10
B. Sides- Cut 4 pieces to 4X10
C. Bottom- Cut 2 pieces to 4X8
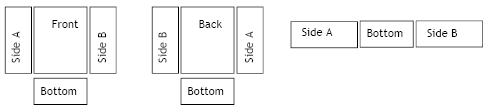
2. Match up 2 of each piece together so that they will form a pocket for the patterned paper. You should
have the following pieces(each piece will have two layers of vinyl):
3. Punch your sewing holes along the edges of the vinyl using the Bind-It-All Machine. Make sure that your
holes match up by placing matching edges in the machine at the same time. For example, match up the
Front to Side A and place them both in the machine together, that way, when you sew them up, the holes
will match perfectly. Be careful not to punch holes through the edge of the vinyl. If you can’t fit one
last hole, leave a gap.
4. You will want to punch holes in the following combinations:
A. Front to Side A and Side B and long side of Bottom.
B. Back to Side A and Side B and long side of Bottom.
C. Side A to Short Side of Bottom
D. Side B to Short Side of Bottom
5. When you have all of your holes punched, you are ready to begin sew-
ing. To sew, cut a 1 yard length of boondoggle and begin at one corner.
Thread the boondoggle half way through the first holes (you will thread
the entire length of the boondoggle and then go back and thread the
other way with the second half of your strand. Loop the boondoggle
through the matching holes down the entire length of the piece. Return
to the top of the piece and take the other half of the strand and loop it
the opposite direction through each hole. Tie off the two ends at the
bottom of each piece. Before you sew on the last side of the bottom
piece, you will want to slip a piece of chipboard in to give added sup-
port. You may also slip in patterned paper, but keep in mind that you will not be able to change out
whatever you put inside because it will be sew shut. Bottom chipboard should be cut to 3.25X7.25
6. Cut Patterned Paper and Chipboard in the following dimensions. You can also add any additional em-
bellishments to the paper at this time.
A. Front and Back- Cut 2 Chipboards and 2 Patterned Papers to
7.25×9.5
B. Sides (patterned paper only)-Cut 2 to 3.25X9.5
7. Open up pocket formed by double sheets of vinyl and slip in patterned paper and chipboard. If you
would like the inside of your bag to be patterned also, you can cut additional pieces and slip them in
facing the inside of the bag.
8. Cut refrigerator tubing to the desired length for handles. Using a dowl or metal wire, thread two
pieces of coordinating ribbon (cut to 1 yard each) through the center of the tubing, leaving two lengths of
ribbon out each end.
9. Using a cropadile or other hole punch, punch 2 holes through vinyl,
chipboard, patterned paper where you would like the handles to connect.
10. Using the ribbon that is hanging outside the tubing, thread one end
through the hole and tie a double knot to secure the handle in place.
Then complete the look with a bow. Trim off excess ribbon.
To change out the paper and ribbon, simply untie or cut off the ribbon for the handles and slip in new
supplies.
*Bags are great for swimming, scripture totes, girl’s camp, school lunches, purses, gift bags and much
more!
Click here for an easy to print PDF instruction sheet.
Heartland Paper has two locations for your scrapbook needs:
Bountiful
616 West 2600 South
(801) 294-7166
Hours:
Monday: 10 A.M. to 6 P.M.
Tuesday – Saturday: 10 A.M. to 8 P.M.
Closed Sunday
Taylorsville
5794 South Redwood Road
(801) 963-6101
Hours:
Monday: 10 A.M. to 6 P.M.
Tuesday – Thursday: 10 A.M. to 8 P.M.
Friday: 10 A.M. to 9 P.M.


Add comment