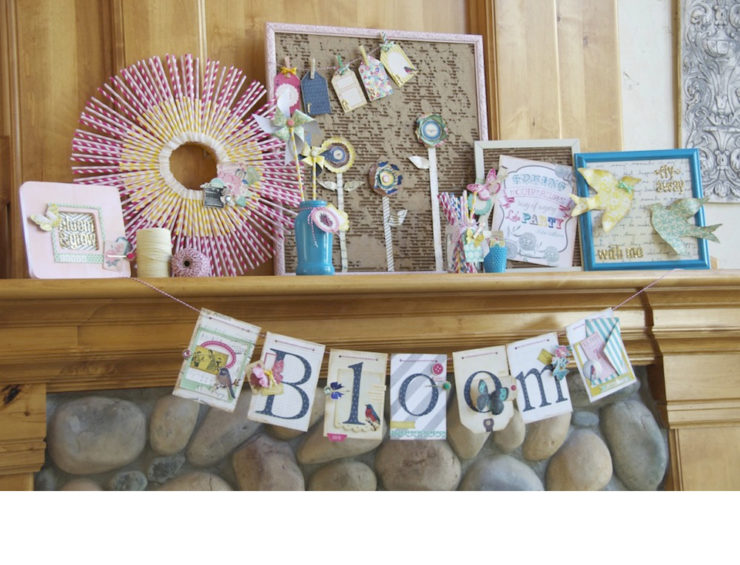
After a long, dark winter, we could all use a little pop of sunshine in our homes, and the mantle is the perfect place to make a statement.Kelly Brown with Simply Kelly B shares do it yourself projects to create a stunning spring mantel!
If you don’t have a mantle, don’t despair, you can bring this same spring spirit to your home using a simple shelf. Using just a few paper crafting supplies combined with some thrift store treasures, I’ve created a mantle I just love! Today on Studio 5, I showed off my spring mantle and I can’t wait to share it with you as well.
Beginning a new mantle from scratch can be overwhelming! Before you can begin, you need to gather all of the important elements. Think of your display as an artsy vignette. You want to create a theme that flows and draws the eye. I love these great tips from Stephen and Chris that help to demystify the mantle process.
1. Large Centerpiece- This is the main weight of your mantle. (three flower large frame with banner)
2. Layers- Layer art and photos in front of the centerpiece (multiple layers of different frames)
3. Movement – Add something with movement. Movement means something that causes your eye to bounce to another object because of the varying heights. (the straw wreath works to move your eye here) At this point, a triangle shape should start to form. Remember to stand back every so often, squint and adjust accordingly.
4. Visual Weight- Incorporate an element with visual weight. This means something that your eye is drawn too. An eye catcher! (The straw wreath definitely catches the eye and adds weight to the mantle)
5. Finishing touches – Finish off the vignette with accessories that reflect your personality like souvenirs or items from a collection. (spools, jars, banner)
The fresh, new “Maggie Holme’s” line from Crate Paper is where I began my decorating journey. I was drawn to the soft pastels and bright pops of bold colors in this line. Of course I love the vintage elements in the designs, but another thing that caught my eye about this line was the pre-made accessories. They made putting together my mantle a snap! I used the precut shapes and die-cuts throughout each of my projects to tie the different elements together.
Here’s how I implemented the five key elements above to create my “Vintage Spring Cleaning Vignette”.
1. Large Centerpiece- I repurposed an existing frame that I had in storage. I spray painted the pearly gold frame to match my paper line. I used a large cardboard box to create the recycled background in my frame. To create the corrugated look, I peeled the top layer of paper from the board after I had cut it to size. I love the way the cardboard looks earthy and rustic. I cut simple circles of patterned paper and bent them into shape to create three posey flowers in the frame. For a little extra pizzazz, I crafted a mini banner using the Maggie Holmes paper clips and tags. Draping the banner along the frame edge added just a little accent to draw the eye.
2. Layers- I used three varying sized and shaped frames to fill the visual space of my mantle. Each frame was painted a coordinating shade and filled with an original art piece.
a. Bloom and Grow-This frame is so simple, a basic background paper, a few sticker letters, and some ephemera embellishments is all it took to call this little beauty complete! Adding art to the actual frame as well as inside it, creates depth and visual interest.
b. Spring Printable- I created an original Spring Printable to make recreating this frame a cinch! I used a frame slightly bigger than my 8×10 artwork so that I could use another cardboard backer. A few dimensional embellishments add excitement to the otherwise flat piece.
c. Fly away with me!- This frame took flight with my dimensional paper birdies. (You can print and cut the template to create birdies of your own). I used a patterned paper and sticker letters as backdrop for these flying friends. To create dimension in this frame, I bent the wings and tails of each bird and adhered them overlapping the frame.
3. Movement- my vignette naturally creates movement with the different sizes and shapes. Your eye naturally flows from one object to another until it takes in the complete scene.
4. Visual Weight- I used a handmade paper straw wreath to add weight to my mantle layout. This wreath was such a breeze to assemble. You can create your own with just a few items. Paper striped straws usually come in boxes of 144 of one color. I got mine from Green Party Paper Goods for a great price. You can make a wreath out of one box of straws, but if you want the variety in colors, you will need to buy multiple boxes. Luckily, extra straws can be used for a variety of different projects and parties. They are so cute!


Add comment