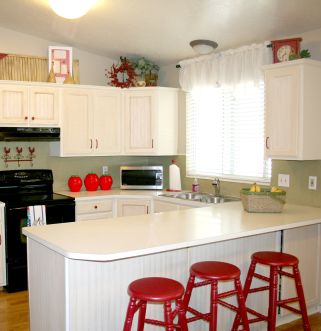
Designer Tausha Hoyt from Sassy Style Redesign shares ideas to give your kitchen a makeover on almost any budget.
A SASSY Kitchen Redo-all for under $300!
I know, I know, you must be thinking that I forgot to add a zero to that number.
Nope-really, it was all done with a budget of $300!
I learned some tips and tricks along the way that I must share with you!
First-anyone can do this. I do NOT use power tools. I don’t even know how to turn on a saw. I do however, know how to paint, spray paint, stain and now know how to wallpaper.
So, I thought that I would teach you, so you too can do this to your kitchen.
Don’t think that you need to have all new everything! You don’t! You don’t even need new appliances. I painted my kitchen table and chairs, my barstools, the hardware on the cabinets and my fridge! Yes-my fridge! I used a fabulous product called Appliance Epoxy Spray Paint.
You can purchase it at Lowes or Home Depot for about $5 a can. It comes in 3 colors; black, white and almond.
Now-you must take your fridge outside! You CAN’T do this inside. The fumes are way too toxic and any spray residue must be removed with paint thinner.
1-Clean your fridge extremely well with TSP (tri-sodium phosphate) this is a ultra heavy duty cleaner. It’s about $4 a box and you can pick it up wherever you are getting your appliance paint.
2-Tape off anything that you don’t want painted. You MUST use frog tape if you want crisp, clean lines. I couldn’t spray where my ice and water came out. So make sure that you don’t forget to tape!
3- Wear shoes with socks and a mask. This stuff is potent! I had a flip flop line from the spray.
4-Paint away! If you are a little nervous, start with the back. Also, if you want to give it a test run and you happen to have a freezer in your garage, try it out on that. I did that first. I felt much better after I had a little practice. Get to spraying. Don’t stand too close because it will run just like any other spray paint. Unlike any other spray paint, you can only re-spray within 30 miutes, or 7 days later.
5- Read the back of the can and follow drying instructions to a tee!
You can’t even tell that my fridge once was white!
Next, I painted my cupboards and my kitchen table with a paint and primer in one. I finished them off with an oil-based glaze. The reason why you use the oil based glaze is because it is much easier to work with, but it will also protect your painted surfaces. I didn’t want to use oil based paint on everything, so I used the oil based glaze instead. By using the oil base glaze, it will last longer and hold up better.
Finally, I updated my kitchen cabinets and bar with Beadboard Wallpaper!
If you have never heard of this, you are in for a treat! This stuff is amazing! You can pick this up at Lowes for $13.79 a roll. 1 roll will cover 56 sq. feet. You just put this on like any wall paper. Since I didn’t know how to wallpaper, I enlisted help from my mother. She wallpapered our whole house in the 80’s so she was a pro! It really was not that hard, I have detailed instructions on my site if you need them. I just cut the wallpaper to fit into the inserts in my cupboards. Applied it, then when it was dry, I glazed directly onto it. You CAN NOT tell that this is not the real stuff. Every person that comes into my kitchen has to touch it. Even then, they are still a little skeptical.
You can also paint the wallpaper. I painted my backsplash with some leftover paint from my walls. I then glazed them when the paint was dry. I also papered around my bar. I did not paint this. I just used the same treatment as I did on the cupboards. I just glazed the wallpaper.
This wall paper is so fantastic, my head is just spinning of ways that it can be used. It would be darling in the back of a shadow box frame. It would also be cute on some wooden letters from the craft store. The possibilities are endless. If the surface can handle water, than it can be wallpapered.
We finished off the kitchen by adding some $5 pieces of crown molding to the top of cupboards. It took 20 minutes to put up.
I also re-painted my walls with a fabulous Tavern Taupe color. Then I added some new drapes, and new rugs.
Here a just a few tips that will make the whole thing a lot easier!
1-Buy good paint. DON’T buy the cheap paint. Invest in some better paint. It will look better on the walls and you will use less. I prefer using Pratt & Lambert or Benjamin Moore.
2- Use good brushes and rollers. I know-you wouldn’t think that this would make a difference-but it does. Your painting will go on much smoother.
3- Use FROG tape. If you want nice, crisp lines-purchase this. I used the 2 inch tape, which I found in Ogden at Weber Paint & Glass.
4-Make sure every surface in your kitchen that is going to see paint, receives a good scrubbing with TSP. I did not have to strip my cabinets because I used this. Much easier!
You can do this! It is a weekend project. You will love the outcome. Your kitchen will look so good, you will want to sleep in it!
If your home is in need of some decorating help, or if you just need some ideas. Contact Tausha at Sassystyleredesign.blogspot.com


Add comment