
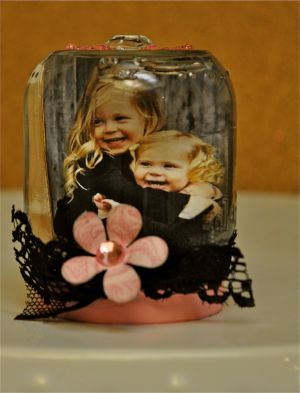
Papercrafter Kelly Brown shares steps to make your own Valentine snow globes.
Supplies you will need:
• Glass Jar (try a variety of sizes and shapes. Baby food jars make adorable little shakers)
• Paint (for painting lid if it doesn’t match your project- spray paint works great!)
• Laminated Photos or Other Artwork (You will want two for each jar so that it can be double-sided)
• Mini Glass Beads (try plain clear or coordinating colors)
• Decorative Elements (ribbon, rhinestones, stickers, charms, ribbons) I used Bo Bunny’s two new, beautiful Valentine lines for all of the decorative elements in my globes. To check out the entire lines, visit their website at www.bobunny.com
Instructions:
1. Clean out jars and lids and paint lids desired colors. I found that spray paint works much better than acrylic, but either is fine. You will probably have to paint several coats to get the lids really covered. Allow to dry well before proceeding through next steps.
2. Measure your jars and print and cut artwork so that it will fit in each jar. The artwork should fit tightly once it is laminated (laminating will add up to 1/4 inch or more so cut your photos accordingly). The most important dimension is the height of the photo. After you laminate it, the lid needs to be able to close securely without touching the photo. You will want two pieces of art for each jar so that you can glue them back to back. Print artwork on the thinnest possible material so that it laminates easily.
3. Laminate your photos and cut so that you avoid the air pocket around the photo. Be sure to cut outside the seal line so that water can’t leak into your photos. *It is better to cut far outside the seal so that you don’t have any close calls.
4. Place your artwork in your jar. Your artwork should be snug in your jar. It will bend slightly, but that is okay. It just adds to the “snow globe” effect. If you are concerned about your photo shifting, you can secure it to the rim and top of the jar using some E6000 epoxy. However, if your photo is snug in the jar, you shouldn’t need the glue.
5. Add mini glass beads to the jar. You really don’t need very many beads to create the fun effect. Just pour a few into the bottom of the jar and you are all set.
6. Now you are ready to fill your jar with water. You want to put as much water as you possibly can into the jar before sealing it. The less air left in the jar, the better. Once you fill your jar, you can carefully place the lid on and secure it (try to avoid spilling out any water)
7. Now comes the fun part, the decorating. Use your embellishments to add a little flair to your jars.


Add comment