
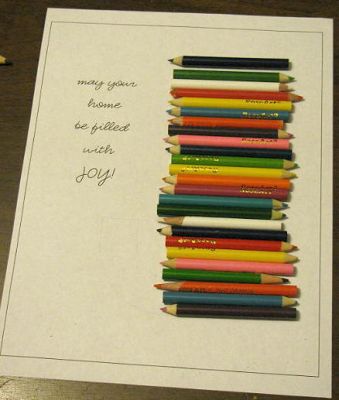
Lisa Nord describes her innovative and economical project as a finalist in the Studio 5 $5 Craft Challenge.
For my Colored Pencil Letter Art I used a finished size of 8 x 10, and these instructions are based upon that size. However, you can certainly go bigger or smaller, based on the size you want the finished artwork to be. It’s helpful to select your frame, mat board, canvas, foam core, masonite board or other mounting surface before you begin, so you know what size to make your letter and position your quote/title if you’re going to use one.
The first part of this project is actually done on the computer. You need to make a tempate to glue your pencils onto, and you need to print out your quote on your background. I prefer to use fonts that are somewhat thick and have a serif. If you don’t have many fonts with serifs I would suggest checking out www.urbanfonts.com and do a search for serif fonts. They have a whole bunch of serif fonts you can download, and they’re free.
Step 1:
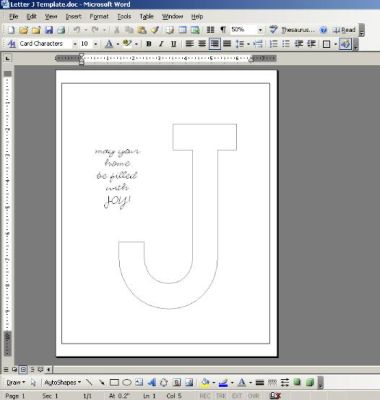
In MS Word find a font you like for the letter you want to make. Once you have chosen your font type your letter as either a capital or lower case letter, most letters look great either way! Increase the font size to about 500 – 600 pt, and change the color to a very light grey. (You don’t want the outline to show underneath the pencils.) Under Format, Fonts select the check box to convert the letter to an outline. Print out a test copy of the letter to make sure it has the right look and size you want.
Step 2:
Go back to your Word document and choose a different font for your quote or title. Insert a text box and type in your quote, formatting it to fit the space around your letter. Move the text box around until you are happy with it’s size and position next to the letter. Make sure font color is black for your quote. Print one more test copy, with the letter template and quote together on the same page. If you are happy with it go ahead and print out the final copy on a nice cardstock. Cut it down to 8 x 10.
Step 3:
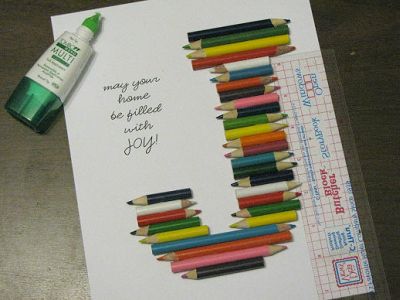
Use your test copy and put some temporary adhesive down the middle of the letter. Either ouble stick tape or low tack adhesive works well. Get out your colored pencils and place them over the letter, moving them around until you get a color arrangement that you like. Press them onto the temporary adhesive to hold the order of colors in place.
Step 4:
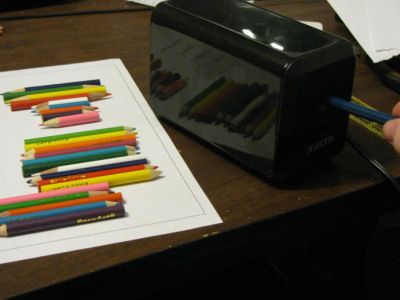
You’ll need to shorten your pencils one of two ways. Either use a sharpener to reduce the pencils down to the right length, or if you have a saw or other cutting tool (I used a Dremel tool) you can cut the pencils down. One at a time sharpen or cut the pencils down, then place them back on the test copy so you can remember the color order you decided on. This will also ensure that your pencil pieces are a good fit to cover the section of template they’re supposed to cover.
Step 5:
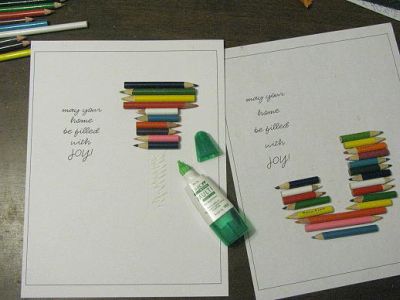
After all your pencils are sharpened/cut down to fit over the letter template start adhering them to the final copy you printed out. Lay down a thin line of craft glue (Elmer’s or Aleene’s would work fine) and press your first pencil into the glue. Make sure to check that your pencil is placed with the words on it face down, check to see that the letter outline is not showing, and clean away any extra glue that may squeeze out from under the pencil. Repeat with all the colored pencil pieces until you have covered the letter template. Allow to dry.
Step 6:
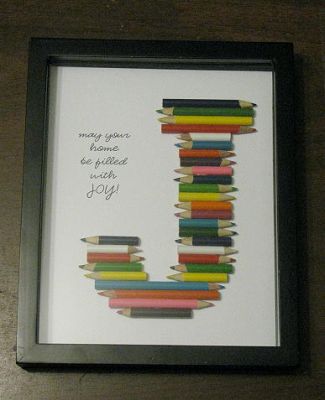
Mount the completed art onto a sturdy backing, using Glue Dots or other very sticky adhesive. Set the
artwork into your shadowbox frame and display your completed project!! Looks great on a shelf or
hanging on a wall.
Optional:
If you don’t want to purchase a shadow box here are some other ideas for you to use to display
Your Colored Pencil Letter Art! You can use the kind of clear acrylic frames that are the 1″ deep and very inexpensive, a stretched canvas, foam core, a piece of masonite board, mat board, etc. Use your imagination, and watch for sales on frames and other art supplies to display your art. This truly is an inexpensive but fun and unique craft!


Add comment