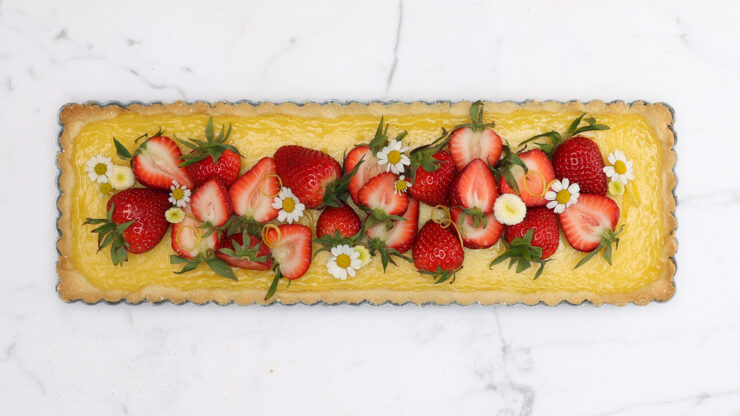
A lemon tart has the most perfect fresh spring flavor.
We’ve had enough of winter. This French lemon tart is our way of boycotting the gloom! It’s creamy, vibrant, and has just the right amount of zippy lemon tartness.
Tami Steggell shared her recipe. She says this pastry is popular around patisserie shops in France, known as Tarte au Citron. It can be served in a pie pan, personal tartlette, or a rectangle.
Typically, this dessert is topped with a dusting of powdered sugar or even lemon meringue from your leftover egg whites. But Tami loves to add a dollop of fresh whipped cream, fresh fruit, and edible flowers!
Classic French Lemon Tart
Servings: 10
Prep Time: 1 Hour
Cook Time: 30 Minutes
Chill Time: 2 Hours 30 Minutes
Total Time: 4 hours 30 Minutes
Yields: One 14” x 5” rectangular or One 9” round tart
INGREDIENTS
The Crust: (20 minutes prep + 15 min baking)
- 1½ cups (180g) all-purpose flour
- ½ cup (113g) butter, cold, cut into cubes
- ¼ cup (30g) powdered sugar
- 1 tablespoon lemon zest, from 1 large lemon (optional)
- ¼ teaspoon salt
The Lemon Curd Filling: (35 minutes prep + 15 min baking)
- 4 egg yolks (72g) – reserve the whites
- 4 eggs, whole (272g)
- ¾ cup (160g) castor fine bakers sugar
- 1 cup (236ml) lemon juice from 6 fresh lemons
- Zest of 2 lemons
- ¾ cup (170g) butter, cold, cut into cubes
The Meringue: (5 minutes prep/cooking + 7 minutes mixing)
- 4 large egg whites (132g)
- ¾ cup (160g) castor fine bakers sugar
- 1 teaspoon vanilla extract
METHOD
Prepare the Shortbread Crust: dough accommodates a 9” round or a 14” x 5” tart pan
- Preheat oven to 350°F/180°C
- In a food processor combine the ingredients, blend in 3-5 second pulses for a total of about 45 seconds, just until the dry ingredients combine with the butter and it forms pebbles of dough.
- Pour the pebbled crumble mixture into the tart pan. Starting with the outside edges first, begin to mold and sculpt into the tart pan until you have created a uniform shell of even thickness all over. Once the edges are formed, tamper down the center with your fingers, or the back of a small jar.
- Line pastry shell with parchment paper and add pie weights (dry beans/rice/legumes also work). Put the prepared tart pan in the refrigerator and let it chill for 20-30 minutes. This will help prevent it from shrinking in the oven or bleeding butter.
- Place prepared shell on a bake sheet lined with parchment before baking.
Note: if you are in a hurry, it is okay to bake the crust straight away. Know that some butter residue will be left on your parchment lined bake sheet.
- Bake for 15 minutes until the edges start to get lightly golden brown.
- Remove from oven and set aside to cool while you make the lemon curd.
Note: You can also transfer the pebbled dough to a tea towel and twist into a dough ball using the beggar’s purse method, then roll out the dough very thin and transfer to tart mold and cut off excess crust.
The Lemon Curd
- In a bowl, rub lemon zest together with sugar until fragrant and evenly distributed. Or pulse standard granulated sugar in a food processor to maximize capturing the lemon oils.
- In a medium saucepan, whisk together the eggs and egg yolks. A fork works well to facilitate blending.
- Whisk in the lemon zested sugar, followed by the lemon juice.
- Add the butter and cook over medium-low heat, stirring constantly with a whisk until the butter melts. Continue stirring with a rubber spatula until the mixture thickens slightly and coats the back of the spatula, approx. 170°F/76°C on an instant-read thermometer. The final texture will be similar to soft pudding.
- Pour the mixture through a fine-mesh sieve to remove zest and any lumps.
- Pour the sieved lemon mixture into the cooled crust.
- Bake 15 more minutes, until the edges are set but the center still jiggles when shaken. Remove from oven and allow to cool completely to room temperature, then refrigerate for 2 hours, overnight, or until ready to garnish. Top with meringue using the reserved egg whites (see other garnish ideas).
Make the Meringue: This is the Italian Meringue Method
- In a pot, bring about 1″ of water to a simmer. I like to preheat kettle water to speed things up.
- In a medium mixing bowl, stir together the egg whites and sugar. Place the bowl on top of the pot of simmering water to create a double boiler. Keep the flame on low. Make sure the bottom of the bowl does not touch the water.
- Heat the egg and sugar mixture while stirring constantly with a whisk until all the sugar has dissolved, about 4 minutes, and the temperature reaches 150°F/65° When you rub a small amount of the syrup between your fingers, it should be smooth without any grittiness.
- Remove the bowl from the pot. Add in the vanilla extract.
- Use a stand mixer (speed 6-7) or an electric hand mixer to whisk the egg whites on high speed until it becomes stiff peaks, about 5-7 minutes.
- Transfer the meringue to a piping bag fitted with a piping tip of your choice. Pipe the meringue on top of the lemon filling. Use a kitchen torch to toast the meringue before serving.
Note: The French Meringue Method warms the sugar in the oven, while first beating the egg whites, the two are beaten together until the grains of sugar dissolve and stiff peaks form.
EQUIPMENT
Equipment for the Crust
- Food Processor
- Sheet of Parchment
- Pie Pearls or Subs: Rice, Beans, Legumes, Course Sugar
Equipment for The Lemon Curd
- Tart Pan – 9” x 14” rectangular or a 9” Round
- Lemon Juicer or Reamer
- Medium Saucepan
- Hand Whisk
- Fine Mesh Strainer
- Rubber Spatula
Equipment for the Meringue
- Medium Saucepan
- Metal Mixing Bowl to fit on top of saucepan
- Whisk
- Stand Mixer fitted with a whisk or Hand Mixer
- Piping Bag (flat ribbon piping tip optional)
- Butane Kitchen Torch for toasting the meringue
Garnish Ideas for the finished Tart
- Dust with powdered sugar, use a template to create a beautiful pattern.
- Top with an Italian Meringue using the remaining egg whites (see recipe). Toast with a small butane torch, or place under the oven broiler for a quick minute.
- Top with whipped cream and fresh berries.
- Top with beautiful fresh strawberries both whole and cut in half. Garnish with edible flowers and lemon zest twists. Did you Know? Strawberry greens are edible!
- Drizzle fresh passion fruit over whipped cream and top with lime zest
- Decorate with thinly sliced fresh lemons, cut in half and create a pattern. Perhaps add a homemade shortbread crumble for added decoration.
Fun Fact! Don’t overlook your strawberry leaves. They have more health benefits than the berries themselves. Strawberry leaves are completely edible and are high in antioxidants, vitamin C, calcium and iron. You can enjoy the green leaves as a decorative accent on your desserts, in your salads and smoothies. Now that you know, consider retaining your strawberry leaves instead of discarding them.
Find more from Tami on Instagram, @bitemeindustries, or on her website, bitemeindustries.com.


Add comment