
Pull out your sheet pan for all of these recipes!
Out of all the kitchen tools and gadgets, there’s one we just wouldn’t be able to live without: the humble sheet pan. It’s the most important pan in the kitchen.
And let’s be honest, the sheet pan deserves more credit. It’s not flashy, but it sure is indispensable. This unassuming pan simplifies cooking and cleanup, making it a true kitchen hero.
We asked a few of our kitchen friends to find new ways to put it to work. We’ve rounded up a few recipes in its honor. It’s our way of saying, ‘thanks!’ to the sheet pan.
Sheet Pan Lasagna
Our friend Wendy Paul taught us how to make sheet pan lasagna. This classic casserole makeover will change the way you make lasagna forever. It uses similar ingredients but cuts the layering time in half.
Makes 6 large servings
INGREDIENTS
- Napa Valley Olive oil
- 1 lb. ground turkey or lean beef
- Dried basil, oregano and garlic
- Pinch of salt
- 1 jar of your favorite marinara sauce
- Fresh spinach
- 1 box No bake lasagna noodles, broken
- 1 jar of your favorite alfredo sauce or 1 recipe béchamel sauce (below)
- 2 cups shredded Italian cheese
- 16 oz. ricotta cheese
- 2 tbsp. basil paste
Optional: Béchamel Sauce Recipe (or use a jar of alfredo sauce)
- 4 tbsp butter
- 4 tbsp flour
- 2-3 cup half and half
- Pinch of salt
- Fresh nutmeg
- 1/2 cup Parmesan cheese
- Parmesan cheese and basil for garnish
METHOD
- Preheat your oven to 375 degrees.
- Brown your meat in a large skillet with some Napa Valley Olive oil, over medium heat. Season with 1 tsp. each basil and oregano, pinch of salt and 1/2 tsp garlic powder.
- Once the meat is browned, add your favorite marinara sauce, the add 1/2 cup water, put the lid back on and shake to get all the marinara out, and add to the meat mixture. Stir together and simmer for 10 minutes.
- Add 1 large handful of fresh spinach. Stir and cook the spinach down, for about 5 more minutes.
- Set it aside.
- In a medium sauce pan, melt the butter over medium heat, until its browned slightly, then add the flour and cook for about 1 minute. Whisk in the half and half, bringing to a simmer to thicken. Season with some salt, and 1/2 tsp. fresh nutmeg. Remove from the heat after thickened and add the Parmesan cheese. Set it aside.
- Assemble your sheet pan lasagna:
- Spread 1/3 of the meat marinara on the bottom of your 1/4 size sheet pan. Then spread a little about 1 cup béchamel or alfredo sauce. Then place broken noodles over the top, doesn’t need to be perfect. Top with a handful of Italian cheese, grated. Repeat, ending with marinara and cheese.
- Place your small sheet pan, on a parchment lined larger baking sheet, in case of spillage.
- Bake for 35-45 minutes. Remove from the oven.
- Mix your ricotta & basil paste. Scoop evenly on top of the baked lasagna and add more Parmesan and fresh basil. You can even broil this for 2 minutes to melt the cheese a little more.
Find more ideas from Wendy on Instagram, @therealwendypaul, or on her website,wendypaulcreations.com
Sheet Pan Quesadillas
Alex Daynes added her Sheet Pan Quesadillas to the lineup. You might never make quesadillas on the stovetop or griddle again. She says this is a recipe that everyone should have in their back pocket. It’s a great way to make a lot of quesadillas—in just a little time. They’re easy to assemble, loaded with a homemade fajita filling, beans, and lots of ooey-gooey cheese.
The entire recipe is made on a sheet pan, even the fajita bell pepper filling! Make it your own by customizing with any sort of fillings you have on hand. Try adding chicken, sweet pork, or even shrimp to up the protein. The magical technique is in the tortilla layering. Alex shared how to lay out the tortillas so you can envelop all the goodness inside.
PREP TIME 5 minutes
COOK TIME 20 minutes
ADDITIONAL TIME 5 minutes
TOTAL TIME 5 minutes
INGREDIENTS
Fajita Filling
- 1 red onion, thinly sliced
- 1 orange bell pepper, thinly sliced
- 1 red bell pepper, thinly sliced
- 1 yellow bell pepper, thinly sliced
- 2 Tablespoons olive oil
- 1 packet fajita seasoning
Quesadillas
- 8 large burrito sized tortillas
- Prepared fajita filling
- 15 ounce can black beans, drained and rinsed
- 15 ounce can pinto beans, drained and rinsed
- 2 cups Monterey Jack shredded cheese
- 1 cup shredded mozzarella cheese
METHOD
For the Fajita Filling
- Preheat oven to 350 degrees. Spread the sliced onion and peppers on a large baking sheet.
- Drizzle with olive oil. Sprinkle with fajita seasoning. Toss to coat evenly.
- Bake for 20 minutes until the edges become slightly crispy, and the peppers are soft.
- For the Quesadilla
- Line a sheet pan with foil.
- Place 6 of the flour tortillas around the edges of the sheet pan, with the tortillas hanging halfway over the edge of the pan, leaving a gap in the center. Place one tortilla in the bottom center gap. Layer half the cheese, beans, fajita mixture, and the remainder of the cheese.
- Carefully begin folding the tortillas hanging over the pan’s edge towards the middle. Place the last tortilla in the center to fill the gap. Place a second sheet pan on the folded tortillas and slightly press down.
- Transfer the baking sheets to the oven and bake at 350 degrees for 20 minutes. Remove the top sheet pan and bake for 5 minutes until the top is golden brown.
- Remove the sheet pan from the oven and allow the quesadilla to cool slightly before cutting it into servings. Serve with your favorite quesadilla toppings.
Find more from Alex on Instagram, @thealexdaynes, or on her website, alexdaynes.com.
Sheet Pan Honey Garlic Chicken Lunch
Usually we say, ‘Winner winner, chicken dinner,’ but we’re singing, ‘Winner winner, chicken lunch,’ with this recipe. Recipe creator Rachael Yerkes took the Sheet Pan Party to lunch with a no-fuss tray bake that pretty much makes itself. Meal prep for a week of mom lunch, or even serve it up for an easy dinner. You probably already have these six ingredients on hand!
Prep Time: 10 Minutes
Cook Time: 20 Minutes
Total Time: 30 Minutes
Servings: 4
INGREDIENTS
- 1 1/2 pounds chicken breast pounded flat, so they have even thickness throughout
Sauce
- 2 teaspoon garlic minced
- 1 teaspoon ginger paste
- 1/3 cup honey
- 1/4 cup soy sauce
- 1/2 tsp dried oregano
- salt and pepper to taste
- Cooking spray
Veggies
- 16 ounces red potatoes cubed
- 1 Tbs olive oil
- salt and pepper to taste
- 2 Tbs chopped fresh parsley for garnish optional
METHOD
- Preheat oven to 400 degrees.
- Toss quartered potatoes with olive oil, season with salt and pepper, and pour onto one half of a sheet pan sprayed with cooking oil.
- Put sheet pan in preheated oven, and roast for 10 minutes.
- Meanwhile, mix “sauce” ingredients together in a bowl.
- After the 10 minutes are up, remove potatoes from oven, and carefully place chicken on the other half of the pan.
- Spoon half the sauce over the chicken.
- Roast for 15-20 minutes, at 400 then turn oven up to broil, and broil 5-10 minutes until potatoes are tender chicken reaches internal temp of 165 degrees.
- Meanwhile, heat remaining half of the sauce over medium-high heat, and cook until reduced by half.
- Remove chicken and potatoes from oven, spoon remaining reduced sauce over the chicken, garnish with fresh parsley and enjoy!
Find more recipes from Rachael on Instagram, @ezpzmealz or on her website, eazypeazymealz.com.
Perfect Sheet Pan Veggies
It’s the best way to eat your veggies, and the easiest way to prep ‘em, too! This recipe is simple, delicious, and pretty much fail-proof. Lisa Danielson taught us her method to getting the perfect roast on sheet pan veggies– every time. This recipe combines sweet potatoes, chickpeas, broccoli, and onions with a little bit of olive oil and seasonings to give you a fresh-flavored dinner. You’ll cook the sweet potatoes and chickpeas first, as they take a little more time in the oven. Then you’ll take your tray out and add all the other veggies. Lisa likes serving this over rice with a little bit of hummus or tzatziki sauce to bring it to life.
INGREDIENTS
- 1 large sweet potato, peeled and cubed into ½ inch squares
- 1 can chickpeas, drained and rinsed
- 2 cups broccoli florets, rinsed and chopped into bite size pieces
- ½ red onion sliced
- 1 tsp cumin
- 1 tsp garlic powder
- 2 TBSP olive oil
- 1 bunch cilantro
- Salt and Pepper
METHOD
- Preheat the oven to 400 degrees. Allow chickpeas to drain on a paper towel until totally dry.
- In a medium size bowl, add potatoes and chickpeas. Toss with 1 TBSP of olive oil.
- Add cumin and garlic powder. Toss the vegetables well.
- Spread the mixture on a sheet pan lined with foil or parchment and season with salt and pepper.
- Bake for 20 minutes
- Remove from the oven and add in broccoli and red onion. Add another TBSP of olive oil and bake for another 15 minutes.
- Remove the pan from the oven and sprinkle it with cilantro.
- Serve with jasmine rice and hummus.
Find more from Lisa on Instagram, @veggie_lisa, or on her website, veggielisa.com.
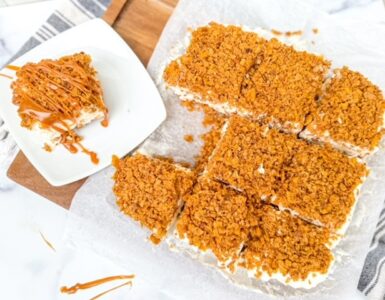
Sheet Pan Grasshopper Pie
Courtney Rich took the sheet pan on a date with dessert! Skip the round pie- a sheet pan pie is the best way to serve up a slice. Courtney turned her No Bake Grasshopper Pie into a sheet-pan-friendly recipe. This dessert is made with a Mint Oreo crust, whipped mint cookies and cream filling, chocolate ganache, and whipped cream on top.
The fridge is your friend for this no-bake pie. Courtney also recommends EZ Gel, an instant thickener, to help set and stabilize the filling. If you aren’t a fan of Mint Oreos, you could even swap them out for Thin Mint or Grasshopper cookies!
Use the same measurements below to convert to a sheet pan. If you want a thicker crust and more filling, double it! Or, use a quarter sheet pan.
INGREDIENTS
For the Oreo Crust
- 40 Mint Oreo cookies
- 1/2 cup unsalted butter, melted
For the Ganache
- 1/4 cup dark chocolate chips
- 2 tablespoons heavy whipping cream
For the Mint Cookies and Cream Filling
- 1 1/2 cups heavy whipping cream
- 1 tablespoon EZ Gel (optional, but recommended)
- 8 ounces cream cheese
- 1 1/2 cups powdered sugar
- 1/2 teaspoon mint extract or emulsion, Courtney uses the LorAnn brand
- 1 drop green food coloring
- 8 Mint Oreo cookies, crushed
For the Whipped Topping
- 1 cup heavy whipping cream
- 1/3 cup powdered sugar
- 1/2 teaspoon vanilla
METHOD
For the Mint Oreo Crust
- Using a food processor or blender, pulse the cookies until you’ve created a fine crumb. (No need to remove the cream filling)
- Combine the Mint Oreo crumbs and melted butter in a mixing bowl. Mix until the crumbs are “wet.”
- Firmly press the Oreo mixture into an 8-inch or 9-inch pie pan, making sure to form the crust up the sides of the pan.
- Set it aside.
For the Ganache
- Combine the chocolate chips and cream in a microwave safe bowl. Microwave in 20 to 30 second intervals until the chocolate chips melt and create a silky-smooth consistency when you stir.
- Allow the ganache to cool before spreading on top of the pie crust.
- Refrigerate the crust with the ganache on it while you make the filling.
For the Mint Cookies and Cream Filling
- In a chilled stainless-steel bowl, beat the heavy whipping cream on high speed. While beating the cream, gradually sprinkle in the EZ Gel. Beat the cream until semi-stiff peaks form. Set it aside.
- In a separate mixing bowl, combine the cream cheese, powdered sugar, and mint extract. Mix until smooth.
- Gently fold the whipped cream into the cream cheese mixture.
- Fold in a small dollop of green food coloring, followed by the broken cookie pieces.
- Evenly spread the filling on top of the pie crust.
For the Whipped Topping
- Combine the heavy whipping cream, powdered sugar and vanilla in a stainless-steel bowl. Beat until soft speaks form. Spread the whipped cream on top of the pie or use the Wilton 1M piping tip to pipe buttercream around the edges.
- Refrigerate for at least three hours before serving.
- Can be made ahead of time and stored in the refrigerator overnight, covered.
Find more of Courtney’s recipes on Instagram, @cakebycourtney, or at cakebycourtney.com.
Sheet Pan Barbeque
It’s a backyard barbeque—on a sheet pan. Dina Driggs says this sheet pan dinner is the perfect set-it-and-forget-it type of meal. Throw all of your veggies, chicken and seasonings on a pan and let the oven do the work.
You can use any sort of veggie or protein you have in your fridge for this recipe. Think of it as a fridge cleanout. Dina loves to add red and yellow bell peppers, broccoli, red onions, and then top everything off with fresh pineapple.
PREP TIME 20 minutes
COOK TIME 1 hour
TOTAL TIME 1 hour 20 minutes
EQUIPMENT
- 1 Cookie Sheet, with a one-inch lip on the sides
INGREDIENTS
- 1 Red Bell Pepper
- 1 Yellow Bell Pepper
- 1 Small Red Onion
- 2 Cups Broccoli Florets
- 1 Fresh Pineapple
- 1 Cup Barbecue Sauce
- 3 Chicken Breasts
- 2 Tbsp. Olive Oil
- 2 tsp. Salt
- 1 tsp. Pepper
- Teriyaki Sauce, garnish
- 1 Tbsp. Sesame Seeds, garnish
METHOD
- Cut all the vegetables into one-inch pieces.
- Cube the chicken breasts into pieces of the same size.
- Sprinkle the chicken with olive oil. Then season well with salt and pepper.
- Take the skin off the pineapple and core it.
- Divide the pineapple into spears and cut across them into bite size pieces.
- Pour BBQ sauce over the vegetables and mix.
- Place a piece of aluminum foil over a large baking sheet.
- Spread the chicken over the aluminum foil.
- Add the vegetables and mix with the chicken.
- Sprinkle the pineapple over everything.
- Place in a 400° oven.
- Bake for one hour, turning the contents every 15 minutes.
- Serve over rice. Drizzle with teriyaki sauce and sprinkle with sesame seeds.
Find more recipes from Dina on Instagram, @dinasdiner, or on her website, dinasdiner.com.


Add comment