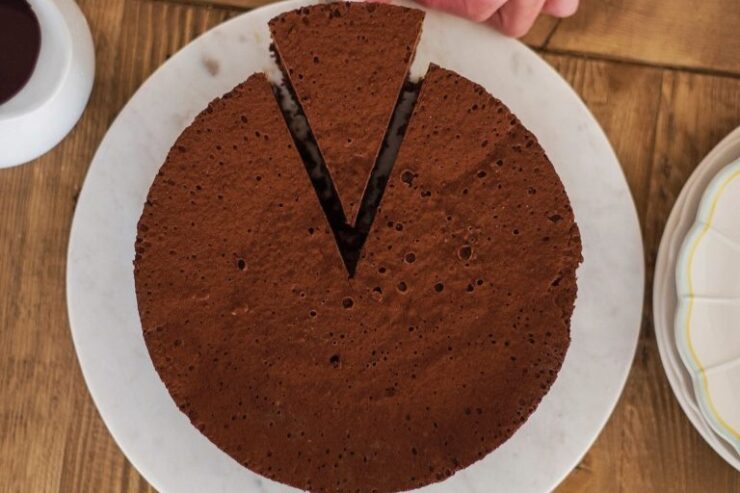
Make your Valentine’s Day dessert a little more fancy with a flourless chocolate cake.
No flour? No problem. This flourless chocolate cake is decadent and delicious. While it’s normally served up at elegant parties, it’s actually not too complicated to make right at home.
Our friend and cake queen Courtney Rich shared her recipe with us. This cake is naturally gluten-free, but that doesn’t make it any less glamorous. With only seven ingredients, you can pull off this fancy-looking dessert.
Find more recipes from Courtney on Instagram, @cakebycourtney, or on her website, cakebycourtney.com.
Flourless Chocolate Cake
Rich, dark chocolate flourless cake, sprinkled with cocoa powder and topped with creme fraiche whipped cream and raspberry sauce.
Courtney shares a unique baking method that helps this cake retain its moisture while cooking: the cake bath method. This is when you cook your cake in a water bath. The method involves placing the cake pan inside a larger pan filled with hot water, which helps regulate the temperature and creates a moist environment for the cake to bake. This results in a more evenly baked and tender cake. It also helps avoid cracking and overcooking.
Courtney likes to top this cake with a little bit of homemade raspberry sauce and Crème Fraîche. It has a slightly tangy flavor and a thick, creamy texture. It’s made by fermenting the cream, similar to sour cream, and it’s used a topping in both savory and sweet dishes. It’s the perfect way to top this cake off.
INGREDIENTS
For the Cake
- 1/2 cup (115 g) water
- 1 cup (200 g) granulated sugar
- 12 tbsp (170 g) unsalted butter
- 1/2 tsp (3 g) salt
- 18 ounces (510 g) dark chocolate
- 7 large eggs
- 1 tsp. (4 g) vanilla
For the Whipped Cream
- 2 cups (462 g) heavy whipping cream
- 8 oz. (227 g) creme fraiche
- 1 cup (125 g) powdered sugar measured and then sifted
- 1 tsp. (4 g) vanilla extract
For the Raspberry Sauce
- 10 oz. (283 g) frozen raspberries
- 1/2 cup (100g) granulated sugar
- 2 tsps. (4 g) corn starch
METHOD
For the Cake
- Preheat your oven to 325 degrees F.
- Spray one 8-inch round cake pan with nonstick spray. Line the bottom with parchment paper. Spray again and set aside.
- In a medium saucepan, add the water, sugar and salt. Bring the mixture to a boil, stirring occasionally to make sure the sugar dissolves completely.
- While the water mixture boils, combine the chocolate chips and butter in a medium sized mixing bowl.
- Pour the hot water mixture over the chocolate chips and butter. Stir until the chocolate and butter are melted and create a silky, smooth texture. Let cool for about 10 minutes before you add the eggs. We don’t want to cook the eggs!
- In a small bowl, whisk the eggs and vanilla. Add the egg mixture to the chocolate mixture and mix well. No beating required, just mix with a wooden spoon or spatula.
- Pour the batter into the prepared pan.
- Place the 8-inch cake pan in a larger baking dish. Place the baking dish on the middle rack of the oven and then pour hot water into the larger baking disk to create a “bath” for the cake. You need enough water to go half way up the side of the 8-inch cake pan.
- Bake for 55 to 60 minutes.
- Don’t be alarmed if the cake rises and then sinks slightly. Remember, there’s no flour or leavening agents in this cake. A little sink is normal.
- Remove the cake pan from the baking dish, and allow the cake to cool for one hour at room temperature, then cover it with plastic wrap at refrigerate for at least 2 hours or overnight.
For the Whipped Cream
- In the bowl of an electric mixer, fitted with the whisk attachment, beat the heavy cream and powdered sugar until stiff peaks form. Fold in the crème fraîche. Cover and refrigerate until you’re ready to use.
For the Raspberry Sauce
- In a medium sauce pan, combine the raspberries, sugar and corn starch. Cook over medium heat until the raspberries soften and release juices.
- Reduce the heat to low and cook for about 5 minutes.
- Puree the mixture until smooth and then strain. Return the mixture to a low heat and cook for another 5 minutes to thicken a bit more.
- Refrigerate until ready to use.
Assembly
- There’s actually not much to assemble, but I did want to mention that I dusted some cocoa powder over the top of the cake before serving.
- Also, as I mentioned earlier, this is a great cake to make ahead of time and is best served a little cold.
Courtney is a cake fanatic who waved goodbye to box mixes in search of those melt-in-your-mouth flavors, fillings, and textures that make life sweeter. With a “you-can-do-it” attitude, she’s all about baking with love. Through loads of trial and error, Courtney learned cake baking basics, and how she’s on a mission to show others the ropes. When she’s not busy whipping up treats, you’ll find her soaking up the joys of motherhood with her two kids, hanging with her husband, or teaching her latest cake creations in her classes at Orson Gygi.


Add comment