Change up your holiday drapes!
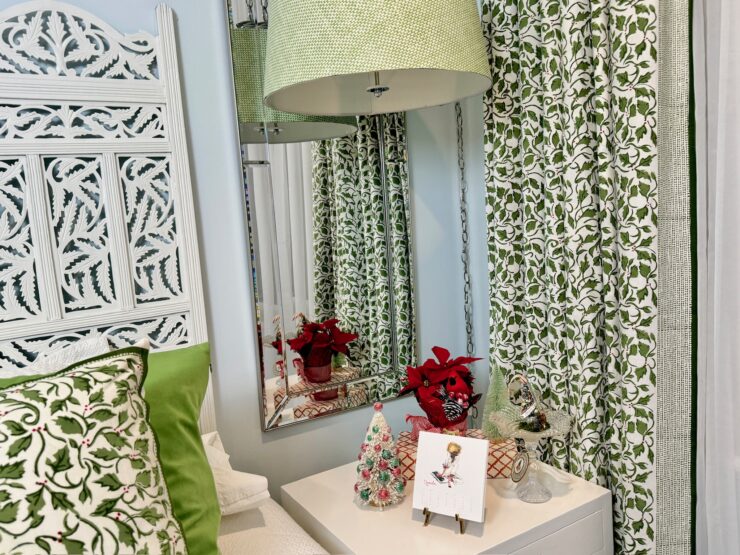
A lot of women swap things out for the holidays. Some change their bedding, some change their pajamas, and some change their draperies. You can turn your table linens into high-end home décor! It’s a nearly no-sew project that brings the wow factor to your windows.
Studio 5 Creative Contributor Michelle Crowley shares shares how to do it.
Find more ideas from Michelle on Instagram, @michellesdesignlife.
How to Turn Tablecloths Into Holiday Drapes
Turning holiday themed table linens into fabulous, high-end looking holiday home décor is a creative way to level up your home’s festive style. It’s not even hard and guess what? It doesn’t require any sewing… unless, of course, you want it to! Make your own high-end window draperies from tablecloths and coordinating pillows from matching napkins.
Why Tablecloths?
There are two big reasons for choosing tablecloths over fabric yardage or off the shelf pre-made when looking for fabulous window décor!
Patterns, Colors & Borders
If you know me, you know… I’m ALL IN when the options include glorious, mood lifting color, pattern and texture! Tablecloths come in tons and tons and tons of colors, patterns, textures and often, even boarders, which look A-MA-ZING on drapery panels!
Rarely do pre-made, off the shelf draperies come in a fabric that is heart stopping. Designer fabric by the yard does, but it’s also no cheap date. If you’re not a skilled seamstress, add the expense of hiring someone who is to your tab.
Do you want those amazing boarders you’ve been drooling over all along the side… the bottom… the top? All the way around? Tack on several hundred more dollars to the budget.
OR go buy two tablecloths and come sit next to me!
Width Issues
Does drapery fabric width even matter? Simply put… yes. Yes, it actually matters A LOT. Full, flowy draperies look abundant and luxurious. Thin, narrow draperies look cheap and skimpy. When designing window treatments, the minimum width I will allow for a drapery panel is 60″ wide.
Usually, we think of two options for purchasing draperies. Off the shelf, pre-made draperies. A single panel of pre-made draperies is too narrow to achieve a beautiful look. Or custom made, either by you or by someone else. This requires fabric yardage, which also comes too narrow off the bolt to achieve a beautiful look. (See a more detailed explanation below if you’re interested.)
Now, let me introduce you to a very fun third option! Coming in at 60”-70” wide, tablecloths are the perfect width for most drapery uses. Bingo!
Typically, a rectangular tablecloth is going to be 60″-70″ wide. This alone is a winning point. By using a tablecloth that is wide enough for our purposes right from the get-go, we’re already saving time and money!
Explanation: Below is a more in-depth designer lesson about the width of drapery panels. If you’re interested read on… if not, jump down to the next section.
Most fabric yardage comes on bolts that are anywhere from 45″-54″ wide. Fashion, or clothing fabric is typically going to come 45″ wide. The standard width of home décor fabric is 54″ wide. Although occasionally home décor fabric can vary in width, sometimes coming in at 60″ wide, this is an extremely rare exception and not the norm.
In a nutshell, fabric yardage doesn’t come off the bolt wide enough to create beautiful draperies with a single width. Confusingly, neither do most pre-made drapery panels (this is a phinominum that I can’t put my head around – why?) This typically leaves both designers and homeowners with two solutions:
1. Buy more fabric yardage and seam one and one-half lengths of fabric together to create a wider panel. This requires extra expense and time, but I do it all the time and so will any professional seamstress that’s any good at what they do. It’s well worth it!
2. OR – purchase double the number of pre-made drapery panels. For example; if I’m draping a single window, I will use two full panels on each side of the window, for a total of 4 panels. This is perfect for achieving the full, lush look we all want.
3. OR – make drapery panels from tablecloths!
How It’s Done
You don’t need to know how to sew, I’ll be teaching you hacks to achieve this look without a sewing machine. But if you can and want to sew, follow all of these same directions, but use your sewing machine instead of hem tape for each step.
Step 1
Choose a tablecloth. Design wise, there are no right or wrong answers here. Jump online, go to your favorite stores, search until you find a pattern, color and design that makes your heart sing! Don’t rush and settle for less, keep looking until you find “the one.”
There are, however, right and wrong answers when it comes to the size and weight of fabric you’ll want to use.
- Obviously, choose a rectangular shaped tablecloth.
- The length should not be less than 92″-96″. You can go up to 140”-160,” depending on how tall your ceilings are. (See “Notes” below regarding ideal drapery length)
- Choose a cloth that has enough weight (opacity) for your purposes.
Things to be careful of:
- Check to make sure the tablecloth is at least 60″ wide. If it’s even wider than that, hooray!
- If you can’t get two of the same length cloths, don’t assume you can make two different sizes work. First check to be sure the pattern size is the same on the different length cloths. Often, if the cloth is shorter, the pattern is also smaller. Just double check.
Step 2
Collect the other supplies you need:
- Full Size Iron (w/Hot Steam setting)
- Ironing Board
- Hem Tape (the one I prefer is linked here)
- Drapery Header Tape (Optional, but I never hang draperies without this stuff)
- Sewing Pins
- 1 sheet of cardstock
- Measuring Tool (I can’t live without the one linked here)
- Disappearing Marking Pen (or a sliver of soap)
Optional Materials
- Two (2) Extra Long (XL) Twin Sheets (if you want your draperies to be lined, which I highly recommend)
- Coordinating Grosgrain Ribbon (for creating tab back draperies)
Step 3 – Iron
Always begin by ironing the fabrics. I know… this is an extremely boring task. It’s SO tempting to skip the whole ironing bit. Let me just say this, whenever I skip the ironing part I live to regret it. When there are wrinkles in fabric it’s impossible to get accurate measurements. Suck it up and iron it all out.
Step 4 – Measure
Determine how long you want your finished draperies to be. If you’ve already had draperies on the window and the rod is already there then lucky you – you can use the measurement of your previous drapes. But if your starting from scratch checkout this post for a quick tutorial on how to determine what the length of your draperies should be and how to determine your measurements.
Step 5 – Measure More & Cut
Lay the ironed fabric out on a large flat surface. I generally end up on the floor of my long hallway, but just know, a ping pong table comes in clutch for this project.
Measure the length from the middle of the fabric, both sides and at least two other points along the width of the fabric. Using a squaring ruler like this one, mark a straight line across all three measurement points.
Note: It’s extremely unlikely that your table cloths are going to be perfectly straight and square. You’ll want to decide the best way to deal with this before you cut into the fabric. Usually I square up the fabric by adjusting at the top where I cut for length.
Unless you’re trying to preserve a boarder along the bottom, you’ll want to have a hem. A nice deep hem will cause the drapes to hang really nicely. For a hemmed panel, measure out the desired finished legnth. Then add 4″-8″ for the hem at the bottom. If your table cloth is long enough, I always prefer at least a 4″ double hem. Which means I need 8 1/2″ for the hem (if you don’t have enough fabric for that much hem, then give yourself 4 1/2″ for a single hem). Finally, add additional fabric to your measurements for the top header. Here are your options for a header.
- Sheered Rod Pocket – 4 1/2″ (easiest)
- Straight Header with Sewn on or Clip on Drapery/Curtain Rings
- Tab Back
Formula – Length of your finished draperies + 1/2″ Seam top Seam + 4″ Header + 1/2″ Bottom Seam + 4 ” – 8 ” Hem = Total length to cut Fabric
Step 6 – Create a Seams & Hem template
Grab a sheet of card-stock and cut it to 4″ longways.
Next mark a 1/2″ straight line longways across the bottom of the 4″ piece of card-stock.
Step 7 – Seams & Headers
Using the template you’ve just made Iron your seams.
- Fold over and press a 1/2″ seam across the top edge of the fabric (see video for tutorial).
- Fold over the the 4″ template (for rod pocket header), or fold in the 4″ Header Tape to create a 4″ top hem and press a seam with heat (See video for tutorial)
- If your want a hemmed bottom, also press a 1/2″ seam across the bottom edge (do not do this step if you have a bottom boarder to the fabric).
- For a bottom hem use the template to create a 4″ hem. For a doubled hem (I highly recommend if you have enough fabric), roll the bottom hem once again another 4″
Step 8 – Finish it all up
Now here comes the magical, fun to do part! It’s magical fun because it really comes together so fast, and who doesn’t love instant gratification?
Grab your your hem tape. I prefer the Heat-N-Bond brand hem tape. Hem tape is essentially cold glue that is melted into the fibers of fabric to crate a strong adhesion.
There are two kinds and I use both. One is webbed and the other is paper backed. The webbed is best when you are just sandwiching the tape directly between the fabric folds. The paper backed is best when you need precision when adding the tape before you glue your fabrics together.
With your pressed seamed fabric ready to go, simply lay the hem tape right under the edge of the fold and press it with a very hot iron. Hold it for as long as it takes for the glue to melt and hold.
That’s it – it’s Done! How easy was that????
Tips for Using Hem Tape
- Use water! Water conducts heat. Misting the fabric with water and using the steam setting on the iron will both create much more heat, causing the glue to melt faster.
- Before pressing, make sure no little edges of the hem tape are exposed above the fabric edge. This is glue, if it gets on your iron it’ll make a sticky mess on your iron! If this happens, use a dry rag to clean it off while the iron is still hot.
- Don’t burn your fabric! You want to leave the iron on as long as you can so the glue thorougly melts into the fabrics for a really good adhesion – but you dont want to burn your fabric on the process. So be careful.
- If you’re using an exra heavy fabric, or pressing through layers of fabric you may need extra stick. You can double or even triple up the hem tape to create more stickiness, and therefor a more secure seam.
*Do you want to line your new curtains? I highly recommend it. You can find the extra, super easy (I promise) steps to do this at michellesdesignlife.com.
Michelle is the newest addition to the Studio 5 team, joining in Season 18 as our Creative Contributor. Friends describe Michelle as a gatherer. Entertaining, nesting at home, and jumping in painters’ overalls have become Michelle’s happy place. Michelle is a degreed interior designer. She gets her energy from other people. And did you know — her bedroom is yellow! Find Michelle on Instagram @michellesdesignlife or via the Studio 5 email, studio5@ksl.com.


Add comment