When you think about burlap, you often think of it as being natural and neutral. But this Christmas, the burlap trend is anything but boring!
Studio 5 Contributor Amy Twitty is here to show us all how burlap can create a bright and cheerful Christmas!
Gifts:
– Gift box
If you are in a bind and need a rustic way of decorating those presents under the tree use burlap! A simple way of dressing up your gift boxes with burlap can add simplicity and beauty to your presents. You can accent them with bows, doilies, pom poms for a little extra touch.
– Hopscotch
Christmas presents can be a challenge to be unique and different. Especially to find indoor activities during the winter months can take some creativity. With this burlap hop scotch mat is sure to create hours of entertainment. Using 2 yards of burlap, tape off your squares measuring them as big or small as you would like. The ones shown are 11×11. Then using a sponge brush added your numbers with acrylic paint. You can add some fabric to the back to give it some extra texture.
-Chalkboard
Chalkboards prints and lettering are a hot trend this Christmas. And you can make your own for just a few dollars. The supplies required for this are chalkboard, (Home Depot sells it in a sheet 2×4′.) a piece of lumber that is 1x4x12, Gorilla glue, and burlap ribbon. When you pick up the chalkboard and lumber have them cut it at Home Depot into the following;
Chalkboard – cut in half creating 2 pieces that are 2′ square.
Lumber – cut 2 pieces that are 24″, and 2 pieces that are 22 ½”
Using your gorilla glue, glue the lumber to all four sides of the chalkboard. Allowing overnight to dry, and then add your burlap ribbon to the sides and you have created yourself a chalkboard for just a few dollars.
Decorations
– Santa’s sack
Part of the Santa’s experience is seeing him with his Santa’s sack filled with toys for all the boys and girls. Creating your own, possibly for each child, can add to their fantasy that Santa was right there in their own room and left their toys and his sack. With basic sewing, you cut a piece of burlap 2x 2 ½”. Sewing along the sides until you reach the top, leaving 4 inches. Then fold your top pieces creating a pocket. Sew along the bottom of this piece from side to side. You will have 2 pockets on both sides of the bag. Attach a clothespin to a piece of ribbon and string it through the pockets connecting one to the other and pull tight. The ribbon should pull the bag tight. Added some embellishments to your sack and making it your own.
– Tree Skirt
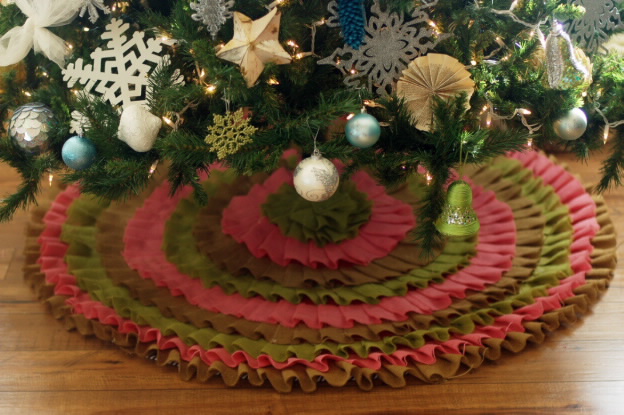
If you have needed a new tree skirt to place under your tree and didn’t want to spend a lot of money, try this adorable burlap ruffle tree skirt. You will need about 4 yards total and you can mix and match your colors of burlap. Cut your burlap into 3 inch strips. Start at the end and the bottom of your skirt. Using hot glue (a lot of hot glue so prepare yourself) glue your burlap and then tuck and fold, gluing at the top fold. Continue through with your strips until your skirt it completely covered.
Tip for cutting burlap. At the end of the burlap you will see how it has strings on the end. Pick one string at your measurement and pull it out. It will start to form a gather and gently pull the string through the burlap. Once the string is completely out, you will have a straight line and simply cut along that line.
– Mini tree
If you are looking for a unique Christmas decoration you can create these mini trees using a Styrofoam cone and scrap burlap and fabric. Starting at the bottom of your cone, using sewing pins, pin your burlap with a fold and continue around the cone layering different textures and prints on top of each other.
– Star Ornament & Ball ornament
Star Ornament
When using burlap it is normal that you will create a mess and have strings of leftover burlap. Use those strings for simple Christmas tree ornaments. For this project you will need a piece of wood, (found at Hobby Lobby for $1.33 and .79), burlap strings, paint, and small nails. Nailing in 5 nails in the shape of your star, gather 4-5 strings all similar in size and tie a knot at the top nail. Wrapping the strings around in the shape of a star, and then ending with another knot.
Ball Ornament –
Take glass empty ornaments and simply fill with those leftover strings to create a beautiful ornament.


Add comment