It’s time to freshen up for Spring, and your home is no exception!
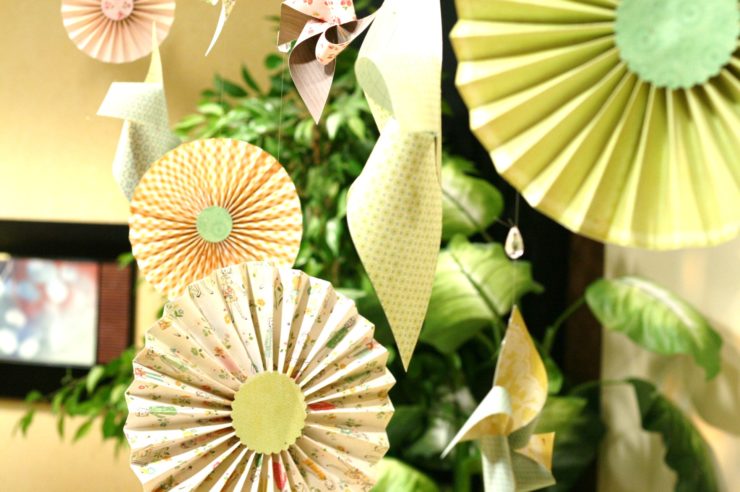
Studio 5 Contributor Kelly Brown combines pinwheels, pennants and posies
for one an eye-catching window display
I started off by getting some inspiration from the owners of Willow and
Wildflowers, a floral shop and boutique in the heart of Bountiful, UT. These
creative gals are known for creating eclectic and unique window displays,
that draw in the customers. Mindy, from Willow, shared three tips for
creating a show stopping display:
1. Play up the color. Whether it is red, white and blue or hot
pink and black, it is important to create a color scheme for your window
display. Color in the windows can create a mood and set the tone for your
home. For my window treatment, I used the Pretty Party
Collection from
Crate Paper, which mixes soft spring colors with pops of more vibrant
hues.
2. Free movement. There is something mesmerizing about
watching something turn slowly in the sunlight. Building a window
treatment that is free moving gives life and energy to your display. To
keep my pieces free flowing, I tied them directly to a current rod with
fishing line. The current rod keeps them away from the window and gives
them space to turn and move. Objects that are hung freely will naturally
turn as people open doors, walk through the room, or air is blown from
vents or fans.
3. Stick to a theme. Creating within a theme simplifies the
process. When you have a theme, your mind can start processing ideas and
the process will develop smoothly. A theme can be anything from 80’s to
formal, or Tea Party to Grunge. I chose to go seasonal with my window
decor. Seasons and holidays create a mood and feeling all on their own,
making them the perfect themes when decorating windows. To bring the
Spring season into play, I created Posies and Pinwheels from double-sided
patterned paper.
Once I had developed my theme, determined my color scheme, and created
a general plan…it was time to get started crafting. I stuck to simple, paper
crafted designs that could be recreated several times without being too
time consuming. I created posies and pinwheels in a variety of sizes to fill
the different areas of space.
Pinwheels
If you haven’t ever made a handmade pinwheel, you’ve got to try making
one or two. They are so simple to make, and they turn out just adorable!
All you need to create a basic pinwheel is a square piece of paper, a pair of
scissors, small hole punch and a brad.
-Turn the square piece of paper diagonally (like a diamond), and cut a
straight line from each corner to the center (stop about 2″ from the center).
You now have four flaps.
-Use hole punch to create a small hole in one of the corners of each flap,
moving around the square until there is 1 hole in each corner.
-Thread holes through brad, tucking each flap under the next until all flaps
are threaded onto brad. Stick brad through the center of the paper and
open prongs on the back side of the pinwheel.
-Voila! You have a basic pinwheel that can be strung up or attached to a
stick for spinning.
Posies
The classic accordion posy makes a great spring flower. Here is a simple
how-to for creating the posies: (these are the instructions for creating the
large 12X12 pieces, but keep in mind that you can make all different sizes
by changing the size of your paper strips and the width of your fold)
1. I like to scor a complete 12X12 sheet before I cut it into strips. This
saves time in scoring. Using your Scor-Pal, scor your paper in 1″ intervals
alternating front and back side so the folds go back and forth.
2. Cut your paper across the scors at 6″(this will leave you with a 6″X12″
strip.
3. Repeat process until you have 5 strips (2.5 sheets of paper).
4. Adhere strips together using strong adhesive (gotta love the scor tape).
5. Adhere two ends together to create a ring.
6. Press ring down so that it fans out.
7. Use hot glue in the center of the fan to adhere it all together.
Pennant Banner
To add a little space filler, I created a simple pennant banner to drape
along the top of the windows. Creating this banner was a snap! I simple
cut triangles from my double sided paper, punched a small hole in the top
two corners of the triangle, and strung the triangles together using twine. I
then spaced them along the twine so that they would fit and drape nicely in
the windows.
Once all of your pieces are created, it is time to assemble. I punched a
small hole in the top of each paper piece and tied a length of fishing line to
the hole. I then tied the opposite end to a curtain rod and adjusted the
height as desired for each piece. Play around with heights and
combinations of pieces until you love your layout. I taped the pennant
banner directly to the window frame to add some dimension.
Crystal Accents
Adding crystal dangling accents will make your window display sparkle in
the happy Spring sunlight! I purchased a package of large crystal accents
from the craft store and strung them through the fishing line above each
hanging paper piece. I also hung separate strands of crystals between
paper pieces for some extra bling!


Add comment