Master a simple technique and create funky tie dye cookies for some Fourth
of July fun!
Soft Chocolate Sour Cream Sugar Cookies
Makes approximately 3-4 dozen cookies depending on size
3 c. all-purpose flour
1/2 c. cocoa powder
1/4 t. salt
1/2 t. baking soda
1 t. baking powder
1/2 c. butter, softened
1/2 c. sour cream
2/3 c. sugar
1/3 c. packed light brown sugar
1 large egg
2 t. pure vanilla extract
Confectioners’ sugar for rolling the dough
In a large bowl whisk together the cocoa, flour, salt, baking soda and baking
powder. Set aside.
In the bowl of a stand mixer with paddle attachment, cream together the
butter, sour cream and both sugars for 3 minutes or until light and fluffy.
Beat in the egg and vanilla.
With the speed of the mixer turned down to low, add the flour mixture and
stir to combine just until all the ingredients are mixed together, stopping to
scrape down the bowl if needed to make sure no dry ingredients are left in
the bottom of the bowl.
Gather the dough into a ball and place it on a large piece of plastic wrap,
flattened into a disk and wrap well to make airtight. Chill the dough for at
least one hour in the refrigerator.
When ready to make the cookies preheat the oven to 350 degrees F. Line
your baking sheet with parchment or lightly grease the pan. Set aside.
On a clean surface sprinkle a little confectioners’ sugar to help keep the
dough from sticking to the work surface (using confectioners’ sugar instead
of flour helps keep the dough from having added flour and becoming tough
with re-rolling scraps).
Remove the cookie dough from the refrigerator and roll it to 1/4-inch thick.
Cut out desired shapes (you can use flour or confectioners’ sugar on the
cookie cutters as well to keep from sticking to the dough). Use a small
spatula to move the shapes to your prepared baking sheet, place cut cookies
about 1-inch apart. Bake the cookies for 9-11 minutes. Remove from the
oven and allow the cookies to rest on the baking sheet for 5 minutes before
using a spatula to move them to a cooling rack to cool completely before
decorating them.
Royal Icing
Makes about 2 1/2 cups icing
1/3 c. meringue powder
1/2 c. warm water + more as needed to get a smooth consistency that just
flows
1 lb. confectioners’ sugar, sifted (approximately 4 cups)
1 t. lemon juice
1 t. pure vanilla extract
Red gel food coloring
Blue gel food coloring
Place the meringue powder and 1/2 cup warm water in a large mixing bowl.
Beat with a mixture or whisk well until fluffy (this step will take a few
minutes). Whisk in the lemon juice and vanilla. Add the sifted confectioners’
sugar about 1/2 cup at a time until all combined and the mixture is white,
thick and smooth.
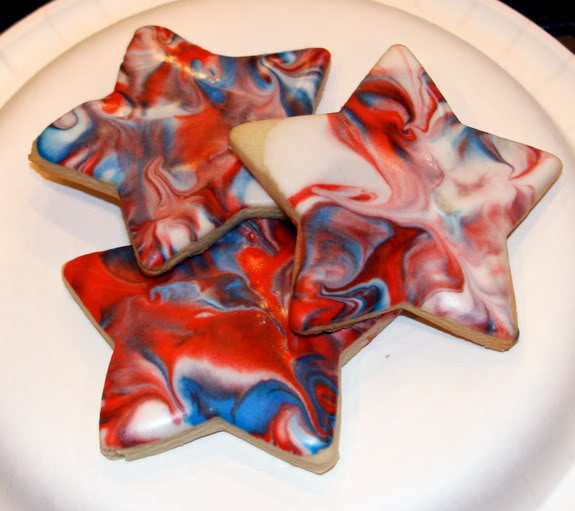
To decorate the cookies with Red, White and Blue ‘Tie Dye’ marbling, divide
out about 1/2 cup icing into two separate bowls. Set the remaining white
icing aside. Add enough of each color of food coloring to get the desired
shade of red and blue in each separate bowl, whisking well to combine the
color. Add enough water to each mixture, 1 teaspoon at a time, to get a
syrup-like consistency.
On a small plate or in a shallow dish, place a large spoonful of the white
icing. Using a fork or small whisk, drip and drizzle a few streaks of each
color all over the white icing, not adding too much – there should be plenty
of white icing visible. Use a toothpick or thin knife to gently swirl and pull the
colors together just a tiny bit to get the marbled effect on the plate.
Gently dip each cookie top-side down into the frosting – try not to wiggle the
cookie around and then gently lift the cookie back up. Set each cookie on the
cooling rack again to dry.
Alternatively, dip the cookies a few at a time into the white icing and drip the
red and blue directly onto the cookie and use the toothpick to drag and swirl
the color on the cookie for smaller designs.
Allow decorated cookies to set completely, uncovered before storing in an
airtight container. Keep the decorated cookies at room temperature, away
from humidity and heat until ready to serve.
Additional Tips:
– Cookie dough may be chilled in the refrigerator for up to two days
before baking.
– Baked cookies may be wrapped tightly and stored in an airtight container
for 2 days before decorating.
– Baked cookies may be wrapped tightly and stored in an airtight container
in the freezer for up to a month before thawing and decorating.
– Decorated cookies may be stored at room temperature and kept in an
airtight container for up to a week.
– Vanilla Sugar Cookie Recipe available from Budget Gourmet Mom
RECIPE SOURCE: Holly at PheMOMenon.com
Almond Sugar Cookies with Cream Cheese Frosting and Fresh Berries
Makes about 3 dozen 3-inch round cookies
3 1/3 c. flour
½ t. baking soda
1 t. baking powder
1/8 t. salt
1 c. sugar
½ c. butter, softened
½ c. sour cream
1 large egg
2 t. pure vanilla extract
1 t. pure almond extract
Confectioners’ sugar for rolling the dough
In a large bowl whisk together the flour, salt, baking soda and baking
powder. Set aside.
In the bowl of a stand mixer with paddle attachment, cream together the
butter, sour cream and sugar for 3 minutes or until light and fluffy. Beat in
the egg and vanilla.
With the speed of the mixer turned down to low, add the flour mixture and
stir to combine just until all the ingredients are mixed together, stopping to
scrape down the bowl if needed to make sure no dry ingredients are left in
the bottom of the bowl.
Gather the dough into a ball and place it on a large piece of plastic wrap,
flattened into a disk and wrap well to make airtight. Chill the dough for at
least one hour in the refrigerator.
When ready to make the cookies preheat the oven to 350 degrees F. Line
your baking sheet with parchment or lightly grease the pan. Set aside.
On a clean surface sprinkle a little confectioners’ sugar to help keep the
dough from sticking to the work surface (using confectioners’ sugar instead
of flour helps keep the dough from having additional flour and that could
make it become tough with re-rolling scraps).
Remove the cookie dough from the refrigerator and roll it to 1/4-inch thick.
Cut out desired shapes (you can use flour or confectioners’ sugar on the
cookie cutters as well to keep from sticking to the dough), repeat with
gathered scraps after using a small spatula to move the shapes to your
prepared baking sheet. Place cut cookies about 1-inch apart and bake the
cookies for 8-10 minutes or until the bottom just starts to turn pale gold
around the edges. Remove the baking sheet from the oven and allow the
cookies to rest on the sheet for 5 minutes before using a spatula to move
them to a cooling rack to cool completely before frosting.
Almond Cream Cheese Frosting and Berries
Makes about 2 cups frosting
6 ounces cream cheese, room temperature
½ c. butter, room temperature
2 1/2 c. confectioners’ sugar, sifted
1 1/2 t. pure vanilla extract
1/2 t. pure almond extract
Fresh raspberries and blueberries for topping (1 pint each or more if desired)
Beat all the frosting ingredients together until creamy and smooth. Scoop
about 1 tablespoon onto the top of each cooled cookie for a thick, swirled
layer of frosting. Top with a few fresh raspberries and blueberries and store
in an airtight container in the refrigerator until ready to serve.
Red, White & Blue Candied Popcorn
12 cups popped popcorn (from 1/2 cup popcorn kernels and 6 tablespoons
vegetable oil)
2 c. sugar
2/3 c. whole milk or half and half
2 T. corn syrup
½ t. fine sea salt
2 t. pure vanilla extract
1 drop red gel food coloring, or enough drops liquid to get a nice red color
1 drop blue gel food coloring, or enough drops liquid to get a deep blue
color
To pop the popcorn on the stovetop, in a large pot with a tight fitting lid, add
the 6 tablespoons of vegetable oil and 2 kernels of the popcorn and heat
over medium heat, uncovered. When the kernels pop, add the remaining 1/2
cup of kernels and fit the lid on the pot. Shake the pot on the stove to heat
the kernels. Shake a few times and keep the kernels moving. When the
kernels start popping keep the pan moving until the pops are about 2
seconds apart and slowing down (it will take a few minutes to get up to heat,
but don’t be tempted to turn the heat up or you’ll scorch the kernels).
Remove the popcorn from the heat and divide into about 4 cups per bowl in
3 large bowls and set aside.
In a medium sized saucepan combine the sugar, milk or half and half, corn
syrup and salt. Cook over medium heat until the sugar dissolves, then bring
the mixture to a low boil until the temperature reaches 230 degrees F (soft
ball stage – this is where if you drop a small drop of the sugar mixture into a
very cold cup of water it should form a soft ball in the water that flattens out
when it is out of the water. Don’t rush this part of the process or turn your
heat up and get impatient because you’ll end up with caramel instead of a
well cooked sugar syrup that you can color with the food coloring. Still tasty,
but not what we’re going for here. This part of the cooking process took a
good 15 minutes for me on a barely medium flame (at high altitude).
Once your sugar syrup has reached the soft ball stage at 230 degrees, stir in
the vanilla extract. It will bubble and hiss, and that’s ok. Once it is all stirred
in, pour 1/3 of the mixture into a small heat proof bowl. Add another 1/3 of
the mixture from the pan into another heat proof bowl. Add the red food
coloring to one of the bowls and the blue food coloring to the other bowl.
Whisk the food coloring quickly and carefully into each bowl separately to get
your colored syrups.
(NOTE: Please work carefully with the hot sugar syrup – it’s like kitchen
napalm! Don’t worry too much about any little spills – the great thing is that
sugar dissolves with a wet towel or in your sink really well so don’t try to
wipe it up too quickly and end up burning yourself.
Working as quickly as possible so your syrup doesn’t cool too much pour the
colored sugar syrup each over one of the bowls of popcorn you separated
earlier and use a rubber spatula to fold and stir the candy over the popcorn
gently to coat. Repeat with the other two syrups in the other two bowls – if
your syrup has cooled too much to pour, reheat it quickly in the microwave
for a few seconds to make it more pourable, but not enough to bubble it – it
should be about the consistency of corn syrup and still warm.
Spread the stirred and coated popcorn out onto a large piece of parchment to
cool and dry for a few minutes. Toss the colors together (or line them up on
a pan in stripes!) and serve. Store in an airtight container for up to two
weeks.
Makes 12 cups.
RECIPES FROM Phttp://www.phemomenon.com/


Add comment